 private File[] getJpgFiles(File f){
  File[] files = f.listFiles(new FilenameFilter(){

   @Override
   public boolean accept(File dir, String filename) {
    return filename.toLowerCase().endsWith(".jpg");
   }});

  return files;
 }
List files in directory with specified type
The example List all 'jpg' files in given directoty:
Get bitmap color on touched position in ImageView
Last exercise demonstrate "How to detect touch event and position on ImageView". It's modified to get bitmap color on the touched position.

Modify android:scaleType and android:adjustViewBounds of ImageView in activity_main.xml. You can also try different setting to see how it affect the ImageView and Bitmap reloation.
 Download the files.
Next: Detect touch and free draw on Bitmap
more: Something about processing images in Android

package com.example.androiddrawbitmap;

import java.io.FileNotFoundException;

import android.R.color;
import android.net.Uri;
import android.os.Bundle;
import android.app.Activity;
import android.content.Intent;
import android.graphics.Bitmap;
import android.graphics.BitmapFactory;
import android.graphics.Canvas;
import android.view.MotionEvent;
import android.view.View;
import android.view.View.OnClickListener;
import android.view.View.OnTouchListener;
import android.widget.Button;
import android.widget.ImageView;
import android.widget.TextView;

public class MainActivity extends Activity {

 Button btnLoadImage;
 TextView textSource, textInfo;
 ImageView imageResult;

 final int RQS_IMAGE1 = 1;

 Uri source;
 Bitmap bitmapMaster;
 Canvas canvasMaster;

 @Override
 protected void onCreate(Bundle savedInstanceState) {
  super.onCreate(savedInstanceState);
  setContentView(R.layout.activity_main);

  btnLoadImage = (Button)findViewById(R.id.loadimage);
  textSource = (TextView)findViewById(R.id.sourceuri);
  imageResult = (ImageView)findViewById(R.id.result);

  btnLoadImage.setOnClickListener(new OnClickListener(){

   @Override
   public void onClick(View arg0) {
    Intent intent = new Intent(Intent.ACTION_PICK,
      android.provider.MediaStore.Images.Media.EXTERNAL_CONTENT_URI);
    startActivityForResult(intent, RQS_IMAGE1);
   }});

  imageResult.setOnTouchListener(new OnTouchListener(){

   @Override
   public boolean onTouch(View v, MotionEvent event) {

    int action = event.getAction();
    int x = (int) event.getX();
    int y = (int) event.getY();
    switch(action){
    case MotionEvent.ACTION_DOWN:
     textSource.setText("ACTION_DOWN- " + x + " : " + y);
     textSource.setBackgroundColor(
       getProjectedColor((ImageView)v, bitmapMaster, x, y));
     break;
    case MotionEvent.ACTION_MOVE:
     textSource.setText("ACTION_MOVE- " + x + " : " + y);
     textSource.setBackgroundColor(
       getProjectedColor((ImageView)v, bitmapMaster, x, y));
     break;
    case MotionEvent.ACTION_UP:
     textSource.setText("ACTION_UP- " + x + " : " + y);
     textSource.setBackgroundColor(
       getProjectedColor((ImageView)v, bitmapMaster, x, y));
     break;
    }
    /*
     * Return 'true' to indicate that the event have been consumed.
     * If auto-generated 'false', your code can detect ACTION_DOWN only,
     * cannot detect ACTION_MOVE and ACTION_UP.
     */
    return true;
   }});
 }

 /*
  * Project position on ImageView to position on Bitmap
  * return the color on the position
  */
 private int getProjectedColor(ImageView iv, Bitmap bm, int x, int y){
  if(x<0 || y<0 || x > iv.getWidth() || y > iv.getHeight()){
   //outside ImageView
   return color.background_light;
  }else{
   int projectedX = (int)((double)x * ((double)bm.getWidth()/(double)iv.getWidth()));
   int projectedY = (int)((double)y * ((double)bm.getHeight()/(double)iv.getHeight()));

   textSource.setText(x + ":" + y + "/" + iv.getWidth() + " : " + iv.getHeight() + "\n" +
     projectedX + " : " + projectedY + "/" + bm.getWidth() + " : " + bm.getHeight()
     );

     return bm.getPixel(projectedX, projectedY);
  }
 }

 @Override
 protected void onActivityResult(int requestCode, int resultCode, Intent data) {
  super.onActivityResult(requestCode, resultCode, data);
  if(resultCode == RESULT_OK){
   switch (requestCode){
   case RQS_IMAGE1:
    source = data.getData();
    textSource.setText(source.toString());

    try {
     bitmapMaster = BitmapFactory.decodeStream(
       getContentResolver().openInputStream(source));
     imageResult.setImageBitmap(bitmapMaster);
    } catch (FileNotFoundException e) {
     // TODO Auto-generated catch block
     e.printStackTrace();
    }

    break;
   }
  }
 }

}
Modify android:scaleType and android:adjustViewBounds of ImageView in activity_main.xml. You can also try different setting to see how it affect the ImageView and Bitmap reloation.
<LinearLayout xmlns:android="http://schemas.android.com/apk/res/android"
    xmlns:tools="http://schemas.android.com/tools"
    android:layout_width="match_parent"
    android:layout_height="match_parent"
    android:orientation="vertical"
    android:paddingBottom="@dimen/activity_vertical_margin"
    android:paddingLeft="@dimen/activity_horizontal_margin"
    android:paddingRight="@dimen/activity_horizontal_margin"
    android:paddingTop="@dimen/activity_vertical_margin"
    tools:context=".MainActivity" >

    <TextView
        android:layout_width="wrap_content"
        android:layout_height="wrap_content"
        android:layout_gravity="center_horizontal"
        android:autoLink="web"
        android:text="http://arteluzevida.blogspot.com/"
        android:textStyle="bold" />

    <Button
        android:id="@+id/loadimage"
        android:layout_width="match_parent"
        android:layout_height="wrap_content"
        android:text="Load Image 1" />

    <TextView
        android:id="@+id/sourceuri"
        android:layout_width="match_parent"
        android:layout_height="wrap_content" />

    <ImageView
        android:id="@+id/result"
        android:scaleType="centerInside"
        android:adjustViewBounds="true"
        android:layout_width="match_parent"
        android:layout_height="wrap_content"
        android:background="@android:color/background_dark" />

</LinearLayout>
Next: Detect touch and free draw on Bitmap
more: Something about processing images in Android
Detect touch on ImageView
The example demonstrate how to detect touch event and position on ImageView, by implementing OnTouchListener().

MainActivity.java
Layout
Download the files.
Next: Get bitmap color on touched position in ImageView
more: Something about processing images in Android

MainActivity.java
package com.example.androiddrawbitmap;

import java.io.FileNotFoundException;

import android.net.Uri;
import android.os.Bundle;
import android.app.Activity;
import android.content.Intent;
import android.graphics.Bitmap;
import android.graphics.BitmapFactory;
import android.graphics.Canvas;
import android.view.MotionEvent;
import android.view.View;
import android.view.View.OnClickListener;
import android.view.View.OnTouchListener;
import android.widget.Button;
import android.widget.ImageView;
import android.widget.TextView;

public class MainActivity extends Activity {

 Button btnLoadImage;
 TextView textSource, textInfo;
 ImageView imageResult;

 final int RQS_IMAGE1 = 1;

 Uri source;
 Bitmap bitmapMaster;
 Canvas canvasMaster;

 @Override
 protected void onCreate(Bundle savedInstanceState) {
  super.onCreate(savedInstanceState);
  setContentView(R.layout.activity_main);

  btnLoadImage = (Button)findViewById(R.id.loadimage);
  textSource = (TextView)findViewById(R.id.sourceuri);
  imageResult = (ImageView)findViewById(R.id.result);

  btnLoadImage.setOnClickListener(new OnClickListener(){

   @Override
   public void onClick(View arg0) {
    Intent intent = new Intent(Intent.ACTION_PICK,
      android.provider.MediaStore.Images.Media.EXTERNAL_CONTENT_URI);
    startActivityForResult(intent, RQS_IMAGE1);
   }});

  imageResult.setOnTouchListener(new OnTouchListener(){

   @Override
   public boolean onTouch(View v, MotionEvent event) {

    int action = event.getAction();
    int x = (int) event.getX();
    int y = (int) event.getY();
    switch(action){
    case MotionEvent.ACTION_DOWN:
     textSource.setText("ACTION_DOWN- " + x + " : " + y);
     break;
    case MotionEvent.ACTION_MOVE:
     textSource.setText("ACTION_MOVE- " + x + " : " + y);
     break;
    case MotionEvent.ACTION_UP:
     textSource.setText("ACTION_UP- " + x + " : " + y);
     break;
    }
    /*
     * Return 'true' to indicate that the event have been consumed.
     * If auto-generated 'false', your code can detect ACTION_DOWN only,
     * cannot detect ACTION_MOVE and ACTION_UP.
     */
    return true;
   }});
 }

 @Override
 protected void onActivityResult(int requestCode, int resultCode, Intent data) {
  super.onActivityResult(requestCode, resultCode, data);
  if(resultCode == RESULT_OK){
   switch (requestCode){
   case RQS_IMAGE1:
    source = data.getData();
    textSource.setText(source.toString());

    try {
     bitmapMaster = BitmapFactory.decodeStream(
       getContentResolver().openInputStream(source));
     imageResult.setImageBitmap(bitmapMaster);
    } catch (FileNotFoundException e) {
     // TODO Auto-generated catch block
     e.printStackTrace();
    }

    break;
   }
  }
 }

}
Layout
<LinearLayout xmlns:android="http://schemas.android.com/apk/res/android"
    xmlns:tools="http://schemas.android.com/tools"
    android:layout_width="match_parent"
    android:layout_height="match_parent"
    android:orientation="vertical"
    android:paddingBottom="@dimen/activity_vertical_margin"
    android:paddingLeft="@dimen/activity_horizontal_margin"
    android:paddingRight="@dimen/activity_horizontal_margin"
    android:paddingTop="@dimen/activity_vertical_margin"
    tools:context=".MainActivity" >

    <TextView
        android:layout_width="wrap_content"
        android:layout_height="wrap_content"
        android:layout_gravity="center_horizontal"
        android:autoLink="web"
        android:text="http://arteluzevida.blogspot.com/"
        android:textStyle="bold" />

    <Button
        android:id="@+id/loadimage"
        android:layout_width="match_parent"
        android:layout_height="wrap_content"
        android:text="Load Image 1" />

    <TextView
        android:id="@+id/sourceuri"
        android:layout_width="match_parent"
        android:layout_height="wrap_content" />

    <ImageView
        android:id="@+id/result"
        android:scaleType="matrix"
        android:layout_width="wrap_content"
        android:layout_height="wrap_content"
        android:background="@android:color/background_dark" />

</LinearLayout>
Next: Get bitmap color on touched position in ImageView
more: Something about processing images in Android
RenderScript Intrinsics
Posted by R. Jason Sams, Android RenderScript Tech Lead
RenderScript has a very powerful ability called Intrinsics. Intrinsics are built-in functions that perform well-defined operations often seen in image processing. Intrinsics can be very helpful to you because they provide extremely high-performance implementations of standard functions with a minimal amount of code.
RenderScript intrinsics will usually be the fastest possible way for a developer to perform these operations. We’ve worked closely with our partners to ensure that the intrinsics perform as fast as possible on their architectures — often far beyond anything that can be achieved in a general-purpose language.
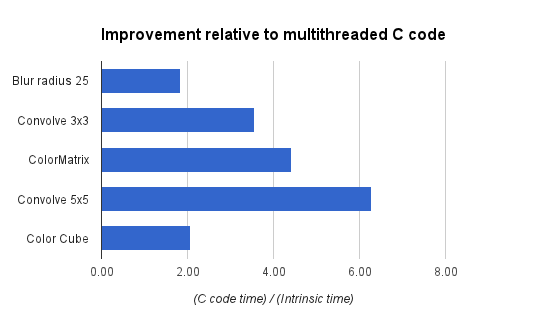
Table 1. RenderScript intrinsics and the operations they provide.
| Name | Operation |
|---|---|
ScriptIntrinsicConvolve3x3, ScriptIntrinsicConvolve5x5 | Performs a 3x3 or 5x5 convolution. |
ScriptIntrinsicBlur | Performs a Gaussian blur. Supports grayscale and RGBA buffers and is used by the system framework for drop shadows. |
ScriptIntrinsicYuvToRGB | Converts a YUV buffer to RGB. Often used to process camera data. |
ScriptIntrinsicColorMatrix | Applies a 4x4 color matrix to a buffer. |
ScriptIntrinsicBlend | Blends two allocations in a variety of ways. |
ScriptIntrinsicLUT | Applies a per-channel lookup table to a buffer. |
ScriptIntrinsic3DLUT | Applies a color cube with interpolation to a buffer. |
Your application can use one of these intrinsics with very little code. For example, to perform a Gaussian blur, the application can do the following:
RenderScript rs = RenderScript.create(theActivity);
ScriptIntrinsicBlur theIntrinsic = ScriptIntrinsicBlur.create(mRS, Element.U8_4(rs));;
Allocation tmpIn = Allocation.createFromBitmap(rs, inputBitmap);
Allocation tmpOut = Allocation.createFromBitmap(rs, outputBitmap);
theIntrinsic.setRadius(25.f);
theIntrinsic.setInput(tmpIn);
theIntrinsic.forEach(tmpOut);
tmpOut.copyTo(outputBitmap);
This example creates a RenderScript context and a Blur intrinsic. It then uses the intrinsic to perform a Gaussian blur with a 25-pixel radius on the allocation. The default implementation of blur uses carefully hand-tuned assembly code, but on some hardware it will instead use hand-tuned GPU code.
What do developers get from the tuning that we’ve done? On the new Nexus 7, running that same 25-pixel radius Gaussian blur on a 1.6 megapixel image takes about 176ms. A simpler intrinsic like the color matrix operation takes under 4ms. The intrinsics are typically 2-3x faster than a multithreaded C implementation and often 10x+ faster than a Java implementation. Pretty good for eight lines of code.
 style="border:1px solid #ddd;border-radius: 6px;" />
Figure 1. Performance gains with RenderScript intrinsics, relative to equivalent multithreaded C implementations.
Applications that need additional functionality can mix these intrinsics with their own RenderScript kernels. An example of this would be an application that is taking camera preview data, converting it from YUV to RGB, adding a vignette effect, and uploading the final image to a SurfaceView for display.
In this example, we’ve got a stream of data flowing between a source device (the camera) and an output device (the display) with a number of possible processors along the way. Today, these operations can all run on the CPU, but as architectures become more advanced, using other processors becomes possible.
For example, the vignette operation can happen on a compute-capable GPU (like the ARM Mali T604 in the Nexus 10), while the YUV to RGB conversion could happen directly on the camera’s image signal processor (ISP). Using these different processors could significantly improve power consumption and performance. As more these processors become available, future Android updates will enable RenderScript to run on these processors, and applications written for RenderScript today will begin to make use of those processors transparently, without any additional work for developers.
Intrinsics provide developers a powerful tool they can leverage with minimal effort to achieve great performance across a wide variety of hardware. They can be mixed and matched with general purpose developer code allowing great flexibility in application design. So next time you have performance issues with image manipulation, I hope you give them a look to see if they can help.
Respecting Audio Focus
Posted by Kristan Uccello, Google Developer Relations
It’s rude to talk during a presentation, it disrespects the speaker and annoys the audience. If your application doesn’t respect the rules of audio focus then it’s disrespecting other applications and annoying the user. If you have never heard of audio focus you should take a look at the Android developer training material.
With multiple apps potentially playing audio it's important to think about how they should interact. To avoid every music app playing at the same time, Android uses audio focus to moderate audio playback—your app should only play audio when it holds audio focus. This post provides some tips on how to handle changes in audio focus properly, to ensure the best possible experience for the user.
Requesting audio focus
Audio focus should not be requested when your application starts (don’t get greedy), instead delay requesting it until your application is about to do something with an audio stream. By requesting audio focus through the AudioManager system service, an application can use one of the AUDIOFOCUS_GAIN* constants (see Table 1) to indicate the desired level of focus.
Listing 1. Requesting audio focus.
1. AudioManager am = (AudioManager) mContext.getSystemService(Context.AUDIO_SERVICE);
2.
3.  int result = am.requestAudioFocus(mOnAudioFocusChangeListener,
4.    // Hint: the music stream.
5.    AudioManager.STREAM_MUSIC,
6.    // Request permanent focus.
7.    AudioManager.AUDIOFOCUS_GAIN);
8.  if (result == AudioManager.AUDIOFOCUS_REQUEST_GRANTED) {
9.    mState.audioFocusGranted = true;
10. } else if (result == AudioManager.AUDIOFOCUS_REQUEST_FAILED) {
11.   mState.audioFocusGranted = false;
12. }
In line 7 above, you can see that we have requested permanent audio focus. An application could instead request transient focus using AUDIOFOCUS_GAIN_TRANSIENT which is appropriate when using the audio system for less than 45 seconds.
Alternatively, the app could use AUDIOFOCUS_GAIN_TRANSIENT_MAY_DUCK, which is appropriate when the use of the audio system may be shared with another application that is currently playing audio (e.g. for playing a "keep it up" prompt in a fitness application and expecting background music to duck during the prompt). The app requesting AUDIOFOCUS_GAIN_TRANSIENT_MAY_DUCK should not use the audio system for more than 15 seconds before releasing focus.
Handling audio focus changes
In order to handle audio focus change events, an application should create an instance of OnAudioFocusChangeListener. In the listener, the application will need to handle theAUDIOFOCUS_GAIN* event and AUDIOFOCUS_LOSS* events (see Table 1). It should be noted that AUDIOFOCUS_GAIN has some nuances which are highlighted in Listing 2, below.
Listing 2. Handling audio focus changes.
1. mOnAudioFocusChangeListener = new AudioManager.OnAudioFocusChangeListener() {
2.
3. @Override
4. public void onAudioFocusChange(int focusChange) {
5.   switch (focusChange) {
6.   case AudioManager.AUDIOFOCUS_GAIN:
7.     mState.audioFocusGranted = true;
8.
9.     if(mState.released) {
10.   initializeMediaPlayer();
11.    }
12.
13.    switch(mState.lastKnownAudioFocusState) {
14.    case UNKNOWN:
15.      if(mState.state == PlayState.PLAY && !mPlayer.isPlaying()) {
16.        mPlayer.start();
17.      }
18.      break;
19.    case AudioManager.AUDIOFOCUS_LOSS_TRANSIENT:
20.      if(mState.wasPlayingWhenTransientLoss) {
21.        mPlayer.start();
22.      }
23.      break;
24.    case AudioManager.AUDIOFOCUS_LOSS_TRANSIENT_CAN_DUCK:
25.      restoreVolume();
26.      break;
27.    }
28.
29.    break;
30.  case AudioManager.AUDIOFOCUS_LOSS:
31.    mState.userInitiatedState = false;
32.    mState.audioFocusGranted = false;
33.    teardown();
34.    break;
35.  case AudioManager.AUDIOFOCUS_LOSS_TRANSIENT:
36.    mState.userInitiatedState = false;
37.    mState.audioFocusGranted = false;
38.    mState.wasPlayingWhenTransientLoss = mPlayer.isPlaying();
39.    mPlayer.pause();
40.    break;
41.  case AudioManager.AUDIOFOCUS_LOSS_TRANSIENT_CAN_DUCK:
42.   mState.userInitiatedState = false;
43.   mState.audioFocusGranted = false;
44.   lowerVolume();
45.   break;
46.  }
47.  mState.lastKnownAudioFocusState = focusChange;
48.  }
49.};
AUDIOFOCUS_GAIN is used in two distinct scopes of an applications code. First, it can be used when registering for audio focus as shown in Listing 1. This does NOT translate to an event for the registered OnAudioFocusChangeListener, meaning that on a successful audio focus request the listener will NOT receive an AUDIOFOCUS_GAIN event for the registration.
AUDIOFOCUS_GAIN is also used in the implementation of an OnAudioFocusChangeListener as an event condition. As stated above, the AUDIOFOCUS_GAIN event will not be triggered on audio focus requests. Instead the AUDIOFOCUS_GAIN event will occur only after an AUDIOFOCUS_LOSS* event has occurred. This is the only constant in the set shown Table 1 that is used in both scopes.
There are four cases that need to be handled by the focus change listener. When the application receives an AUDIOFOCUS_LOSS this usually means it will not be getting its focus back. In this case the app should release assets associated with the audio system and stop playback. As an example, imagine a user is playing music using an app and then launches a game which takes audio focus away from the music app. There is no predictable time for when the user will exit the game. More likely, the user will navigate to the home launcher (leaving the game in the background) and launch yet another application or return to the music app causing a resume which would then request audio focus again.
However another case exists that warrants some discussion. There is a difference between losing audio focus permanently (as described above) and temporarily. When an application receives an AUDIOFOCUS_LOSS_TRANSIENT, the behavior of the app should be that it suspends its use of the audio system until it receives an AUDIOFOCUS_GAIN event. When the AUDIOFOCUS_LOSS_TRANSIENT occurs, the application should make a note that the loss is temporary, that way on audio focus gain it can reason about what the correct behavior should be (see lines 13-27 of Listing 2).
Sometimes an app loses audio focus (receives an AUDIOFOCUS_LOSS) and the interrupting application terminates or otherwise abandons audio focus. In this case the last application that had audio focus may receive an AUDIOFOCUS_GAIN event. On the subsequent AUDIOFOCUS_GAIN event the app should check and see if it is receiving the gain after a temporary loss and can thus resume use of the audio system or if recovering from an permanent loss, setup for playback.
If an application will only be using the audio capabilities for a short time (less than 45 seconds), it should use an AUDIOFOCUS_GAIN_TRANSIENT focus request and abandon focus after it has completed its playback or capture. Audio focus is handled as a stack on the system — as such the last process to request audio focus wins.
When audio focus has been gained this is the appropriate time to create a MediaPlayer or MediaRecorder instance and allocate resources. Likewise when an app receives AUDIOFOCUS_LOSS it is good practice to clean up any resources allocated. Gaining audio focus has three possibilities that also correspond to the three audio focus loss cases in Table 1. It is a good practice to always explicitly handle all the loss cases in the OnAudioFocusChangeListener.
Table 1. Audio focus gain and loss implication.
| GAIN | LOSS |
|---|---|
AUDIOFOCUS_GAIN | AUDIOFOCUS_LOSS |
AUDIOFOCUS_GAIN_TRANSIENT | AUDIOFOCUS_LOSS_TRANSIENT |
AUDIOFOCUS_GAIN_TRANSIENT_MAY_DUCK | AUDIOFOCUS_LOSS_TRANSIENT_CAN_DUCK |
Note: AUDIOFOCUS_GAIN is used in two places. When requesting audio focus it is passed in as a hint to the AudioManager and it is used as an event case in the OnAudioFocusChangeListener. The gain events highlighted in green are only used when requesting audio focus. The loss events are only used in the OnAudioFocusChangeListener.
Table 2. Audio stream types.
| Stream Type | Description |
|---|---|
STREAM_ALARM | The audio stream for alarms |
STREAM_DTMF | The audio stream for DTMF Tones |
STREAM_MUSIC | The audio stream for "media" (music, podcast, videos) playback |
STREAM_NOTIFICATION | The audio stream for notifications |
| STREAM_RING | The audio stream for the phone ring |
| STREAM_SYSTEM | The audio stream for system sounds |
An app will request audio focus (see an example in the sample source code linked below) from the AudioManager (Listing 1, line 1). The three arguments it provides are an audio focus change listener object (optional), a hint as to what audio channel to use (Table 2, most apps should use STREAM_MUSIC) and the type of audio focus from Table 1, column 1. If audio focus is granted by the system (AUDIOFOCUS_REQUEST_GRANTED), only then handle any initialization (see Listing 1, line 9).
Note: The system will not grant audio focus (AUDIOFOCUS_REQUEST_FAILED) if there is a phone call currently in process and the application will not receive AUDIOFOCUS_GAIN after the call ends.
Within an implementation of OnAudioFocusChange(), understanding what to do when an application receives an onAudioFocusChange() event is summarized in Table 3.
In the cases of losing audio focus be sure to check that the loss is in fact final. If the app receives an AUDIOFOCUS_LOSS_TRANSIENT or AUDIOFOCUS_LOSS_TRANSIENT_CAN_DUCK it can hold onto the media resources it has created (don’t call release()) as there will likely be another audio focus change event very soon thereafter. The app should take note that it has received a transient loss using some sort of state flag or simple state machine.
If an application were to request permanent audio focus with AUDIOFOCUS_GAIN and then receive an AUDIOFOCUS_LOSS_TRANSIENT_CAN_DUCK an appropriate action for the application would be to lower its stream volume (make sure to store the original volume state somewhere) and then raise the volume upon receiving an AUDIOFOCUS_GAIN event (see Figure 1, below).

Table 3. Appropriate actions by focus change type.
| Focus Change Type | Appropriate Action |
|---|---|
AUDIOFOCUS_GAIN | Gain event after loss event: Resume playback of media unless other state flags set by the application indicate otherwise. For example, the user paused the media prior to loss event. |
AUDIOFOCUS_LOSS | Stop playback. Release assets. |
AUDIOFOCUS_LOSS_TRANSIENT | Pause playback and keep a state flag that the loss is transient so that when the AUDIOFOCUS_GAIN event occurs you can resume playback if appropriate. Do not release assets. |
AUDIOFOCUS_LOSS_TRANSIENT_CAN_DUCK | Lower volume or pause playback keeping track of state as with AUDIOFOCUS_LOSS_TRANSIENT. Do not release assets. |
Conclusion and further reading
Understanding how to be a good audio citizen application on an Android device means respecting the system's audio focus rules and handling each case appropriately. Try to make your application behave in a consistent manner and not negatively surprise the user. There is a lot more that can be talked about within the audio system on Android and in the material below you will find some additional discussions.
- Managing Audio Focus, an Android developer training class.
- Allowing applications to play nice(r) with each other: Handling remote control buttons, a post on the Android Developers Blog.
Example source code is available here:
https://android.googlesource.com/platform/development/+/master/samples/RandomMusicPlayer
Android Native Development Kit Cookbook
Android Native Development Kit Cookbook
A step-by-step tutorial with more than 60 concise recipes on Android NDK development skills
Overview
- Build, debug, and profile Android NDK apps
- Implement part of Android apps in native C/C++ code.
- Optimize code performance in assembly with Android NDK.
In Detail
Building Android applications would usually mean that you spend all of your time working in Java. There are however times when this is not the most efficient or best method for the application being built. This is where Android NDK comes in. Android NDK allows the developer to write in Native C/C++, giving you the power to reuse code and libraries and also, in most cases, increase the speed and efficiency of your application.
The "Android Native Development Kit Cookbook" will help you understand the development, building, and debugging of your native Android applications. We will discover and learn JNI programming and essential NDK APIs such as OpenGL ES, and the native application API. We will then explore the process of porting existing libraries and software to NDK. By the end of this book you will be able to build your own apps in NDK apps.
"Android Native Development Kit Cookbook" begins with basic recipes that will help you in the building and debugging of native apps, and JNI programming. The recipes cover various topics of application development with Android NDK such as OpenGL programming and Multimedia programming. We will begin with a simple recipe, Hello NDK, before moving on to cover advanced topics with recipes on OpenGL ES that focus on 2D and 3D graphics, as well as recipes that discuss working with NDK and external APIs. If you are looking for ways to make your application available in Android and take measures to boost your application’s performance, then this Cookbook is for you.
What you will learn from this book
- Develop Android apps in C/C++ without a single line of Java.
- Program 2D/3D graphics with both OpenGL ES 1x and 2.0 in Android NDK.
- Write multi-threaded Android apps in Android NDK.
- Port existing C/C++ libraries and applications to Android with NDK.
- Develop multimedia Android apps with Android NDK.
Approach
This book is written in a Cookbook style, beginning with recipes which focus on helping developers make their software/application available in Android.
Who this book is written for
Android developers who want to learn Android NDK programming, or develop multimedia and games in Android NDK will benefit from this book.
Fine tune scaled down bitmap to exact size
Last post genarate a scaled down bitmaps, approximate but not exact size. In order to fine tune bitmap to exact size, we can re-create another bitmap from this scaled bitmap using Bitmap.createScaledBitmap() method with expected width and height.

Modify MainActivity.java from Last post to fine tune bitmap after scaled.
Download the files.
more: Something about processing images in Android

Modify MainActivity.java from Last post to fine tune bitmap after scaled.
package com.test.androidimageprocessing;

import java.io.FileNotFoundException;

import android.net.Uri;
import android.os.Bundle;
import android.app.Activity;
import android.content.Intent;
import android.graphics.Bitmap;
import android.graphics.Bitmap.Config;
import android.graphics.BitmapFactory;
import android.graphics.Canvas;
import android.graphics.Paint;
import android.graphics.PorterDuff;
import android.graphics.PorterDuff.Mode;
import android.graphics.PorterDuffXfermode;
import android.view.View;
import android.view.View.OnClickListener;
import android.widget.ArrayAdapter;
import android.widget.Button;
import android.widget.ImageView;
import android.widget.Spinner;
import android.widget.TextView;
import android.widget.Toast;
import com.example.androidimageprocessing.R;

public class MainActivity extends Activity {

 Button btnLoadImage1, btnLoadImage2;
 TextView textSource1, textSource2;
 Button btnProcessing;
 ImageView imageResult;
 Spinner spinnerMode;

 final int RQS_IMAGE1 = 1;
 final int RQS_IMAGE2 = 2;

 Uri source1, source2;

 String[] arrayModeName = { "ADD", "CLEAR", "DARKEN", "DST", "DST_ATOP",
   "DST_IN", "DST_OUT", "DST_OVER", "LIGHTEN", "MULTIPLY", "OVERLAY",
   "SCREEN", "SRC", "SRC_ATOP", "SRC_IN", "SRC_OUT", "SRC_OVER", "XOR" };

 /*
  * To use Mode.ADD and Mode.OVERLAY, android:minSdkVersion have to be set
  * "11" or higher.
  */
 PorterDuff.Mode[] arrayMode = { Mode.ADD, Mode.CLEAR, Mode.DARKEN,
   Mode.DST, Mode.DST_ATOP, Mode.DST_IN, Mode.DST_OUT, Mode.DST_OVER,
   Mode.LIGHTEN, Mode.MULTIPLY, Mode.OVERLAY, Mode.SCREEN, Mode.SRC,
   Mode.SRC_ATOP, Mode.SRC_IN, Mode.SRC_OUT, Mode.SRC_OVER, Mode.XOR };

 @Override
 protected void onCreate(Bundle savedInstanceState) {
  super.onCreate(savedInstanceState);

  setContentView(R.layout.activity_main);
  btnLoadImage1 = (Button) findViewById(R.id.loadimage1);
  btnLoadImage2 = (Button) findViewById(R.id.loadimage2);
  textSource1 = (TextView) findViewById(R.id.sourceuri1);
  textSource2 = (TextView) findViewById(R.id.sourceuri2);
  btnProcessing = (Button) findViewById(R.id.processing);
  imageResult = (ImageView) findViewById(R.id.result);

  spinnerMode = (Spinner) findViewById(R.id.mode);
  ArrayAdapter<String> adapter = new ArrayAdapter<String>(
    MainActivity.this, android.R.layout.simple_spinner_item,
    arrayModeName);
  adapter.setDropDownViewResource(android.R.layout.simple_spinner_dropdown_item);
  spinnerMode.setAdapter(adapter);

  btnLoadImage1.setOnClickListener(new OnClickListener() {

   @Override
   public void onClick(View arg0) {
    Intent intent = new Intent(
      Intent.ACTION_PICK,
      android.provider.MediaStore.Images.Media.EXTERNAL_CONTENT_URI);
    startActivityForResult(intent, RQS_IMAGE1);
   }
  });

  btnLoadImage2.setOnClickListener(new OnClickListener() {

   @Override
   public void onClick(View arg0) {
    Intent intent = new Intent(
      Intent.ACTION_PICK,
      android.provider.MediaStore.Images.Media.EXTERNAL_CONTENT_URI);
    startActivityForResult(intent, RQS_IMAGE2);
   }
  });

  btnProcessing.setOnClickListener(new OnClickListener() {

   @Override
   public void onClick(View v) {

    if (source1 != null && source2 != null) {
     Bitmap processedBitmap = ProcessingBitmap();
     if (processedBitmap != null) {
      imageResult.setImageBitmap(processedBitmap);
      Toast.makeText(getApplicationContext(), "Done",
        Toast.LENGTH_LONG).show();
     } else {
      Toast.makeText(getApplicationContext(),
        "Something wrong in processing!",
        Toast.LENGTH_LONG).show();
     }
    } else {
     Toast.makeText(getApplicationContext(),
       "Select both image!", Toast.LENGTH_LONG).show();
    }

   }
  });
 }

 @Override
 protected void onActivityResult(int requestCode, int resultCode, Intent data) {
  super.onActivityResult(requestCode, resultCode, data);
  if (resultCode == RESULT_OK) {
   switch (requestCode) {
   case RQS_IMAGE1:
    source1 = data.getData();
    textSource1.setText(source1.toString());
    break;
   case RQS_IMAGE2:
    source2 = data.getData();
    textSource2.setText(source2.toString());
    break;
   }
  }
 }

 private Bitmap ProcessingBitmap() {
  Bitmap bm1 = null;
  Bitmap bm2 = null;
  Bitmap newBitmap = null;

  try {
   /*
    * bm1 = BitmapFactory.decodeStream(getContentResolver()
    * .openInputStream(source1));
    * bm2 = BitmapFactory.decodeStream(getContentResolver()
    * .openInputStream(source2));
    */

   bm1 = loadScaledBitmap(source1);
   Toast.makeText(getApplicationContext(),
     "bm1: " + bm1.getWidth() + " x " + bm1.getHeight(),
     Toast.LENGTH_LONG).show();

   bm2 = loadScaledBitmap(source2);
   Toast.makeText(getApplicationContext(),
     "bm2: " + bm2.getWidth() + " x " + bm2.getHeight(),
     Toast.LENGTH_LONG).show();

   int w;
   if (bm1.getWidth() >= bm2.getWidth()) {
    w = bm1.getWidth();
   } else {
    w = bm2.getWidth();
   }

   int h;
   if (bm1.getHeight() >= bm2.getHeight()) {
    h = bm1.getHeight();
   } else {
    h = bm2.getHeight();
   }

   Config config = bm1.getConfig();
   if (config == null) {
    config = Bitmap.Config.ARGB_8888;
   }

   newBitmap = Bitmap.createBitmap(w, h, config);
   Canvas newCanvas = new Canvas(newBitmap);

   newCanvas.drawBitmap(bm1, 0, 0, null);

   Paint paint = new Paint();

   int selectedPos = spinnerMode.getSelectedItemPosition();
   PorterDuff.Mode selectedMode = arrayMode[selectedPos];

   paint.setXfermode(new PorterDuffXfermode(selectedMode));
   newCanvas.drawBitmap(bm2, 0, 0, paint);

  } catch (FileNotFoundException e) {
   // TODO Auto-generated catch block
   e.printStackTrace();
  }

  return newBitmap;
 }

 private Bitmap loadScaledBitmap(Uri src) throws FileNotFoundException {

  // required max width/height
  final int REQ_WIDTH = 1024;
  final int REQ_HEIGHT = 1024;

  Bitmap bm = null;

  // First decode with inJustDecodeBounds=true to check dimensions
  final BitmapFactory.Options options = new BitmapFactory.Options();
  options.inJustDecodeBounds = true;
  BitmapFactory.decodeStream(getContentResolver().openInputStream(src),
    null, options);

  // Calculate inSampleSize
  options.inSampleSize = calculateInSampleSize(options, REQ_WIDTH,
    REQ_HEIGHT);

  // Decode bitmap with inSampleSize set
  options.inJustDecodeBounds = false;
  bm = BitmapFactory.decodeStream(
    getContentResolver().openInputStream(src), null, options);

  /*
   * Up to here, bm will be scaled down, but not exactly expected size!
   *
   * To fine tune the size, re-create another bitmap from this scaled bitmap
   * using Bitmap.createScaledBitmap() method with expected width and height.
   */
  final int LONGEST_LENGTH = 1024;
  int dstWidth, dstHeight;

  if(options.outWidth >= options.outHeight){
   //Landscape orientation
   dstWidth = LONGEST_LENGTH;
   dstHeight = LONGEST_LENGTH * options.outHeight/options.outWidth;
  }else{
   //portrait orientation
   dstHeight = LONGEST_LENGTH;
   dstWidth = LONGEST_LENGTH * options.outWidth/options.outHeight;
  }

  //To save memory, re-use bm
  bm = Bitmap.createScaledBitmap(bm, dstWidth, dstHeight, false);

  return bm;
 }

 private int calculateInSampleSize(BitmapFactory.Options options,
   int reqWidth, int reqHeight) {
  // Raw height and width of image
  final int height = options.outHeight;
  final int width = options.outWidth;
  int inSampleSize = 1;

  if (height > reqHeight || width > reqWidth) {

   // Calculate ratios of height and width to requested height and
   // width
   final int heightRatio = Math.round((float) height
     / (float) reqHeight);
   final int widthRatio = Math.round((float) width / (float) reqWidth);

   // Choose the smallest ratio as inSampleSize value, this will
   // guarantee
   // a final image with both dimensions larger than or equal to the
   // requested height and width.
   inSampleSize = heightRatio < widthRatio ? heightRatio : widthRatio;
  }

  Toast.makeText(getApplicationContext(),
    "inSampleSize: " + inSampleSize, Toast.LENGTH_LONG).show();

  return inSampleSize;
 }

}
more: Something about processing images in Android
Load scaled bitmap
Last post provide UN-RECOMMENDED methods to handle error of 'OutOfMemoryError' and 'Bitmap too large to be uploaded into a texture' for images/bitmaps. Here is another approach, scale-down bitmap before processing and display. It's recommanded by Google's document Loading Large Bitmaps Efficiently for displaying bitmap.

Please note that the final value of BitmapFactory.Options.inSampleSize used by decoder will be based on powers of 2, any other value will be rounded down to the nearest power of 2.
For example: if the original photos is in 4256x2832, and REQ_WIDTH/REQ_HEIGHT are 1024, the calculated inSampleSize will be 3. But the rounded down value used by decoder will be 2. And the scaled bitmap will be 2128x1416.
Refer to the exercise "Merge images with PorterDuffXfermode", modify MainActivity.java to implement loadScaledBitmap() and calculateInSampleSize() methods.
Download the files.
Next: Fine tune scaled down bitmap to exact size
Related: Scale bitmap with inDither and inPreferQualityOverSpeed
more: Something about processing images in Android

Please note that the final value of BitmapFactory.Options.inSampleSize used by decoder will be based on powers of 2, any other value will be rounded down to the nearest power of 2.
For example: if the original photos is in 4256x2832, and REQ_WIDTH/REQ_HEIGHT are 1024, the calculated inSampleSize will be 3. But the rounded down value used by decoder will be 2. And the scaled bitmap will be 2128x1416.
Refer to the exercise "Merge images with PorterDuffXfermode", modify MainActivity.java to implement loadScaledBitmap() and calculateInSampleSize() methods.
package com.test.androidimageprocessing;

import java.io.FileNotFoundException;

import android.net.Uri;
import android.os.Bundle;
import android.app.Activity;
import android.content.Intent;
import android.graphics.Bitmap;
import android.graphics.Bitmap.Config;
import android.graphics.BitmapFactory;
import android.graphics.Canvas;
import android.graphics.Paint;
import android.graphics.PorterDuff;
import android.graphics.PorterDuff.Mode;
import android.graphics.PorterDuffXfermode;
import android.view.View;
import android.view.View.OnClickListener;
import android.widget.ArrayAdapter;
import android.widget.Button;
import android.widget.ImageView;
import android.widget.Spinner;
import android.widget.TextView;
import android.widget.Toast;
import com.example.androidimageprocessing.R;

public class MainActivity extends Activity {

 Button btnLoadImage1, btnLoadImage2;
 TextView textSource1, textSource2;
 Button btnProcessing;
 ImageView imageResult;
 Spinner spinnerMode;

 final int RQS_IMAGE1 = 1;
 final int RQS_IMAGE2 = 2;

 Uri source1, source2;

 String[] arrayModeName = { "ADD", "CLEAR", "DARKEN", "DST", "DST_ATOP",
   "DST_IN", "DST_OUT", "DST_OVER", "LIGHTEN", "MULTIPLY", "OVERLAY",
   "SCREEN", "SRC", "SRC_ATOP", "SRC_IN", "SRC_OUT", "SRC_OVER", "XOR" };

 /*
  * To use Mode.ADD and Mode.OVERLAY, android:minSdkVersion have to be set
  * "11" or higher.
  */
 PorterDuff.Mode[] arrayMode = { Mode.ADD, Mode.CLEAR, Mode.DARKEN,
   Mode.DST, Mode.DST_ATOP, Mode.DST_IN, Mode.DST_OUT, Mode.DST_OVER,
   Mode.LIGHTEN, Mode.MULTIPLY, Mode.OVERLAY, Mode.SCREEN, Mode.SRC,
   Mode.SRC_ATOP, Mode.SRC_IN, Mode.SRC_OUT, Mode.SRC_OVER, Mode.XOR };

 @Override
 protected void onCreate(Bundle savedInstanceState) {
  super.onCreate(savedInstanceState);

  setContentView(R.layout.activity_main);
  btnLoadImage1 = (Button) findViewById(R.id.loadimage1);
  btnLoadImage2 = (Button) findViewById(R.id.loadimage2);
  textSource1 = (TextView) findViewById(R.id.sourceuri1);
  textSource2 = (TextView) findViewById(R.id.sourceuri2);
  btnProcessing = (Button) findViewById(R.id.processing);
  imageResult = (ImageView) findViewById(R.id.result);

  spinnerMode = (Spinner) findViewById(R.id.mode);
  ArrayAdapter<String> adapter = new ArrayAdapter<String>(
    MainActivity.this, android.R.layout.simple_spinner_item,
    arrayModeName);
  adapter.setDropDownViewResource(android.R.layout.simple_spinner_dropdown_item);
  spinnerMode.setAdapter(adapter);

  btnLoadImage1.setOnClickListener(new OnClickListener() {

   @Override
   public void onClick(View arg0) {
    Intent intent = new Intent(
      Intent.ACTION_PICK,
      android.provider.MediaStore.Images.Media.EXTERNAL_CONTENT_URI);
    startActivityForResult(intent, RQS_IMAGE1);
   }
  });

  btnLoadImage2.setOnClickListener(new OnClickListener() {

   @Override
   public void onClick(View arg0) {
    Intent intent = new Intent(
      Intent.ACTION_PICK,
      android.provider.MediaStore.Images.Media.EXTERNAL_CONTENT_URI);
    startActivityForResult(intent, RQS_IMAGE2);
   }
  });

  btnProcessing.setOnClickListener(new OnClickListener() {

   @Override
   public void onClick(View v) {

    if (source1 != null && source2 != null) {
     Bitmap processedBitmap = ProcessingBitmap();
     if (processedBitmap != null) {
      imageResult.setImageBitmap(processedBitmap);
      Toast.makeText(getApplicationContext(), "Done",
        Toast.LENGTH_LONG).show();
     } else {
      Toast.makeText(getApplicationContext(),
        "Something wrong in processing!",
        Toast.LENGTH_LONG).show();
     }
    } else {
     Toast.makeText(getApplicationContext(),
       "Select both image!", Toast.LENGTH_LONG).show();
    }

   }
  });
 }

 @Override
 protected void onActivityResult(int requestCode, int resultCode, Intent data) {
  super.onActivityResult(requestCode, resultCode, data);
  if (resultCode == RESULT_OK) {
   switch (requestCode) {
   case RQS_IMAGE1:
    source1 = data.getData();
    textSource1.setText(source1.toString());
    break;
   case RQS_IMAGE2:
    source2 = data.getData();
    textSource2.setText(source2.toString());
    break;
   }
  }
 }

 private Bitmap ProcessingBitmap() {
  Bitmap bm1 = null;
  Bitmap bm2 = null;
  Bitmap newBitmap = null;

  try {
   /*
    * bm1 = BitmapFactory.decodeStream(getContentResolver()
    * .openInputStream(source1)); bm2 =
    * BitmapFactory.decodeStream(getContentResolver()
    * .openInputStream(source2));
    */

   bm1 = loadScaledBitmap(source1);
   Toast.makeText(getApplicationContext(),
     "bm1: " + bm1.getWidth() + " x " + bm1.getHeight(),
     Toast.LENGTH_LONG).show();

   bm2 = loadScaledBitmap(source2);
   Toast.makeText(getApplicationContext(),
     "bm2: " + bm2.getWidth() + " x " + bm2.getHeight(),
     Toast.LENGTH_LONG).show();

   int w;
   if (bm1.getWidth() >= bm2.getWidth()) {
    w = bm1.getWidth();
   } else {
    w = bm2.getWidth();
   }

   int h;
   if (bm1.getHeight() >= bm2.getHeight()) {
    h = bm1.getHeight();
   } else {
    h = bm2.getHeight();
   }

   Config config = bm1.getConfig();
   if (config == null) {
    config = Bitmap.Config.ARGB_8888;
   }

   newBitmap = Bitmap.createBitmap(w, h, config);
   Canvas newCanvas = new Canvas(newBitmap);

   newCanvas.drawBitmap(bm1, 0, 0, null);

   Paint paint = new Paint();

   int selectedPos = spinnerMode.getSelectedItemPosition();
   PorterDuff.Mode selectedMode = arrayMode[selectedPos];

   paint.setXfermode(new PorterDuffXfermode(selectedMode));
   newCanvas.drawBitmap(bm2, 0, 0, paint);

  } catch (FileNotFoundException e) {
   // TODO Auto-generated catch block
   e.printStackTrace();
  }

  return newBitmap;
 }

 private Bitmap loadScaledBitmap(Uri src) throws FileNotFoundException {

  // required max width/height
  final int REQ_WIDTH = 800;
  final int REQ_HEIGHT = 800;

  Bitmap bm = null;

  // First decode with inJustDecodeBounds=true to check dimensions
  final BitmapFactory.Options options = new BitmapFactory.Options();
  options.inJustDecodeBounds = true;
  BitmapFactory.decodeStream(getContentResolver().openInputStream(src),
    null, options);

  // Calculate inSampleSize
  options.inSampleSize = calculateInSampleSize(options, REQ_WIDTH,
    REQ_HEIGHT);

  // Decode bitmap with inSampleSize set
  options.inJustDecodeBounds = false;
  bm = BitmapFactory.decodeStream(
    getContentResolver().openInputStream(src), null, options);

  return bm;
 }

 public int calculateInSampleSize(BitmapFactory.Options options,
   int reqWidth, int reqHeight) {
  // Raw height and width of image
  final int height = options.outHeight;
  final int width = options.outWidth;
  int inSampleSize = 1;

  if (height > reqHeight || width > reqWidth) {

   // Calculate ratios of height and width to requested height and
   // width
   final int heightRatio = Math.round((float) height
     / (float) reqHeight);
   final int widthRatio = Math.round((float) width / (float) reqWidth);

   // Choose the smallest ratio as inSampleSize value, this will
   // guarantee
   // a final image with both dimensions larger than or equal to the
   // requested height and width.
   inSampleSize = heightRatio < widthRatio ? heightRatio : widthRatio;
  }

  Toast.makeText(getApplicationContext(),
    "inSampleSize: " + inSampleSize, Toast.LENGTH_LONG).show();

  return inSampleSize;
 }

}
Next: Fine tune scaled down bitmap to exact size
Related: Scale bitmap with inDither and inPreferQualityOverSpeed
more: Something about processing images in Android
Handle error of 'OutOfMemoryError' and 'Bitmap too large to be uploaded into a texture' for images/bitmaps
Before start this post, I have to mention that: IT'S STRONGLY NOT RECOMMENDED TO USE THE APPROACH HERE.
In the previous exercise for image processing, I haven't handle resizing of the images/bitmaps. It will cause the app close, or no display on ImageView, if you try to load with large images. Mainly there are two problem here:
- java.lang.OutOfMemoryError
It's due to Heap Size not enough to handle the bitmaps, you can try to require large heap by defining android:largeHeap="true" inside <application> in AndroidManifest.xml file. In my trial experience, after defined it, the app can handle the original 3264x2448 photos taken by HTC One X, but cannot handle original 4256x2832 photos from Nikon D700 DSLR.
- Bitmap too large to be uploaded into a texture (..., max=2048x2048)
It's due to OpenGLRenderer hardware Acceleration cannot handle bitmap larger than 2048x2048. You can try to disable hardware Acceleration by defining android:hardwareAccelerated="false" inside <application> in AndroidManifest.xml file.
Finally, your AndroidManifest.xml will look like this:
Exercise of "Merge images with PorterDuffXfermode" with these modification to handle original photos by HTC One X.

Anyway, both method cannot solve the problem perfectly, so it's not recommended.
Sometimes, even you have enough memory but not in single block. For example, you have three 1K memory block in seperated area, but you request memory of 1.5K, you will get 'OutOfMemoryError' also!
Good official lessons teach Caching Bitmaps and Managing Bitmap Memory, it is recommended to read if you need to handle a number of images in your app.
more: Something about processing images in Android
In the previous exercise for image processing, I haven't handle resizing of the images/bitmaps. It will cause the app close, or no display on ImageView, if you try to load with large images. Mainly there are two problem here:
- java.lang.OutOfMemoryError
It's due to Heap Size not enough to handle the bitmaps, you can try to require large heap by defining android:largeHeap="true" inside <application> in AndroidManifest.xml file. In my trial experience, after defined it, the app can handle the original 3264x2448 photos taken by HTC One X, but cannot handle original 4256x2832 photos from Nikon D700 DSLR.
- Bitmap too large to be uploaded into a texture (..., max=2048x2048)
It's due to OpenGLRenderer hardware Acceleration cannot handle bitmap larger than 2048x2048. You can try to disable hardware Acceleration by defining android:hardwareAccelerated="false" inside <application> in AndroidManifest.xml file.
Finally, your AndroidManifest.xml will look like this:
    <application
        ...
        android:hardwareAccelerated="false"
        android:largeHeap="true" >
Exercise of "Merge images with PorterDuffXfermode" with these modification to handle original photos by HTC One X.
Anyway, both method cannot solve the problem perfectly, so it's not recommended.
Sometimes, even you have enough memory but not in single block. For example, you have three 1K memory block in seperated area, but you request memory of 1.5K, you will get 'OutOfMemoryError' also!
Good official lessons teach Caching Bitmaps and Managing Bitmap Memory, it is recommended to read if you need to handle a number of images in your app.
more: Something about processing images in Android
Google Play Developer Program Policy Update
As of August 23, 2013, the new Google Play Developer Program Policy (“Content Policy”) will be in effect for all new applications submitted to the service. Any pre-existing applications must achieve compliance or be voluntarily unpublished by the developer within 30 days of the issuance of this notification.
https://support.google.com/googleplay/android-developer/answer/3311168
The Google Play Developer Program Policy (“Content Policy”) have been updated. Improvements include new guidance on ads behavior and clarifications to existing policies related to hate speech, gambling, in-app payments, ratings, and impersonation.
Please visit and familiarize yourself with the above policies. If you find any existing applications in your catalog to be in non-compliance, we ask you to remedy and republish the application within 30 calendar days of the posting of this notification. After this time period, applications discovered to be in violation may be subject to removal from Google Play. Any newly published applications must adhere to the latest version of the Content Policy for Google Play.
Share bitmap between Activities
This exercise demonstrate how to using static Bitmap in a common class in application, to share between activities. Such that, no need to pass between activities.


CommonBitmap.java, it simple hold a static Bitmap. It can be accessed by all activities in application, using CommonBitmap.bitmap.
MainActivity.java
activity_main.xml
Activity2.java, code of the second activity.
activity2_layout.xml
Finally, add the second activity Activity2.java to AndroidManifest.xml.
Download the files.
more: Something about processing images in Android


CommonBitmap.java, it simple hold a static Bitmap. It can be accessed by all activities in application, using CommonBitmap.bitmap.
package com.example.androidcommonbitmap;

import android.graphics.Bitmap;

public class CommonBitmap {
 public static Bitmap bitmap = null;
}
MainActivity.java
package com.example.androidcommonbitmap;

import java.io.FileNotFoundException;

import android.net.Uri;
import android.os.Bundle;
import android.view.View;
import android.view.View.OnClickListener;
import android.widget.Button;
import android.widget.ImageView;
import android.widget.TextView;
import android.app.Activity;
import android.content.Intent;
import android.graphics.BitmapFactory;

public class MainActivity extends Activity {

 Button btnLoadImage1;
 TextView textSource1;
 Button btnStartActivity;
 ImageView imageResult;

 final int RQS_LOADIMAGE = 1;
 final int RQS_ACTIVITY2 = 2;

 Uri source1;

 @Override
 protected void onCreate(Bundle savedInstanceState) {
  super.onCreate(savedInstanceState);
  setContentView(R.layout.activity_main);
  btnLoadImage1 = (Button)findViewById(R.id.loadimage1);
  textSource1 = (TextView)findViewById(R.id.sourceuri1);
  btnStartActivity = (Button)findViewById(R.id.startactivity);
  imageResult = (ImageView)findViewById(R.id.result);

  btnLoadImage1.setOnClickListener(new OnClickListener(){

   @Override
   public void onClick(View arg0) {
    Intent intent = new Intent(Intent.ACTION_PICK,
      android.provider.MediaStore.Images.Media.EXTERNAL_CONTENT_URI);
    startActivityForResult(intent, RQS_LOADIMAGE);
   }});

  btnStartActivity.setOnClickListener(new OnClickListener(){

   @Override
   public void onClick(View arg0) {
    Intent intent = new Intent(MainActivity.this, Activity2.class);
       startActivityForResult(intent, RQS_ACTIVITY2);
   }});
 }

 @Override
 protected void onActivityResult(int requestCode, int resultCode, Intent data) {
  super.onActivityResult(requestCode, resultCode, data);
  if(resultCode == RESULT_OK){
   switch (requestCode){
   case RQS_LOADIMAGE:
    source1 = data.getData();
    textSource1.setText(source1.toString());

    try {
     //save common static bitmap
     CommonBitmap.bitmap = BitmapFactory.decodeStream(
       getContentResolver().openInputStream(source1));
    } catch (FileNotFoundException e) {
     // TODO Auto-generated catch block
     e.printStackTrace();
    }
    break;
   case RQS_ACTIVITY2:
    imageResult.setImageBitmap(CommonBitmap.bitmap);
    break;
   }
  }
 }

}
activity_main.xml
<LinearLayout xmlns:android="http://schemas.android.com/apk/res/android"
    xmlns:tools="http://schemas.android.com/tools"
    android:layout_width="match_parent"
    android:layout_height="match_parent"
    android:paddingBottom="@dimen/activity_vertical_margin"
    android:paddingLeft="@dimen/activity_horizontal_margin"
    android:paddingRight="@dimen/activity_horizontal_margin"
    android:paddingTop="@dimen/activity_vertical_margin"
    android:orientation="vertical"
    tools:context=".MainActivity" >

    <TextView
        android:layout_width="wrap_content"
        android:layout_height="wrap_content"
        android:text="http://arteluzevida.blogspot.com/"
        android:textStyle="bold"
        android:layout_gravity="center_horizontal"
        android:autoLink="web" />

    <Button
        android:id="@+id/loadimage1"
        android:layout_width="match_parent"
        android:layout_height="wrap_content"
        android:text="Load Image 1" />
    <TextView
        android:id="@+id/sourceuri1"
        android:layout_width="match_parent"
        android:layout_height="wrap_content" />

    <Button
        android:id="@+id/startactivity"
        android:layout_width="match_parent"
        android:layout_height="wrap_content"
        android:text="Start Another Activity" />
    <ImageView
        android:id="@+id/result"
        android:layout_width="match_parent"
        android:layout_height="match_parent" />

</LinearLayout>
Activity2.java, code of the second activity.
package com.example.androidcommonbitmap;

import android.app.Activity;
import android.os.Bundle;
import android.view.View;
import android.view.View.OnClickListener;
import android.widget.Button;
import android.widget.ImageView;

public class Activity2 extends Activity {

 @Override
 protected void onCreate(Bundle savedInstanceState) {
  super.onCreate(savedInstanceState);
  setContentView(R.layout.activity2_layout);

  ImageView image2 = (ImageView)findViewById(R.id.image2);
  image2.setImageBitmap(CommonBitmap.bitmap);

  Button btnFinish = (Button)findViewById(R.id.finish);
  btnFinish.setOnClickListener(new OnClickListener(){

   @Override
   public void onClick(View arg0) {
    setResult(RESULT_OK);
    finish();
   }});
 }

}
activity2_layout.xml
<LinearLayout xmlns:android="http://schemas.android.com/apk/res/android"
    xmlns:tools="http://schemas.android.com/tools"
    android:layout_width="match_parent"
    android:layout_height="match_parent"
    android:paddingBottom="@dimen/activity_vertical_margin"
    android:paddingLeft="@dimen/activity_horizontal_margin"
    android:paddingRight="@dimen/activity_horizontal_margin"
    android:paddingTop="@dimen/activity_vertical_margin"
    android:orientation="vertical"
    tools:context=".MainActivity" >

    <TextView
        android:layout_width="wrap_content"
        android:layout_height="wrap_content"
        android:text="http://arteluzevida.blogspot.com/"
        android:textStyle="bold"
        android:layout_gravity="center_horizontal"
        android:autoLink="web" />
    <Button
        android:id="@+id/finish"
        android:layout_width="match_parent"
        android:layout_height="wrap_content"
        android:text="Finish" />
    <ImageView
        android:id="@+id/image2"
        android:layout_width="match_parent"
        android:layout_height="match_parent" />

</LinearLayout>
Finally, add the second activity Activity2.java to AndroidManifest.xml.
<?xml version="1.0" encoding="utf-8"?>
<manifest xmlns:android="http://schemas.android.com/apk/res/android"
    package="com.example.androidcommonbitmap"
    android:versionCode="1"
    android:versionName="1.0" >

    <uses-sdk
        android:minSdkVersion="8"
        android:targetSdkVersion="17" />

    <application
        android:allowBackup="true"
        android:icon="@drawable/ic_launcher"
        android:label="@string/app_name"
        android:theme="@style/AppTheme" >
        <activity
            android:name="com.example.androidcommonbitmap.MainActivity"
            android:label="@string/app_name" >
            <intent-filter>
                <action android:name="android.intent.action.MAIN" />

                <category android:name="android.intent.category.LAUNCHER" />
            </intent-filter>
        </activity>
        <activity
            android:name="com.example.androidcommonbitmap.Activity2"
            android:label="@string/app_name" >
        </activity>
    </application>

</manifest>
more: Something about processing images in Android
OpenGL ES 2 for Android: A Quick-Start Guide
OpenGL ES 2 for Android: A Quick-Start Guide
Android is booming like never before, with millions of devices shipping every day. It's never been a better time to learn how to create your own 3D games and live wallpaper for Android. You'll find out all about shaders and the OpenGL pipeline, and discover the power of OpenGL ES 2.0, which is much more feature-rich than its predecessor. If you can program in Java and you have a creative vision that you'd like to share with the world, then this is the book for you.
This book will teach you everything you need to know to create compelling graphics on Android. You'll learn the basics of OpenGL by building a simple game of air hockey, and along the way, you'll see how to initialize OpenGL and program the graphics pipeline using shaders. Each lesson builds upon the one before it, as you add colors, shading, 3D projections, touch interaction, and more.
Then, you'll find out how to turn your idea into a live wallpaper that can run on the home screen. You'll learn about more advanced effects involving particles, lighting models, and the depth buffer. You'll understand what to look for when debugging your program, and what to watch out for when deploying to the market.
OpenGL can be somewhat of a dark art to the uninitiated. As you read this book, you'll learn each new concept from first principles. You won't just learn about a feature; you'll also understand how it works, and why it works the way it does. Everything you learn is forward-compatible with the just-released OpenGL ES 3, and you can even apply these techniques to other platforms, such as iOS or HTML5 WebGL.
Processing on desktop vs Processing for Android
It's the same code run Processing on desktop and Android, with Android Mode.
Run on Nexus One:

Run on desktop:

The example code:
Related:
- Setup Processing for Android development
- Hello World of Processing for Android
Cross post: Arduino-er blog - Processing on desktop vs Processing for Android
Run on Nexus One:

Run on desktop:

The example code:
void setup(){
  size(400, 300);
  background(0);
  stroke(255);
}

void draw() {

  noFill();

  if(mousePressed){
    background(0);
    point(mouseX, mouseY);
    line(80, 50, mouseX, mouseY);
    line(50, 200, 350, 250);
    curve(80, 50, mouseX, mouseY, 50, 200, 350, 250);

  }

}
Related:
- Setup Processing for Android development
- Hello World of Processing for Android
Cross post: Arduino-er blog - Processing on desktop vs Processing for Android
Example to create shadow frame for image

package com.example.androidframeimage;

import java.io.FileNotFoundException;

import android.net.Uri;
import android.os.Bundle;
import android.view.View;
import android.view.View.OnClickListener;
import android.widget.Button;
import android.widget.ImageView;
import android.widget.TextView;
import android.widget.Toast;
import android.app.Activity;
import android.content.Intent;
import android.graphics.Bitmap;
import android.graphics.BitmapFactory;
import android.graphics.Canvas;
import android.graphics.Color;
import android.graphics.Paint;
import android.graphics.PorterDuffXfermode;
import android.graphics.Bitmap.Config;
import android.graphics.PorterDuff.Mode;
import android.graphics.Rect;
import android.graphics.RectF;

public class MainActivity extends Activity {

 Button btnLoadImage1;
 TextView textSource1;
 Button btnProcessing;
 ImageView imageResult;

 final int RQS_IMAGE1 = 1;

 Uri source1;

 @Override
 protected void onCreate(Bundle savedInstanceState) {
  super.onCreate(savedInstanceState);
  setContentView(R.layout.activity_main);
  btnLoadImage1 = (Button)findViewById(R.id.loadimage1);
  textSource1 = (TextView)findViewById(R.id.sourceuri1);
  btnProcessing = (Button)findViewById(R.id.processing);
  imageResult = (ImageView)findViewById(R.id.result);

  btnLoadImage1.setOnClickListener(new OnClickListener(){

   @Override
   public void onClick(View arg0) {
    Intent intent = new Intent(Intent.ACTION_PICK,
      android.provider.MediaStore.Images.Media.EXTERNAL_CONTENT_URI);
    startActivityForResult(intent, RQS_IMAGE1);
   }});

  btnProcessing.setOnClickListener(new OnClickListener(){

   @Override
   public void onClick(View v) {

    if(source1 != null){
     Bitmap processedBitmap = ProcessingBitmap();
     if(processedBitmap != null){
      imageResult.setImageBitmap(processedBitmap);
      Toast.makeText(getApplicationContext(),
        "Done",
        Toast.LENGTH_LONG).show();
     }else{
      Toast.makeText(getApplicationContext(),
        "Something wrong in processing!",
        Toast.LENGTH_LONG).show();
     }
    }else{
     Toast.makeText(getApplicationContext(),
       "Select image!",
       Toast.LENGTH_LONG).show();
    }

   }});
 }

 @Override
 protected void onActivityResult(int requestCode, int resultCode, Intent data) {
  super.onActivityResult(requestCode, resultCode, data);
  if(resultCode == RESULT_OK){
   switch (requestCode){
   case RQS_IMAGE1:
    source1 = data.getData();
    textSource1.setText(source1.toString());
    break;
   }
  }
 }

 private Bitmap ProcessingBitmap(){
  Bitmap bm1 = null;
  Bitmap newBitmap = null;
  Bitmap newShadowBitmap = null;

  try {
   bm1 = BitmapFactory.decodeStream(
     getContentResolver().openInputStream(source1));

   int w = bm1.getWidth();
   int h = bm1.getHeight();

   Config config = bm1.getConfig();
   if(config == null){
    config = Bitmap.Config.ARGB_8888;
   }

   newBitmap = Bitmap.createBitmap(w, h, config);
   Canvas newCanvas = new Canvas(newBitmap);
   newCanvas.drawColor(Color.BLACK);

   Paint paint = new Paint();
   paint.setColor(Color.WHITE);
   Rect frame = new Rect(
     (int)(w*0.05),
     (int)(w*0.05),
     (int)(w*0.95),
     (int)(h*0.95));
   RectF frameF = new RectF(frame);
   newCanvas.drawRect(frameF, paint);
   paint.setXfermode(new PorterDuffXfermode(Mode.DARKEN));
   newCanvas.drawBitmap(bm1, 0, 0, paint);

   /*
    * Create shadow like outer frame
    */

   //create BLACK bitmap with same size of the image
   Bitmap bitmapFullGray = Bitmap.createBitmap(w, h, config);
   Canvas canvasFullGray = new Canvas(bitmapFullGray);
   canvasFullGray.drawColor(0xFF808080);

   //create bigger bitmap with shadow frame
   int shadowThick = 100;
   int shadowRadius = 50;
   newShadowBitmap = Bitmap.createBitmap(w+shadowThick+shadowRadius,
     h+shadowThick+shadowRadius, config);
   Canvas newShadowCanvas = new Canvas(newShadowBitmap);
   newShadowCanvas.drawColor(Color.WHITE);

   //generate shadow
   Paint paintShadow = new Paint();
   paintShadow.setShadowLayer(shadowRadius, shadowThick, shadowThick, 0xFF000000);
   newShadowCanvas.drawBitmap(bitmapFullGray, 0, 0, paintShadow);

   //Place the image
   paintShadow.clearShadowLayer();
   newShadowCanvas.drawBitmap(newBitmap, 0, 0, paintShadow);

  } catch (FileNotFoundException e) {
   // TODO Auto-generated catch block
   e.printStackTrace();
  }

  return newShadowBitmap;
 }

}
Layout refer to last exercise "Create frame on Bitmap image".
more: Something about processing images in Android