New test build of Android-x86 released, based on the Android 4.2.2


Android-x86 is a project to port Android open source project to x86 platform, Run Android on Your PC.

The test build 20130228 is based on the latest Android 4.2.2 release (JB-MR1.1 branch). We have fixed and added x86 specified code to let the system runs smoothly on most x86 platforms, especially for tablets and netbooks.

The key features in this release are:
  • Use the latest kernel 3.8.0 to support more drivers.
  • OpenGL ES hardware acceleration for AMD Radeon and Intel chipsets (not included chips with PVR). You may disable it by adding HWACCEL=0 to the cmdline if you have trouble to use it.
  • Support Multi-touch, Wifi, Audio, G-sensor, Camera and Backlight control.
  • Simulate SDCard by internal storage.
  • Auto mount usb driver and sdcard on plugging.
  • Multi-user support (max 8).
  • Support Ethernet (DHCP only).
  • Support VM like Virtual Box.

Instant Spring for Android Starter


The possibility to connect to remote web services is a key feature for most Android apps. REST (Representational State Transfer) is the most popular architecture to provide web services to mobile devices and others. OAuth has recently become the web’s favorite way to authenticate and authorize users and apps, thanks to its capability to re-use popular web platforms accounts (Google, Facebook, Twitter). Spring for Android is an extension of the Spring Framework that aims to simplify the development of native Android applications.

"Spring for Android Starter" is a practical, hands-on guide that provides you with a number of clear step-by-step exercises, which will help you take advantage of the abstractions offered by Spring for Android with regard to REST (RestTemplate) and OAuth (OAuthTemplate). It will also introduce you to the bases of those architectures and the associated tooling.

This book gets you started using Spring for Android, first letting you know how to set up your workspace to include those libraries in your projects (with the Eclipse IDE and also with the popular building tool Maven) and then providing some clear and real life examples of RESTful and OAUth backed Android applications.

After introducing the technology, we’ll discover the different Message Converters provided (to consume JSON, XML, and Atom web services) and the main HTTP verbs to interact with RESTful webservices: GET, POST, DELETE, and UPDATE. We’ll also mention how to support HTTP Basic Auth, Gzip compression, and finally put in practice the OAuth workflow with a concrete example relying on the Google OAuth service provider to authenticate and authorize an app and users.

You will learn everything you need to consume RESTful web services, authenticate your users, and interact with their social platforms profiles from your Android app.

Approach

Get to grips with a new technology, understand what it is and what it can do for you, and then get to work with the most important features and tasks.

This is a Starter which gives you an introduction to Spring for Android with plenty of well-explained practical code examples.

Who this book is for

If you are an Android developer who wants to learn about RESTful web services and OAuth authentication and authorization, and you also want to know how to speed up your development involving those architectures using Spring for Android abstractions, then this book is for you.

But core Java developers are not forgotten, thanks to the explanations on how to set up Eclipse and Maven for Android development (very basic knowledge regarding Android UI design is required to understand the examples; the right pointers to ramp up on this topic are provided though).

Draw tranparent circle for Google Maps Android API v2

This exercise demonstrate how to draw tranparent circle for Google Maps Android API v2. To create a CircleOptions with TRANSPARENT collor, call fillColor(Color.TRANSPARENT) method; actually it's the default value. We can also set the most signification byte of the parameter to make it semi-tranparent.

Draw tranparent circle for Google Maps Android API v2

Modify from the exercise "Draw Circle on GoogleMap".
package com.example.androidmapsv2;

import com.google.android.gms.common.ConnectionResult;
import com.google.android.gms.common.GooglePlayServicesUtil;
import com.google.android.gms.maps.GoogleMap;
import com.google.android.gms.maps.GoogleMap.OnMapClickListener;
import com.google.android.gms.maps.GoogleMap.OnMapLongClickListener;
import com.google.android.gms.maps.MapFragment;
import com.google.android.gms.maps.model.Circle;
import com.google.android.gms.maps.model.CircleOptions;
import com.google.android.gms.maps.model.LatLng;
import android.app.Activity;
import android.app.AlertDialog;
import android.app.FragmentManager;
import android.graphics.Color;
import android.os.Bundle;
import android.view.Menu;
import android.view.MenuItem;
import android.widget.TextView;
import android.widget.Toast;

public class MainActivity extends Activity
implements OnMapClickListener, OnMapLongClickListener{

final int RQS_GooglePlayServices = 1;
private GoogleMap myMap;

TextView tvLocInfo;

Circle myCircle;

@Override
protected void onCreate(Bundle savedInstanceState) {
super.onCreate(savedInstanceState);
setContentView(R.layout.activity_main);

tvLocInfo = (TextView)findViewById(R.id.locinfo);

FragmentManager myFragmentManager = getFragmentManager();
MapFragment myMapFragment
= (MapFragment)myFragmentManager.findFragmentById(R.id.map);
myMap = myMapFragment.getMap();

myMap.setMapType(GoogleMap.MAP_TYPE_HYBRID);

myMap.setOnMapClickListener(this);
myMap.setOnMapLongClickListener(this);

}

@Override
public boolean onCreateOptionsMenu(Menu menu) {
// Inflate the menu; this adds items to the action bar if it is present.
getMenuInflater().inflate(R.menu.activity_main, menu);
return true;
}

@Override
public boolean onOptionsItemSelected(MenuItem item) {
switch (item.getItemId()) {
case R.id.menu_legalnotices:
String LicenseInfo = GooglePlayServicesUtil.getOpenSourceSoftwareLicenseInfo(
getApplicationContext());
AlertDialog.Builder LicenseDialog = new AlertDialog.Builder(MainActivity.this);
LicenseDialog.setTitle("Legal Notices");
LicenseDialog.setMessage(LicenseInfo);
LicenseDialog.show();
return true;
}
return super.onOptionsItemSelected(item);
}

@Override
protected void onResume() {

super.onResume();

int resultCode = GooglePlayServicesUtil.isGooglePlayServicesAvailable(getApplicationContext());

if (resultCode == ConnectionResult.SUCCESS){
Toast.makeText(getApplicationContext(),
"isGooglePlayServicesAvailable SUCCESS",
Toast.LENGTH_LONG).show();
}else{
GooglePlayServicesUtil.getErrorDialog(resultCode, this, RQS_GooglePlayServices);
}

}


@Override
public void onMapClick(LatLng point) {
CircleOptions circleOptions = new CircleOptions()
.center(point) //set center
.radius(500) //set radius in meters
.fillColor(Color.TRANSPARENT) //default
.strokeColor(Color.BLUE)
.strokeWidth(5);

myCircle = myMap.addCircle(circleOptions);
}

@Override
public void onMapLongClick(LatLng point) {
CircleOptions circleOptions = new CircleOptions()
.center(point) //set center
.radius(500) //set radius in meters
.fillColor(0x40ff0000) //semi-transparent
.strokeColor(Color.BLUE)
.strokeWidth(5);

myCircle = myMap.addCircle(circleOptions);

}

}


download filesDownload the files.

The series:
A simple example using Google Maps Android API v2, step by step.

Implement OnMyLocationChangeListener for Google Maps Android API v2

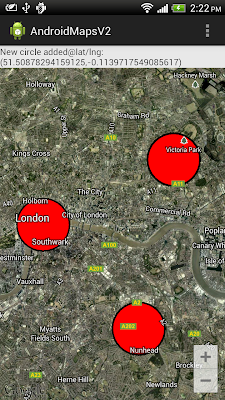
With Google Play services v3.0, and Android SDK Platform-tools with Google Play Services updated, we can implement OnMyLocationChangeListener, called when the Location of the My Location dot has changed.

Implement OnMyLocationChangeListener for Google Maps Android API v2


Modify the Java code from the last exercise "Draw Circle on GoogleMap".
package com.example.androidmapsv2;

import com.google.android.gms.common.ConnectionResult;
import com.google.android.gms.common.GooglePlayServicesUtil;
import com.google.android.gms.maps.CameraUpdateFactory;
import com.google.android.gms.maps.GoogleMap;
import com.google.android.gms.maps.GoogleMap.OnMyLocationChangeListener;
import com.google.android.gms.maps.MapFragment;
import com.google.android.gms.maps.model.Circle;
import com.google.android.gms.maps.model.CircleOptions;
import com.google.android.gms.maps.model.LatLng;
import android.app.Activity;
import android.app.AlertDialog;
import android.app.FragmentManager;
import android.graphics.Color;
import android.location.Location;
import android.os.Bundle;
import android.view.Menu;
import android.view.MenuItem;
import android.widget.TextView;
import android.widget.Toast;

public class MainActivity extends Activity
implements OnMyLocationChangeListener{

final int RQS_GooglePlayServices = 1;
private GoogleMap myMap;

TextView tvLocInfo;

Circle myCircle;

@Override
protected void onCreate(Bundle savedInstanceState) {
super.onCreate(savedInstanceState);
setContentView(R.layout.activity_main);

tvLocInfo = (TextView)findViewById(R.id.locinfo);

FragmentManager myFragmentManager = getFragmentManager();
MapFragment myMapFragment
= (MapFragment)myFragmentManager.findFragmentById(R.id.map);
myMap = myMapFragment.getMap();

myMap.setMapType(GoogleMap.MAP_TYPE_HYBRID);

myMap.setMyLocationEnabled(true);
myMap.setOnMyLocationChangeListener(this);

}

@Override
public boolean onCreateOptionsMenu(Menu menu) {
// Inflate the menu; this adds items to the action bar if it is present.
getMenuInflater().inflate(R.menu.activity_main, menu);
return true;
}

@Override
public boolean onOptionsItemSelected(MenuItem item) {
switch (item.getItemId()) {
case R.id.menu_legalnotices:
String LicenseInfo = GooglePlayServicesUtil.getOpenSourceSoftwareLicenseInfo(
getApplicationContext());
AlertDialog.Builder LicenseDialog = new AlertDialog.Builder(MainActivity.this);
LicenseDialog.setTitle("Legal Notices");
LicenseDialog.setMessage(LicenseInfo);
LicenseDialog.show();
return true;
}
return super.onOptionsItemSelected(item);
}

@Override
protected void onResume() {

super.onResume();

int resultCode = GooglePlayServicesUtil.isGooglePlayServicesAvailable(getApplicationContext());

if (resultCode == ConnectionResult.SUCCESS){
Toast.makeText(getApplicationContext(),
"isGooglePlayServicesAvailable SUCCESS",
Toast.LENGTH_LONG).show();
}else{
GooglePlayServicesUtil.getErrorDialog(resultCode, this, RQS_GooglePlayServices);
}

}

@Override
public void onMyLocationChange(Location location) {
tvLocInfo.setText("New circle added@" + location.toString());

LatLng locLatLng = new LatLng(location.getLatitude(), location.getLongitude());
double accuracy = location.getAccuracy();

if(myCircle == null){
CircleOptions circleOptions = new CircleOptions()
.center(locLatLng) //set center
.radius(accuracy) //set radius in meters
.fillColor(Color.RED)
.strokeColor(Color.BLACK)
.strokeWidth(5);

myCircle = myMap.addCircle(circleOptions);
}else{
myCircle.setCenter(locLatLng);
myCircle.setRadius(accuracy);
}

myMap.animateCamera(CameraUpdateFactory.newLatLng(locLatLng));

}

}


download filesDownload the files.


The series:
A simple example using Google Maps Android API v2, step by step.

Draw Circle on GoogleMap

With Google Play services v3.0, now we can draw circle on Google Maps API V2. To use the new feature, you have to update Android SDK Platform-tools.

Draw Circle on GoogleMap


The code modify from the exercise of Draw Polygon on GoogleMap.

package com.example.androidmapsv2;

import com.google.android.gms.common.ConnectionResult;
import com.google.android.gms.common.GooglePlayServicesUtil;
import com.google.android.gms.maps.GoogleMap;
import com.google.android.gms.maps.GoogleMap.OnMapLongClickListener;
import com.google.android.gms.maps.MapFragment;
import com.google.android.gms.maps.model.CircleOptions;
import com.google.android.gms.maps.model.LatLng;
import android.app.Activity;
import android.app.AlertDialog;
import android.app.FragmentManager;
import android.graphics.Color;
import android.os.Bundle;
import android.view.Menu;
import android.view.MenuItem;
import android.widget.TextView;
import android.widget.Toast;

public class MainActivity extends Activity
implements OnMapLongClickListener{

final int RQS_GooglePlayServices = 1;
private GoogleMap myMap;

TextView tvLocInfo;

@Override
protected void onCreate(Bundle savedInstanceState) {
super.onCreate(savedInstanceState);
setContentView(R.layout.activity_main);

tvLocInfo = (TextView)findViewById(R.id.locinfo);

FragmentManager myFragmentManager = getFragmentManager();
MapFragment myMapFragment
= (MapFragment)myFragmentManager.findFragmentById(R.id.map);
myMap = myMapFragment.getMap();

myMap.setMapType(GoogleMap.MAP_TYPE_HYBRID);

myMap.setOnMapLongClickListener(this);

}

@Override
public boolean onCreateOptionsMenu(Menu menu) {
// Inflate the menu; this adds items to the action bar if it is present.
getMenuInflater().inflate(R.menu.activity_main, menu);
return true;
}

@Override
public boolean onOptionsItemSelected(MenuItem item) {
switch (item.getItemId()) {
case R.id.menu_legalnotices:
String LicenseInfo = GooglePlayServicesUtil.getOpenSourceSoftwareLicenseInfo(
getApplicationContext());
AlertDialog.Builder LicenseDialog = new AlertDialog.Builder(MainActivity.this);
LicenseDialog.setTitle("Legal Notices");
LicenseDialog.setMessage(LicenseInfo);
LicenseDialog.show();
return true;
}
return super.onOptionsItemSelected(item);
}

@Override
protected void onResume() {

super.onResume();

int resultCode = GooglePlayServicesUtil.isGooglePlayServicesAvailable(getApplicationContext());

if (resultCode == ConnectionResult.SUCCESS){
Toast.makeText(getApplicationContext(),
"isGooglePlayServicesAvailable SUCCESS",
Toast.LENGTH_LONG).show();
}else{
GooglePlayServicesUtil.getErrorDialog(resultCode, this, RQS_GooglePlayServices);
}

}

@Override
public void onMapLongClick(LatLng point) {
tvLocInfo.setText("New circle added@" + point.toString());

CircleOptions circleOptions = new CircleOptions()
.center(point) //set center
.radius(1000) //set radius in meters
.fillColor(Color.RED)
.strokeColor(Color.BLACK)
.strokeWidth(5);

myMap.addCircle(circleOptions);
}

}


download filesDownload the files.

Next: Draw tranparent circle

The series:
A simple example using Google Maps Android API v2, step by step.

Google Maps Android API v2 now support anti-clockwise polygons

With Google Play services v3.0 and Android SDK Platform-tools updated. Google Maps Android API v2 now support anti-clockwise polygons.


The code is here: Google Maps Android API v2 example: Draw Polygon on GoogleMap. With video of playing in old version Google Play Services without support of anti-clockwise polygons.

Android SDK Platform-tools updated

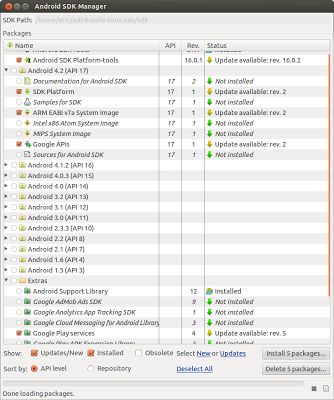
To update Android SDK in Eclipse, click Window -> Android SDK Manager. Updates of Android SDK Platform-tools, Extras of Google Play Services, and a number of features are available.

Android SDK Platform-tools updated

Over-The-Air Installs - stay connected to users across their devices


With Google Play services v3.0, now you can drive automatic Android downloads from your website sign-ins. After signing in with Google on the web, users have the option to send your Android app to their device instantly, without them ever leaving your website. Direct installs from the Google Play Store are limited to free apps that exceed a quality threshold.

Link: https://developers.google.com/+/features/play-installs


Google Play services updated v3.0


Google roll out Google Play services v3.0, includes great Google+ Sign-In and Google Maps Android API improvements.

Know more: Android Developers Blog - Google+ Sign-In Now Part of Google Play Services

Google+ Sign-In Now Part of Google Play Services

Google Play Services is our platform for offering you better integration with Google products, and providing new capabilities to use within your apps. Today we’re rolling out Google Play services v3.0, which includes Google+ Sign-In and Google Maps Android API improvements.


Google+ Sign-In


Google+ Sign-In lets users sign in to your Android app with their existing Google credentials, and bring along their Google+ info for an upgraded experience. In addition to basic authentication, today’s release includes features that can accelerate both app downloads and engagement.


Over-the-air installs from your website

After signing in with Google on your web site, users will now have the option to install your Android app on their devices instantly. They’ll enjoy a seamless desktop-to-mobile experience, and you’ll be able to drive more downloads. Linking your web site and Android apps is as simple as registering your project and clients with the Google APIs console.


App customization

When users sign in with Google, they can now bring their Google+ info with them (like their public profile, and the people in their circles). This lets your app welcome them by name, display their picture, connect them with friends, and lots more.


Interactive posts

Shares from your app can now include calls to action (like “listen,” “RSVP,” and “check-in”), custom thumbnails, and brand attribution — all of which help them stand out in users’ Google+ streams. Clicking on an interactive post can also deep link to a specific piece of content inside your app, further improving engagement.


App activity that’s useful, not annoying

Users’ app activities will only be visible to the Google+ circles they specify (if any), and they’ll only appear when they’re relevant. Putting users in control, and not spraying their stream builds trust in your app, and encourages meaningful sharing.


Measure and monitor key metrics

Once your Google+ Sign-In integration is live, you’ll be able to measure and monitor downloads, total users, interactive post performance, and other key metrics. To set up Google+ Platform Insights for your Android app, simply connect it with your Google+ page.


More about Google+ Sign-In

To learn more about integrating with Google+ Sign-In, visit our developer docs. You can also read our announcement on the Google+ Developers Blog, or download some of the first apps to include this functionality.


Google Maps Android API v2


This release includes fixes for more than 20 bugs, including half of the top 10 issues filed in the Google Maps API issue tracker. These include improvements to map rendering and the behavior of markers and infowindows.


Also included are features like native support for new map shapes such as circles, anti-clockwise polygons, and the OnMyLocationChangeListener event, which is called when a change in location is detected.


Check out the product documentation for a complete set of release notes.


More About Google Play Services


To learn more about Google Play services and the APIs available to you through it, visit the Google Services area of the Android Developers site.

Get memory information

Example to get memory information using Runtime.

memory information


package com.example.androidmem;

import android.os.Bundle;
import android.app.Activity;
import android.widget.TextView;

public class MainActivity extends Activity {

@Override
protected void onCreate(Bundle savedInstanceState) {
super.onCreate(savedInstanceState);
setContentView(R.layout.activity_main);

TextView memInfo = (TextView)findViewById(R.id.meminfo);

String info = "";

info += "Total memory: " + Runtime.getRuntime().totalMemory() + "\n";
info += "Free memory: " + Runtime.getRuntime().freeMemory() + "\n";
info += "Max memory: " + Runtime.getRuntime().maxMemory() + "\n";

memInfo.setText(info);
}

}


<LinearLayout xmlns:android="http://schemas.android.com/apk/res/android"
xmlns:tools="http://schemas.android.com/tools"
android:layout_width="match_parent"
android:layout_height="match_parent"
android:paddingBottom="@dimen/activity_vertical_margin"
android:paddingLeft="@dimen/activity_horizontal_margin"
android:paddingRight="@dimen/activity_horizontal_margin"
android:paddingTop="@dimen/activity_vertical_margin"
android:orientation="vertical"
tools:context=".MainActivity" >

<TextView
android:layout_width="wrap_content"
android:layout_height="wrap_content"
android:text="@string/hello_world" />
<TextView
android:id="@+id/meminfo"
android:layout_width="wrap_content"
android:layout_height="wrap_content" />

</LinearLayout>


Instant Android Fragmentation Management How-to


There are currently 7 different versions of operating systems for Android. A growing issue is fragmentation. With the number of Android users and the variety of versions available, Android fragmentation is a huge problem. This little book is the solution.

Android Fragmentation Management How-to is a step-by-step guide to writing applications that can run on all devices starting from Android 1.6. With simple solutions for complex problems, this book will walk you through the biggest issues facing Android developers today.

This book will take you through the newest features in the latest version of Android, and shows you how to utilize them in the older versions using the compatibility library. This practical guide allows you to focus on  creating the best application possible without worrying about compatibility.

All the heavy lifting is done for you. Using user interface, adapting your application will work perfectly on any Android operating system. Asynchronous data management will also allow your applications to run smoothly on any device.

Everything you need to run your app on any version of Android is right here.

Approach
Filled with practical, step-by-step instructions and clear explanations for the most important and useful tasks. Get the job done and learn as you go. Written in the easy to understand Packt How-to format, this book offers the solution to the big issues in Android application development.

Who this book is for
If you want the best possible reviews for your apps, regardless of device or Android operating system, then this book is for you.


Instructions for flashing a phone or tablet device with Ubuntu

Ubuntu Wiki post Instructions for flashing a phone or tablet device with Ubuntu.

The Ubuntu Touch Developer Preview is intended to be used for development and evaluation purposes only. It does not provide all of the features and services of a retail phone and cannot replace your current handset. This preview is the first release of a very new and unfinished version of Ubuntu and it will evolve quickly. If you want to install this release, please follow the guide provided, which details the available features and how to navigate the user experience.

This process will delete all data from the device. Restoring Android will not restore this data.


Android SDK Tools and ADT plugin updated Revision 21.1.0


Android SDK Tools updated Revision 21.1.0, you can now update it in Eclipse by select Windows -> Android SDK Manager.

The SDK Tools r21.1.0 is designed for use with ADT 21.1.0 and later, to update ADT in Eclipse, select Help -> Check for updates.

Remark: if you cannot update ADT (No updates were found), double check the setting of your software site (in Help -> Install New Software...), make sure https://dl-ssl.google.com/android/eclipse/ is included. In my case, the default included site is http://dl-ssl.google.com/android/eclipse/, no updates were found at this moment!

HTC One, full press conference led by HTC CEO Peter Chou in London.

HTC One - The Unveiling

introduced the brand new HTC One to the world in London and New York on 19 February, 2013. This is the full press conference led by HTC CEO Peter Chou in London.

Demo video of Google Glass


Android Game Programming For Dummies


Learn how to create great games for Android phones
Android phones are rapidly gaining market share, nudging the iPhone out of the top spot. Games are the most frequently downloaded apps in the Android market, and users are willing to pay for them. Game programming can be challenging, but this step-by-step guide explains the process in easily understood terms. A companion Web site offers all the programming examples for download.
  • Presents tricky game programming topics--animation, battery conservation, touch screen input, and adaptive interface issues--in the straightforward, easy-to-follow For Dummies fashion
  • Explains how to avoid pitfalls and create fun games based on best programming practices for mobile devices
  • A companion web site includes all programming examples
If you have some programming knowledge, Android Game Programming For Dummies will have you creating cool games for the Android platform quickly and easily.


Using Cryptography to Store Credentials Safely

random_droid


Following our talk "Security and Privacy in Android Apps" at Google I/O last year, many people had specific questions about how to use cryptography in Android. Many of those revolved around which APIs to use for a specific purpose. Let's look at how to use cryptography to safely store user credentials, such as passwords and auth tokens, on local storage.


An anti-pattern


A common (but incorrect) pattern that we've recently become aware of is to use SecureRandom as a means of generating deterministic key material, which would then be used to encrypt local credential caches. Examples are not hard to find, such as here, here, here, and elsewhere.


In this pattern, rather than storing an encryption key directly as a string inside an APK, the code uses a proxy string to generate the key instead — similar to a passphrase. This essentially obfuscates the key so that it's not readily visible to attackers. However, a skilled attacker would be able to easily see around this strategy. We don't recommend it.


The fact is, Android's existing security model already provides plenty of protection for this kind of data. User credentials should be stored with the MODE_PRIVATE flag set and stored in internal storage, rather than on an SD card, since permissions aren't enforced on external storage. Combined with device encryption, this provides protection from most types of attacks targeting credentials.


However, there's another problem with using SecureRandom in the way described above. Starting with Android 4.2, the default
SecureRandom provider is OpenSSL, and a developer can no longer override SecureRandom’s internal state. Consider the following code:


SecureRandom secureRandom = new SecureRandom();
byte[] b = new byte[] { (byte) 1 };
secureRandom.setSeed(b);
// Prior to Android 4.2, the next line would always return the same number!
System.out.println(secureRandom.nextInt());


The old Bouncy Castle-based implementation allowed overriding the internally generated, /dev/urandom based key for each SecureRandom instance. Developers which attempted to explicitly seed the random number generator would find that their seed replaces, not supplements, the existing seed (contrary to the reference implementation’s documentation). Under OpenSSL, this error-prone behavior is no longer possible.


Unfortunately, applications who relied on the old behavior will find that the output from SecureRandom changes randomly every time their application starts up. (This is actually a very desirable trait for a random number generator!) Attempting to obfuscate encryption keys in this manner will no longer work.


The right way


A more reasonable approach is simply to generate a truly random AES key when an application is first launched:


public static SecretKey generateKey() throws NoSuchAlgorithmException {
// Generate a 256-bit key
final int outputKeyLength = 256;

SecureRandom secureRandom = new SecureRandom();
// Do *not* seed secureRandom! Automatically seeded from system entropy.
KeyGenerator keyGenerator = KeyGenerator.getInstance("AES");
keyGenerator.init(outputKeyLength, secureRandom);
SecretKey key = keyGenerator.generateKey();
return key;
}


Note that the security of this approach relies on safeguarding the generated key, which is is predicated on the security of the internal storage. Leaving the target file unencrypted (but set to MODE_PRIVATE) would provide similar security.


Even more security


If your app needs additional encryption, a recommended approach is to require a passphase or PIN to access your application. This passphrase could be fed into PBKDF2 to generate the encryption key. (PBKDF2 is a commonly used algorithm for deriving key material from a passphrase, using a technique known as "key stretching".) Android provides an implementation of this algorithm inside SecretKeyFactory as PBKDF2WithHmacSHA1:


public static SecretKey generateKey(char[] passphraseOrPin, byte[] salt) throws NoSuchAlgorithmException, InvalidKeySpecException {
// Number of PBKDF2 hardening rounds to use. Larger values increase
// computation time. You should select a value that causes computation
// to take >100ms.
final int iterations = 1000;

// Generate a 256-bit key
final int outputKeyLength = 256;

SecretKeyFactory secretKeyFactory = SecretKeyFactory.getInstance("PBKDF2WithHmacSHA1");
KeySpec keySpec = new PBEKeySpec(passphraseOrPin, salt, iterations, outputKeyLength);
SecretKey secretKey = secretKeyFactory.generateSecret(keySpec);
return secretKey;
}


The salt should be a random string, again generated using SecureRandom and persisted on internal storage alongside any encrypted data. This is important to mitigate the risk of attackers using a rainbow table to precompute password hashes.


Check your apps for proper use of SecureRandom


As mentioned above and in the New Security Features in Jelly Bean, the default implementation of SecureRandom is changed in Android 4.2. Using it to deterministically generate keys is no longer possible.


If you're one of the developers who's been generating keys the wrong way, we recommend upgrading your app today to prevent subtle problems as more users upgrade to devices running Android 4.2 or later.


File Explorer, access SD Card on Samsung Galaxy S3

In the exercise of "File Explorer", the root is set as Environment.getExternalStorageDirectory(). But if you run it on Samsung Galaxy S3, it cannot access the removable external SD Card. It's because what getExternalStorageDirectory() return is /storage/sdcard0, but the SD Card is mounted on /storage/extSdCard, not under the tree of /storage/sdcard0. To solve this case, we have to set root as Environment.getExternalStorageDirectory().getParent(), it's /storage.

access SD Card on Samsung Galaxy S3


package com.example.androidexplorer;

import java.io.File;
import java.util.ArrayList;
import java.util.Arrays;
import java.util.Comparator;
import java.util.List;

import android.os.Bundle;
import android.os.Environment;
import android.app.AlertDialog;
import android.app.ListActivity;
import android.view.View;
import android.view.View.OnClickListener;
import android.widget.ArrayAdapter;
import android.widget.Button;
import android.widget.ListView;
import android.widget.TextView;

public class MainActivity extends ListActivity {

private List<String> item = null;
private List<String> path = null;
private String root;
private TextView myPath;

private String currentPath;
Comparator<? super File> comparator;

@Override
public void onCreate(Bundle savedInstanceState) {
super.onCreate(savedInstanceState);
setContentView(R.layout.activity_main);
myPath = (TextView)findViewById(R.id.path);

comparator = filecomparatorByAlphabetically;
//root = Environment.getExternalStorageDirectory().getPath();
root = Environment.getExternalStorageDirectory().getParent();
getDir(root);

Button btnAlphabetically = (Button)findViewById(R.id.button_alphabetically);
btnAlphabetically.setOnClickListener(new OnClickListener(){

@Override
public void onClick(View arg0) {
comparator = filecomparatorByAlphabetically;
getDir(currentPath);

}});

Button btnLastDateModified = (Button)findViewById(R.id.button_lastDateModified);
btnLastDateModified.setOnClickListener(new OnClickListener(){

@Override
public void onClick(View arg0) {
comparator = filecomparatorByLastModified;
getDir(currentPath);

}});
}

private void getDir(String dirPath)
{
currentPath = dirPath;

myPath.setText("Location: " + dirPath);
item = new ArrayList<String>();
path = new ArrayList<String>();
File f = new File(dirPath);
File[] files = f.listFiles();

if(!dirPath.equals(root))
{
item.add(root);
path.add(root);
item.add("../");
path.add(f.getParent());
}

Arrays.sort(files, comparator);

for(int i=0; i < files.length; i++)
{
File file = files[i];

if(!file.isHidden() && file.canRead()){
path.add(file.getPath());
if(file.isDirectory()){
item.add(file.getName() + "/");
}else{
item.add(file.getName());
}
}
}

ArrayAdapter<String> fileList =
new ArrayAdapter<String>(this, R.layout.row, item);
setListAdapter(fileList);
}

Comparator<? super File> filecomparatorByLastModified = new Comparator<File>(){

public int compare(File file1, File file2) {

if(file1.isDirectory()){
if (file2.isDirectory()){
return Long.valueOf(file1.lastModified()).compareTo(file2.lastModified());
}else{
return -1;
}
}else {
if (file2.isDirectory()){
return 1;
}else{
return Long.valueOf(file1.lastModified()).compareTo(file2.lastModified());
}
}

}
};

Comparator<? super File> filecomparatorByAlphabetically = new Comparator<File>(){

public int compare(File file1, File file2) {

if(file1.isDirectory()){
if (file2.isDirectory()){
return String.valueOf(file1.getName().toLowerCase()).compareTo(file2.getName().toLowerCase());
}else{
return -1;
}
}else {
if (file2.isDirectory()){
return 1;
}else{
return String.valueOf(file1.getName().toLowerCase()).compareTo(file2.getName().toLowerCase());
}
}

}
};

@Override
protected void onListItemClick(ListView l, View v, int position, long id) {
// TODO Auto-generated method stub
File file = new File(path.get(position));

if (file.isDirectory())
{
if(file.canRead()){
getDir(path.get(position));
}else{
new AlertDialog.Builder(this)
.setIcon(R.drawable.ic_launcher)
.setTitle("[" + file.getName() + "] folder can't be read!")
.setPositiveButton("OK", null).show();
}
}else {
new AlertDialog.Builder(this)
.setIcon(R.drawable.ic_launcher)
.setTitle("[" + file.getName() + "]")
.setPositiveButton("OK", null).show();

}
}

}


download filesDownload the files.

Please notice that it's not a standard approach. For example, if you run it on Nexus One, you will see some un-expected folder in /storage.

Run on Nexus One

SharedPreferences.Editor for RadioButton in RadioGroup

Last post demonstrate how to "Read index of the checked RadioButton in RadioGroup" and explain why you cannot save in SharedPreferences.Editor base on IDs. This exercise demonstrate how to save the checked index of RadioButton in RadioGroup using SharedPreferences.Editor.

save the checked index of RadioButton in RadioGroup using SharedPreferences.Editor.


package com.example.androidradiogroup;

import android.os.Bundle;
import android.widget.RadioButton;
import android.widget.RadioGroup;
import android.widget.RadioGroup.OnCheckedChangeListener;
import android.widget.TextView;
import android.app.Activity;
import android.content.SharedPreferences;

public class MainActivity extends Activity {

RadioGroup radioGroup;
TextView textCheckedID, textCheckedIndex;

final String KEY_SAVED_RADIO_BUTTON_INDEX = "SAVED_RADIO_BUTTON_INDEX";

@Override
protected void onCreate(Bundle savedInstanceState) {
super.onCreate(savedInstanceState);
setContentView(R.layout.activity_main);
radioGroup = (RadioGroup)findViewById(R.id.radiogroup);
radioGroup.setOnCheckedChangeListener(radioGroupOnCheckedChangeListener);

textCheckedID = (TextView)findViewById(R.id.checkedid);
textCheckedIndex = (TextView)findViewById(R.id.checkedindex);

LoadPreferences();
}

OnCheckedChangeListener radioGroupOnCheckedChangeListener =
new OnCheckedChangeListener(){

@Override
public void onCheckedChanged(RadioGroup group, int checkedId) {

RadioButton checkedRadioButton = (RadioButton)radioGroup.findViewById(checkedId);
int checkedIndex = radioGroup.indexOfChild(checkedRadioButton);

textCheckedID.setText("checkedID = " + checkedId);
textCheckedIndex.setText("checkedIndex = " + checkedIndex);
SavePreferences(KEY_SAVED_RADIO_BUTTON_INDEX, checkedIndex);
}};

private void SavePreferences(String key, int value){
SharedPreferences sharedPreferences = getSharedPreferences("MY_SHARED_PREF", MODE_PRIVATE);
SharedPreferences.Editor editor = sharedPreferences.edit();
editor.putInt(key, value);
editor.commit();
}

private void LoadPreferences(){
SharedPreferences sharedPreferences = getSharedPreferences("MY_SHARED_PREF", MODE_PRIVATE);
int savedRadioIndex = sharedPreferences.getInt(KEY_SAVED_RADIO_BUTTON_INDEX, 0);
RadioButton savedCheckedRadioButton = (RadioButton)radioGroup.getChildAt(savedRadioIndex);
savedCheckedRadioButton.setChecked(true);
}
}


<LinearLayout xmlns:android="http://schemas.android.com/apk/res/android"
xmlns:tools="http://schemas.android.com/tools"
android:layout_width="match_parent"
android:layout_height="match_parent"
android:orientation="vertical"
tools:context=".MainActivity" >

<TextView
android:layout_width="wrap_content"
android:layout_height="wrap_content"
android:text="@string/hello_world" />

<RadioGroup
android:id="@+id/radiogroup"
android:layout_width="fill_parent"
android:layout_height="wrap_content"
android:orientation="vertical">
<RadioButton
android:id="@+id/option1"
android:layout_width="wrap_content"
android:layout_height="wrap_content"
android:text="Option 1" />
<RadioButton
android:id="@+id/option2"
android:layout_width="wrap_content"
android:layout_height="wrap_content"
android:text="Option 2" />
<RadioButton
android:id="@+id/option3"
android:layout_width="wrap_content"
android:layout_height="wrap_content"
android:text="Option 3" />
</RadioGroup>

<TextView
android:id="@+id/checkedid"
android:layout_width="wrap_content"
android:layout_height="wrap_content" />
<TextView
android:id="@+id/checkedindex"
android:layout_width="wrap_content"
android:layout_height="wrap_content" />

</LinearLayout>

Related:
- Example of using SharedPreferences.Editor; getPreferences() for a single activity.
- Use getSharedPreferences() to retrieve a preferences object shared across multiple activity.


Read index of the checked RadioButton in RadioGroup

This example demonstrate how to get the index of the checked RadioButton in RadioGroup.

Read index of the checked RadioButton in RadioGroup


package com.example.androidradiogroup;

import android.os.Bundle;
import android.widget.RadioButton;
import android.widget.RadioGroup;
import android.widget.RadioGroup.OnCheckedChangeListener;
import android.widget.TextView;
import android.app.Activity;

public class MainActivity extends Activity {

RadioGroup radioGroup;
TextView textCheckedID, textCheckedIndex;

@Override
protected void onCreate(Bundle savedInstanceState) {
super.onCreate(savedInstanceState);
setContentView(R.layout.activity_main);
radioGroup = (RadioGroup)findViewById(R.id.radiogroup);
radioGroup.setOnCheckedChangeListener(radioGroupOnCheckedChangeListener);

textCheckedID = (TextView)findViewById(R.id.checkedid);
textCheckedIndex = (TextView)findViewById(R.id.checkedindex);

}

OnCheckedChangeListener radioGroupOnCheckedChangeListener =
new OnCheckedChangeListener(){

@Override
public void onCheckedChanged(RadioGroup group, int checkedId) {

RadioButton checkedRadioButton = (RadioButton)radioGroup.findViewById(checkedId);
int checkedIndex = radioGroup.indexOfChild(checkedRadioButton);

textCheckedID.setText("checkedID = " + checkedId);
textCheckedIndex.setText("checkedIndex = " + checkedIndex);
}};

}


<LinearLayout xmlns:android="http://schemas.android.com/apk/res/android"
xmlns:tools="http://schemas.android.com/tools"
android:layout_width="match_parent"
android:layout_height="match_parent"
android:orientation="vertical"
tools:context=".MainActivity" >

<TextView
android:layout_width="wrap_content"
android:layout_height="wrap_content"
android:text="@string/hello_world" />

<TextView
android:id="@+id/checkedid"
android:layout_width="wrap_content"
android:layout_height="wrap_content" />
<TextView
android:id="@+id/checkedindex"
android:layout_width="wrap_content"
android:layout_height="wrap_content" />

<RadioGroup
android:id="@+id/radiogroup"
android:layout_width="fill_parent"
android:layout_height="wrap_content"
android:orientation="vertical">
<RadioButton
android:id="@+id/option1"
android:layout_width="wrap_content"
android:layout_height="wrap_content"
android:text="Option 1" />
<RadioButton
android:id="@+id/option2"
android:layout_width="wrap_content"
android:layout_height="wrap_content"
android:text="Option 2" />
<RadioButton
android:id="@+id/option3"
android:layout_width="wrap_content"
android:layout_height="wrap_content"
android:text="Option 3" />
</RadioGroup>

</LinearLayout>


Please note that you cannot assume the checkedId passed to onCheckedChanged() of OnCheckedChangeListener always same for the same button. Specially when you want to set Preference for RadioButton in RadioGroup. The ADT will re-generate the IDs base on your layout. So, after you modify the layout, the IDs will be changed. I read some posts advise keep preference of RadioButton in RadioGroup base on the checkID. Yes, it work if you will not update your APK in the furture.

The IDs changed after re-layout


Next:
- SharedPreferences.Editor for RadioButton in RadioGroup


Back to Home Screen directly using ACTION_MAIN with category CATEGORY_HOME

If you want to go to Home Screen directly, using the code:


Intent intent = new Intent(Intent.ACTION_MAIN);
intent.addCategory(Intent.CATEGORY_HOME);
startActivity(intent);


Python for Android

Python for android is a project to create your own Python distribution including the modules you want, and create an apk including python, libs, and your application.

know more: http://python-for-android.readthedocs.org/

Get user last know location

There are two location provider in Android, NETWORK_PROVIDER and GPS_PROVIDER. In case you want to get last known user location, which one you should use?

It's a example to get last know location from both NETWORK_PROVIDER and GPS_PROVIDER, and choice the provider base on its accuracy.

Get user last know location


Please note that:
- More accuracy not means most recent in time.
- If no accuracy, 0.0 will be return from getLastKnownLocation() method. The code haven't concern this case.
- The code get last known location one time only, if you have to monitor continuously, and estimate the best location, refer Android documenet here.

Main code:
package com.example.androidmylocation;

import android.location.Location;
import android.location.LocationManager;
import android.os.Bundle;
import android.widget.TextView;
import android.app.Activity;
import android.content.Context;

public class MainActivity extends Activity {

TextView textView_GpsLocation, textView_NetworkLocation, textView_MyLocation;

final String gpsLocationProvider = LocationManager.GPS_PROVIDER;
final String networkLocationProvider = LocationManager.NETWORK_PROVIDER;

@Override
protected void onCreate(Bundle savedInstanceState) {
super.onCreate(savedInstanceState);
setContentView(R.layout.activity_main);
textView_GpsLocation = (TextView)findViewById(R.id.textgpslocation);
textView_NetworkLocation = (TextView)findViewById(R.id.textnetworklocation);
textView_MyLocation = (TextView)findViewById(R.id.textmylocation);


LocationManager locationManager =
(LocationManager)this.getSystemService(Context.LOCATION_SERVICE);

Location lastKnownLocation_byGps =
locationManager.getLastKnownLocation(gpsLocationProvider);
Location lastKnownLocation_byNetwork =
locationManager.getLastKnownLocation(networkLocationProvider);

if(lastKnownLocation_byGps==null){
textView_GpsLocation.setText("GPS Last Location not available");

if(lastKnownLocation_byNetwork==null){
textView_NetworkLocation.setText("Network Last Location not available");
textView_MyLocation.setText("No Last Known Location!");
}else{
textView_NetworkLocation.setText("Network Location:\n" + lastKnownLocation_byNetwork.toString());

textView_MyLocation.setText(
"My Location is " + lastKnownLocation_byNetwork.getLatitude() +
" : " + lastKnownLocation_byNetwork.getLongitude());
}


}else{
textView_GpsLocation.setText("GPS Location:\n" + lastKnownLocation_byGps.toString());

if(lastKnownLocation_byNetwork==null){
textView_NetworkLocation.setText("Network Last Location not available");
textView_MyLocation.setText(
"My Location is " + lastKnownLocation_byGps.getLatitude() +
" : " + lastKnownLocation_byGps.getLongitude());
}else{
textView_NetworkLocation.setText("Network Location:\n" + lastKnownLocation_byNetwork.toString());

//Both Location provider have last location
//decide location base on accuracy
if(lastKnownLocation_byGps.getAccuracy() <= lastKnownLocation_byNetwork.getAccuracy()){
textView_MyLocation.setText(
"My Location from GPS\n" + lastKnownLocation_byGps.getLatitude() +
" : " + lastKnownLocation_byGps.getLongitude());
}else{
textView_MyLocation.setText(
"My Location from Network\n" + lastKnownLocation_byNetwork.getLatitude() +
" : " + lastKnownLocation_byNetwork.getLongitude());
}

}
}

}

}


Layout:
<LinearLayout xmlns:android="http://schemas.android.com/apk/res/android"
xmlns:tools="http://schemas.android.com/tools"
android:layout_width="match_parent"
android:layout_height="match_parent"
android:orientation="vertical"
tools:context=".MainActivity" >

<TextView
android:layout_width="wrap_content"
android:layout_height="wrap_content"
android:text="@string/hello_world" />
<TextView
android:id="@+id/textgpslocation"
android:layout_width="wrap_content"
android:layout_height="wrap_content" />
<TextView
android:id="@+id/textnetworklocation"
android:layout_width="wrap_content"
android:layout_height="wrap_content" />
<TextView
android:id="@+id/textmylocation"
android:layout_width="wrap_content"
android:layout_height="wrap_content"
android:textStyle="bold" />

</LinearLayout>


In order to use both NETWORK_PROVIDER and GPS_PROVIDER, only the ACCESS_FINE_LOCATION permission is need, because it includes permission for both providers. (Permission for ACCESS_COARSE_LOCATION includes permission only for NETWORK_PROVIDER.)

download filesDownload the files.

Security Enhancements in Jelly Bean

Posted by Fred Chung, Android Developer Relations team


Android 4.2, Jelly Bean, introduced quite a few new features, and under the covers it also added a number of security enhancements to ensure a more secure environment for users and developers.


This post highlights a few of the security enhancements in Android 4.2 that are especially important for developers to be aware of and understand. Regardless whether you are targeting your app to devices running Jelly Bean or to earlier versions of Android, it's a good idea to validate these areas in order to make your app more secure and robust.


Content Provider default access has changed


Content providers are a facility to enable data sharing amongst app and system components. Access to content providers should always be based on the principle of least privilege — that is, only grant the minimal possible access for another component to carry out the necessary tasks. You can control access to your content providers through a combination of the exported attribute in the provider declaration and app-specific permissions for reading/writing data in the provider.


In the example below, the provider ReadOnlyDataContentProvider sets the exported attribute to "true", explicitly declaring that it is readable by any external app that has acquired the READ_DATA permission, and that no other components can write to it.


<provider android:name=”com.example.ReadOnlyDataContentProvider”
android:authorities=”com.example”
android:exported=”true”
android:readPermission=”com.example.permission.READ_DATA” />


Since the exported attribute is an optional field, potential ambiguity arises when the field is not explicitly declared in the manifest, and that is where the behavior has changed in Android 4.2.


Prior to Jelly Bean, the default behavior of the exported field was that, if omitted, the content provider was assumed to be "exported" and accessible from other apps (subject to permissions). For example, the content provider below would be readable and writable by other apps (subject to permissions) when running on Android 4.1 or earlier. This default behavior is undesirable for sensitive data sources.


<provider android:name=”com.example.ReadOnlyDataContentProvider”
android:authorities=”com.example” />


Starting in Android 4.2, the default behavior for the same provider is now “not exported”, which prevents the possibility of inadvertent data sharing when the attribute is not declared. If either the minSdkVersion or targetSdkVersion of your app is set to 17 or higher, the content provider will no longer be accessible by other apps by default.


While this change helps to avoid inadvertent data sharing, it remains the best practice to always explicitly declare the exported attribute, as well as declaring proper permissions, to avoid confusion. In addition, we strongly encourage you to make use of Android Lint, which among other things will flag any exported content providers (implicit or explicit) that aren't protected by any permissions.


New implementation of SecureRandom


Android 4.2 includes a new default implementation of SecureRandom based on OpenSSL. In the older Bouncy Castle-based implementation, given a known seed, SecureRandom could technically (albeit incorrectly) be treated as a source of deterministic data. With the new OpenSSL-based implementation, this is no longer possible.


In general, the switch to the new SecureRandom implementation should be transparent to apps. However, if your app is relying on SecureRandom to generate deterministic data, such as keys for encrypting data, you may need to modify this area of your app. For example, if you have been using SecureRandom to retrieve keys for encrypting/decrypting content, you will need to find another means of doing that.


A recommended approach is to generate a truly random AES key upon first launch and store that key in internal storage. For more information, see the post "Using Cryptography to Store Credentials Safely".


JavascriptInterface methods in WebViews must now be annotated


Javascript hosted in a WebView can directly invoke methods in an app through a JavaScript interface. In Android 4.1 and earlier, you could enable this by passing an object to the addJavascriptInterface() method and ensuring that the object methods intended to be accessible from JavaScript were public.


On the one hand, this was a flexible mechanism; on the other hand, any untrusted content hosted in a WebView could potentially use reflection to figure out the public methods within the JavascriptInterface object and could then make use of them.


Beginning in Android 4.2, you will now have to explicitly annotate public methods with @JavascriptInterface in order to make them accessible from hosted JavaScript. Note that this also only takes effect only if you have set your app's minSdkVersion or targetSdkVersion to 17 or higher.


// Annotation is needed for SDK version 17 or above.
@JavascriptInterface
public void doSomething(String input) {
. . .
}


Secure USB debugging


Android 4.2.2 introduces a new way of protecting your apps and data on compatible devices — secure USB debugging. When enabled on a device, secure debugging ensures that only host computers authorized by the user can access the internals of a USB-connected device using the ADB tool included in the Android SDK.


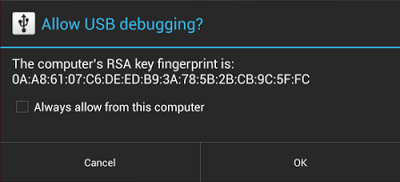
Secure debugging is an extension of the ADB protocol that requires hosts to authenticate before accessing any ADB services or commands. At first launch, ADB generates an RSA key pair to uniquely identifies the host. Then, when you connect a device that requires secure debugging, the system displays an authorization dialog such as the one shown below.


The user can allow USB debugging for the host for a single session or can give automatic access for all future sessions. Once a host is authorized, you can execute ADB commands for the device in the normal way. Until the device is authorized, it remains in "offline" state, as listed in the adb devices command.


For developers, the change to USB debugging should be largely transparent. If you've updated your SDK environment to include ADB version 1.0.31 (available with SDK Platform-tools r16.0.1 and higher), all you need to do is connect and authorize your device(s). If your development device appears in "offline" state, you may need to update ADB. To so so, download the latest Platform Tools release through the SDK Manager.


Secure USB debugging is enabled in the Android 4.2.2 update that is now rolling out to Nexus devices across the world. We expect many more devices to enable secure debugging in the months ahead.


More information about security best practices


For a full list of security best practices for Android apps, make sure to take a look at the Security Tips document.


The Copy Protection feature of Android App is being deprecated

Google is standardizing on two primary tools for helping developers protect against unauthorized copying: app encryption in Jelly Bean and the Licensing Service for all platforms. The older Copy Protection feature, which announced have be deprecating back in 2010, is now going away in favor of these more advanced tools. The Copy Protection feature will no longer be available in the Developer Console starting February 27, 2013 and will no longer be applied on new downloads in Google Play very soon after that. If your app has been using this feature and you would like to continue to protect against unauthorized copying, please begin using the Licensing Service. 

Learn more.

New Google Now: More of the information you need, at just the right time.

When computers do the hard work, you can get on with the things that matter in life. Google Now helps you do just that, giving you the information you need, before you even have to ask. Like updating you with flight times, pulling up your boarding pass when you arrive at the airport, or showing you the weather at your next travel destination. Today, we’re making Google Now even more useful by integrating new partners and making all your information even easier to access.

Going to the movies? Movie cards now include the latest ratings from Rotten Tomatoes, so you can pick the right movie. Purchase your tickets through Fandango, and Google Now will remind you when you need to leave for the theater, and pull up your tickets once you arrive.


In the market for a new home? Google Now can provide you with nearby real estate listings from Zillow. Plus, when you are checking out that remodeled kitchen at the open house, Now will automatically pull up more information about the listing.


Of course, all of this information is most helpful when it’s front and center and ready when you are. The new Google Now widget brings all your important Now cards to your home or lock screen, so you don’t even have to open the app.


When Google Now first launched last summer, we promised it was just the beginning, and it would continue to get better at delivering you more of the information you need, before you even ask. This is the fourth update since launch, and we’re just getting started!


To try out these new cards, get the latest version of the Google Search app for Android, available on Google Play for devices running Android 4.1 and above.

Posted by Baris Gultekin, Product Management Director

Convert between LatLng and Location

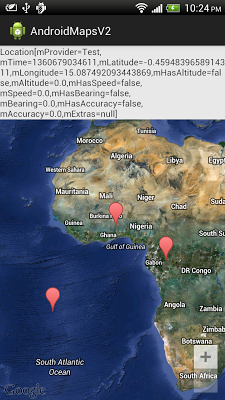
This example demonstrate how to convert between LatLng and Location. Refer onMapClick() in the code.

Convert between LatLng and Location


package com.example.androidmapsv2;

import java.util.Date;

import com.google.android.gms.maps.GoogleMap;
import com.google.android.gms.maps.GoogleMap.OnMapClickListener;
import com.google.android.gms.maps.MapFragment;
import com.google.android.gms.maps.model.LatLng;
import com.google.android.gms.maps.model.MarkerOptions;

import android.location.Location;
import android.os.Bundle;
import android.app.Activity;
import android.app.FragmentManager;
import android.widget.TextView;

public class MainActivity extends Activity
implements OnMapClickListener{

private GoogleMap myMap;

TextView info;

@Override
protected void onCreate(Bundle savedInstanceState) {
super.onCreate(savedInstanceState);
setContentView(R.layout.activity_main);

FragmentManager myFragmentManager = getFragmentManager();
MapFragment myMapFragment =
(MapFragment)myFragmentManager.findFragmentById(R.id.map);
myMap = myMapFragment.getMap();

myMap.setOnMapClickListener(this);

info = (TextView)findViewById(R.id.info);

myMap.setMapType(GoogleMap.MAP_TYPE_HYBRID);
myMap.getUiSettings().setZoomControlsEnabled(true);
myMap.getUiSettings().setCompassEnabled(true);
myMap.getUiSettings().setAllGesturesEnabled(true);
}


@Override
public void onMapClick(LatLng point) {
//myMap.addMarker(new MarkerOptions().position(point).title(point.toString()));

//The code below demonstrate how to convert between LatLng and Location

//Convert LatLng to Location
Location location = new Location("Test");
location.setLatitude(point.latitude);
location.setLongitude(point.longitude);
location.setTime(new Date().getTime()); //Set time as current Date
info.setText(location.toString());

//Convert Location to LatLng
LatLng newLatLng = new LatLng(location.getLatitude(), location.getLongitude());

MarkerOptions markerOptions = new MarkerOptions()
.position(newLatLng)
.title(newLatLng.toString());

myMap.addMarker(markerOptions);

}

}


<LinearLayout xmlns:android="http://schemas.android.com/apk/res/android"
xmlns:tools="http://schemas.android.com/tools"
android:layout_width="match_parent"
android:layout_height="match_parent"
android:orientation="vertical"
tools:context=".MainActivity" >

<TextView
android:id="@+id/info"
android:layout_width="match_parent"
android:layout_height="wrap_content" />

<fragment
android:id="@+id/map"
android:layout_width="match_parent"
android:layout_height="match_parent"
class="com.google.android.gms.maps.MapFragment"/>

</LinearLayout>


The series:
A simple example using Google Maps Android API v2, step by step.