Posted by Reto Meier, Android Developer Relations Tech Lead
We had a lot to talk about this year at I/O. We launched Google Play services 3.1 with Google Play games services, improved Location APIs, and Google Cloud Messaging enhancements; Android Studio: A new IDE for Android development based on IntelliJ IDEA Community Edition; and Google Play Developer Console improvements such as app translation service, revenue graphs, beta testing & staged rollouts, and optimization tips.
With the excitement of these announcements behind us, it's time to sit back, relax, and watch all the sessions we missed during the event. To make that easier, we've collected all the Android sessions together in the Android @ Google I/O 13 page on the developer site.
We've also created the Google I/O 13 - The Android Sessions playlist (embedded below), as well as playlists for each developer category: design, develop, and distribute.
For those of you who prefer listening to your I/O talks without the distraction of watching speakers and slides, we're also making the sessions available as part of the Android Developers Live Podcast.
Google I/O is always a highlight on the Android Developer Relations team's calendar, so we'll be keeping the magic alive with our Android Developers Live broadcasts.
This week we resumed our regular broadcasts with Android Design in Action offering a review of Android Design sessions at I/O. Next week will see the return of This Week in Android Development and The App Clinic, and stay tuned for more episodes of Table Flip, GDG App Clinics, and more!
We'll also continue to add new DevBytes and BizDevBytes to offer tips and tricks for improving your apps and making them more successful.
As always you can talk to us and keep track of our upcoming broadcasts, Android Studio news, and other Android developer news on the +Android Developers Google+ page.
Handling Phone Call Requests the Right Way for Users
Posted by Dirk Dougherty, Android Developer Relations
One of the things users like most about Android is the flexibility to choose which apps should handle common tasks on their devices — from opening a web page or sending an SMS to playing a music file, taking a picture, or making phone calls. This flexibility is provided by Intents.
Intents give you a powerful way to integrate your apps deeply into the system — users can even choose to let your apps replace functionality provided by system apps. In those cases, it’s essential to make sure that anything your app can’t or doesn’t handle can still be handled properly by the default system app.
Proper implementation and testing are especially important for apps that provide telephony services. Make sure that your app doesn't interfere with emergency calling by listening for the wrong intent — CALL_PRIVILEGED. Follow the best practices below to handle outgoing calls the right way, using the NEW_OUTGOING_CALL intent.
Listening for outgoing call requests
Apps that provide phone calling services (such as VOIP or number management) can set up Intent filters to handle outgoing call requests, such as those made from the Dialer or other installed apps. This provides a seamless integration for the user, who can transition directly to the calling service without having to redial or launch another app.
When the user initiates a call, the system notifies interested apps by sending an ordered broadcast of the NEW_OUTGOING_CALL Intent, attaching the original phone number, URI, and other information as extras. This gives apps such as Google Voice and others a chance to modify, reroute, or cancel the call before it’s passed to the system’s default phone app.
If you want your phone calling app to be able to handle outgoing call requests, implement a broadcast receiver that receives the NEW_OUTGOING_CALL Intent, processes the number, and initiates a call as needed. Make sure to declare an intent filter for NEW_OUTGOING_CALL in the receiver, to let the system know that your app is interested in the broadcast. You’ll also need to request the PROCESS_OUTGOING_CALLS permission in order to receive the Intent.
Note that the system broadcasts NEW_OUTGOING_CALL only for numbers that are not associated with core dialing capabilities such as emergency numbers. This means that NEW_OUTGOING_CALL can not interfere with access to emergency services the way your use of CALL_PRIVILEGED might.
Here’s an example broadcast receiver declared in an app’s manifest file:
<manifest>
    <uses-permission android:name="android.permission.PROCESS_OUTGOING_CALLS" />
    <application>
        ...
        <receiver android:name=MyOutgoingCallHandler">
            <intent-filter>
                <action android:name="android.intent.action.NEW_OUTGOING_CALL" />
                <category android:name="android.intent.category.DEFAULT" />
            </intent-filter>
        </receiver>
        ...
    </application>
</manifest>
The implementation of the corresponding broadcast receiver would look something like this:
public class MyOutgoingCallHandler extends BroadcastReceiver {
  @Override
  public void onReceive(Context context, Intent intent) {
    // Extract phone number reformatted by previous receivers
    String phoneNumber = getResultData();
    if (phoneNumber == null) {
      // No reformatted number, use the original
      phoneNumber = intent.getStringExtra(Intent.EXTRA_PHONE_NUMBER);
    }
    // My app will bring up the call, so cancel the broadcast
    setResultData(null);
    // Start my app to bring up the call
    ...
  }
}
Because the NEW_OUTGOING_CALL broadcast is ordered, your app can choose whether to consume the call request itself or simply process the number and pass the result data on to other apps that may be interested. In this example, the broadcast receiver brings up a phone call on it’s own service and sets the result data to null. This prevents the call request from reaching the default phone app.
An anti-pattern
Rather than listening for NEW_OUTGOING_CALL Intents, some apps have mistakenly set up intent filters for CALL_PRIVILEGED Intents as a way to handle outgoing calls. This is not a recommended approach, because the system may send a CALL_PRIVILEGED Intent for any number, including emergency numbers. Since non-system apps can’t reformat emergency numbers or place emergency calls, attempting to handle CALL_PRIVILEGED could inadvertently interfere with access to emergency numbers.
CALL_PRIVILEGED should only be used by apps that have the necessary signatureOrSystem-level permission — it is not designed for use by any third-party apps.
Check your apps for proper use of NEW_OUTGOING_CALL
If your app provides phone calling services and already uses intent filters to handle outgoing call requests, take a few minutes to make sure it is listening for the proper Intent: NEW_OUTGOING_CALL.
If your app includes intent filters that listen for CALL_PRIVILEGED Intents, make sure to remove those filters and related code from the app (in favor of NEW_OUTGOING_CALL) and publish the updated app as soon as possible.
Google Calendar Update for Android: Custom Colors and More
One of the most requested features we’ve seen so far for Google Calendar on Android is the ability to customize event and calendar colors directly from your device. Today’s update allows you to do just that. Now you can highlight those super-urgent meetings and important birthdays, or just switch up the color of your calendar whenever your heart desires.

Adding events is now easier and more fun with our redesigned date and time pickers, which let you schedule your special dinner date or the start of your well-deserved vacation in a snap.
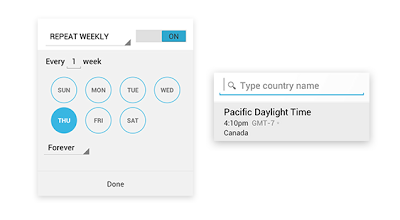
For all of you world travelers, our redesigned timezone picker makes it simpler to find the region that you’re looking for, whether you’re in San Francisco, Tokyo or Zurich.
Finally, it’s easier to schedule repeating events. You can now set events to repeat every Tuesday and Thursday, every month, or every 7 weeks, it’s completely up to you.
The latest version of Google Calendar is built for devices running Android 4.0.3 and above (Android 4.1 or higher for custom event colors). Get it on Google Play, rolling out over the course of the day, and let us know what you think.
Posted by James Kung, Software Engineer
Get video size for MediaPlayer by implementing onVideoSizeChanged()
Further work on the exercise "Simple example to play stream video from internet using MediaPlayer" and "Release MediaPlayer in onDestroy() and onPause()", to get video size we can implement onVideoSizeChanged().
")
Modify MainActivity.java
 Download the files.
")
- Define your Activity with implements OnVideoSizeChangedListener
- Implement your OnVideoSizeChangedListener(), update SurfaceHolder accordingly by calling its setFixedSize() method
- Register your OnVideoSizeChangedListener by calling mediaPlayer.setOnVideoSizeChangedListener(this)
Modify MainActivity.java
package com.example.androidmediaplayer;

import java.io.IOException;

import android.media.AudioManager;
import android.media.MediaPlayer;
import android.media.MediaPlayer.OnPreparedListener;
import android.media.MediaPlayer.OnVideoSizeChangedListener;
import android.os.Bundle;
import android.view.SurfaceHolder;
import android.view.SurfaceView;
import android.widget.Toast;
import android.app.Activity;

public class MainActivity extends Activity
 implements SurfaceHolder.Callback,
 OnPreparedListener, OnVideoSizeChangedListener{

 MediaPlayer mediaPlayer;
 SurfaceHolder surfaceHolder;
 SurfaceView playerSurfaceView;
 String videoSrc = "rtsp://v6.cache1.c.youtube.com/CjYLENy73wIaLQkDsLHya4-Z9hMYDSANFEIJbXYtZ29vZ2xlSARSBXdhdGNoYKX4k4uBjbOiUQw=/0/0/0/video.3gp";

 int videoWidth, videoHeight;

 @Override
 protected void onCreate(Bundle savedInstanceState) {
  super.onCreate(savedInstanceState);
  setContentView(R.layout.activity_main);
  playerSurfaceView = (SurfaceView)findViewById(R.id.playersurface);

        surfaceHolder = playerSurfaceView.getHolder();
        surfaceHolder.addCallback(this);
 }

 @Override
 public void surfaceChanged(SurfaceHolder arg0, int arg1, int arg2, int arg3) {
  // TODO Auto-generated method stub

 }

 @Override
 public void surfaceCreated(SurfaceHolder arg0) {

        try {
         mediaPlayer = new MediaPlayer();
            mediaPlayer.setDisplay(surfaceHolder);
   mediaPlayer.setDataSource(videoSrc);
   mediaPlayer.prepare();
   mediaPlayer.setOnPreparedListener(this);
   mediaPlayer.setOnVideoSizeChangedListener(this);
   mediaPlayer.setAudioStreamType(AudioManager.STREAM_MUSIC);
  } catch (IllegalArgumentException e) {
   // TODO Auto-generated catch block
   e.printStackTrace();
  } catch (SecurityException e) {
   // TODO Auto-generated catch block
   e.printStackTrace();
  } catch (IllegalStateException e) {
   // TODO Auto-generated catch block
   e.printStackTrace();
  } catch (IOException e) {
   // TODO Auto-generated catch block
   e.printStackTrace();
  }
 }

 @Override
 public void surfaceDestroyed(SurfaceHolder arg0) {
  // TODO Auto-generated method stub

 }

 @Override
 public void onPrepared(MediaPlayer mp) {
  surfaceHolder.setFixedSize(videoWidth, videoHeight);
  mediaPlayer.start();
 }

 @Override
 protected void onDestroy() {
  // TODO Auto-generated method stub
  super.onDestroy();
  if (mediaPlayer != null) {
   mediaPlayer.release();
   mediaPlayer = null;
  }
 }

 @Override
 protected void onPause() {
  // TODO Auto-generated method stub
  super.onPause();
  if (mediaPlayer != null) {
   mediaPlayer.release();
   mediaPlayer = null;
  }
 }

 @Override
 public void onVideoSizeChanged(MediaPlayer mp, int width, int height) {
  videoWidth = width;
  videoHeight = height;
  Toast.makeText(getApplicationContext(),
    String.valueOf(videoWidth) + "x" + String.valueOf(videoHeight),
    Toast.LENGTH_SHORT).show();

  if (mediaPlayer.isPlaying()){
   surfaceHolder.setFixedSize(videoWidth, videoHeight);
  }
 }

}
Processing + Android
Processing is an open source programming language and environment for people who want to create images, animations, and interactions. Initially developed to serve as a software sketchbook and to teach fundamentals of computer programming within a visual context, Processing also has evolved into a tool for generating finished professional work. Today, there are tens of thousands of students, artists, designers, researchers, and hobbyists who use Processing for learning, prototyping, and production.
 Processing for Android project is aim to make it foolishly easy to create Android apps using the Processing API. Once you have Processing on your machine (and the Android developer tools), you can simply write a line of code, hit Run (Ctrl-R or Cmd-R), and have your sketch show up in the emulator as a working Android app. Select Run on Device (Ctrl-Shift-R or Cmd-Shift-R) to have it run on an Android device that you have plugged into your machine. That's good stuff!
Read Tutorial to develop Android App with Processing version 2.0+.

Next:
- Download and install Processing software
- Setup Processing for Android development
- Hello World of Processing for Android
- Free to download and open source
- Interactive programs using 2D, 3D or PDF output
- OpenGL integration for accelerated 3D
- For GNU/Linux, Mac OS X, and Windows
- Projects run online or as double-clickable applications
- Over 100 libraries extend the software into sound, video, computer vision, and more...
- Well documented, with many books available
Read Tutorial to develop Android App with Processing version 2.0+.
Next:
- Download and install Processing software
- Setup Processing for Android development
- Hello World of Processing for Android
Release MediaPlayer in onDestroy() and onPause()
If you try run the last exercise of "Simple example of using MediaPlayer", you can notice that if you exit the app, the sound will still playing, and then switch back to the app, both old sound and new sound will overlap.
Actually, you have to release the MediaPlayer in onDestroy() and onPause(), when the app exit. Or any other handling method, depends on your own case.

Next:
- Get video size for MediaPlayer by implementing onVideoSizeChanged()
Actually, you have to release the MediaPlayer in onDestroy() and onPause(), when the app exit. Or any other handling method, depends on your own case.
 @Override
 protected void onDestroy() {
  // TODO Auto-generated method stub
  super.onDestroy();
  if (mediaPlayer != null) {
   mediaPlayer.release();
   mediaPlayer = null;
  }
 }

 @Override
 protected void onPause() {
  // TODO Auto-generated method stub
  super.onPause();
  if (mediaPlayer != null) {
   mediaPlayer.release();
   mediaPlayer = null;
  }
 }

Next:
- Get video size for MediaPlayer by implementing onVideoSizeChanged()
Simple example to play stream video from internet using MediaPlayer
Please notice that it's a very simple and incompleted example to play stream video of 3gp format from internet using MediaPlayer.

Modify layout to have a SurfaceView for the MediaPlayer.
MainActivity.java
Note: permission of "android.permission.INTERNET" is needed in AndroidManifest.xml.
Download the files.
Next:
- Release MediaPlayer in onDestroy() and onPause()

Modify layout to have a SurfaceView for the MediaPlayer.
<LinearLayout xmlns:android="http://schemas.android.com/apk/res/android"
    xmlns:tools="http://schemas.android.com/tools"
    android:layout_width="match_parent"
    android:layout_height="match_parent"
    android:paddingBottom="@dimen/activity_vertical_margin"
    android:paddingLeft="@dimen/activity_horizontal_margin"
    android:paddingRight="@dimen/activity_horizontal_margin"
    android:paddingTop="@dimen/activity_vertical_margin"
    tools:context=".MainActivity" >

    <SurfaceView
        android:id="@+id/playersurface"
        android:layout_width="wrap_content"
        android:layout_height="wrap_content"/>

</LinearLayout>
MainActivity.java
package com.example.androidmediaplayer;

import java.io.IOException;

import android.media.AudioManager;
import android.media.MediaPlayer;
import android.media.MediaPlayer.OnPreparedListener;
import android.os.Bundle;
import android.view.SurfaceHolder;
import android.view.SurfaceView;
import android.app.Activity;

public class MainActivity extends Activity implements SurfaceHolder.Callback, OnPreparedListener{

 MediaPlayer mediaPlayer;
 SurfaceHolder surfaceHolder;
 SurfaceView playerSurfaceView;
 String videoSrc = "rtsp://v6.cache1.c.youtube.com/CjYLENy73wIaLQkDsLHya4-Z9hMYDSANFEIJbXYtZ29vZ2xlSARSBXdhdGNoYKX4k4uBjbOiUQw=/0/0/0/video.3gp";

 @Override
 protected void onCreate(Bundle savedInstanceState) {
  super.onCreate(savedInstanceState);
  setContentView(R.layout.activity_main);
  playerSurfaceView = (SurfaceView)findViewById(R.id.playersurface);

        surfaceHolder = playerSurfaceView.getHolder();
        surfaceHolder.addCallback(this);
 }

 @Override
 public void surfaceChanged(SurfaceHolder arg0, int arg1, int arg2, int arg3) {
  // TODO Auto-generated method stub

 }

 @Override
 public void surfaceCreated(SurfaceHolder arg0) {

        try {
         mediaPlayer = new MediaPlayer();
            mediaPlayer.setDisplay(surfaceHolder);
   mediaPlayer.setDataSource(videoSrc);
   mediaPlayer.prepare();
   mediaPlayer.setOnPreparedListener(this);
   mediaPlayer.setAudioStreamType(AudioManager.STREAM_MUSIC);
  } catch (IllegalArgumentException e) {
   // TODO Auto-generated catch block
   e.printStackTrace();
  } catch (SecurityException e) {
   // TODO Auto-generated catch block
   e.printStackTrace();
  } catch (IllegalStateException e) {
   // TODO Auto-generated catch block
   e.printStackTrace();
  } catch (IOException e) {
   // TODO Auto-generated catch block
   e.printStackTrace();
  }
 }

 @Override
 public void surfaceDestroyed(SurfaceHolder arg0) {
  // TODO Auto-generated method stub

 }

 @Override
 public void onPrepared(MediaPlayer mp) {
  mediaPlayer.start();
 }

}
Note: permission of "android.permission.INTERNET" is needed in AndroidManifest.xml.
Next:
- Release MediaPlayer in onDestroy() and onPause()
Get the current frame in VideoView using MediaMetadataRetriever
Last exercise show a simple example to "Get image frame in video using MediaMetadataRetriever". In this exercise, we will play the video in a VideoView. Then capture the frame at the position when user click on the button.

layout file.
MainActivity.java
Note: To use MediaMetadataRetriever, minSdkVersion="10" have to be defined in AndroidManifest.xml.

layout file.
<LinearLayout xmlns:android="http://schemas.android.com/apk/res/android"
    xmlns:tools="http://schemas.android.com/tools"
    android:layout_width="match_parent"
    android:layout_height="match_parent"
    android:paddingBottom="@dimen/activity_vertical_margin"
    android:paddingLeft="@dimen/activity_horizontal_margin"
    android:paddingRight="@dimen/activity_horizontal_margin"
    android:paddingTop="@dimen/activity_vertical_margin"
    android:orientation="vertical"
    tools:context=".MainActivity" >

    <TextView
        android:layout_width="wrap_content"
        android:layout_height="wrap_content"
        android:text="@string/hello_world" />
    <Button
        android:id="@+id/capture"
        android:layout_width="wrap_content"
        android:layout_height="wrap_content"
        android:text="capture video image" />
    <VideoView
        android:id="@+id/videoview"
        android:layout_width="match_parent"
        android:layout_height="match_parent" />

</LinearLayout>
MainActivity.java
package com.example.androidvideoview;

import android.graphics.Bitmap;
import android.media.MediaMetadataRetriever;
import android.media.MediaPlayer;
import android.net.Uri;
import android.os.Bundle;
import android.app.Activity;
import android.app.AlertDialog;
import android.view.View;
import android.view.View.OnClickListener;
import android.view.ViewGroup.LayoutParams;
import android.widget.Button;
import android.widget.ImageView;
import android.widget.MediaController;
import android.widget.Toast;
import android.widget.VideoView;

public class MainActivity extends Activity {

 MediaMetadataRetriever mediaMetadataRetriever;
 MediaController myMediaController;
 VideoView myVideoView;
 String viewSource = "/storage/sdcard0/DCIM/100MEDIA/VIDEO0009.mp4";

 @Override
 protected void onCreate(Bundle savedInstanceState) {
  super.onCreate(savedInstanceState);
  setContentView(R.layout.activity_main);

  mediaMetadataRetriever = new MediaMetadataRetriever();
  mediaMetadataRetriever.setDataSource(viewSource);

  myVideoView = (VideoView) findViewById(R.id.videoview);
  myVideoView.setVideoURI(Uri.parse(viewSource));
  myMediaController = new MediaController(this);
  myVideoView.setMediaController(myMediaController);

  myVideoView.setOnCompletionListener(myVideoViewCompletionListener);
  myVideoView.setOnPreparedListener(MyVideoViewPreparedListener);
  myVideoView.setOnErrorListener(myVideoViewErrorListener);

  myVideoView.requestFocus();
  myVideoView.start();

  Button buttonCapture = (Button)findViewById(R.id.capture);
  buttonCapture.setOnClickListener(new OnClickListener(){

   @Override
   public void onClick(View arg0) {

    int currentPosition = myVideoView.getCurrentPosition(); //in millisecond
    Toast.makeText(MainActivity.this,
      "Current Position: " + currentPosition + " (ms)",
      Toast.LENGTH_LONG).show();

    Bitmap bmFrame = mediaMetadataRetriever
      .getFrameAtTime(currentPosition * 1000); //unit in microsecond

    if(bmFrame == null){
     Toast.makeText(MainActivity.this,
       "bmFrame == null!",
       Toast.LENGTH_LONG).show();
    }else{
     AlertDialog.Builder myCaptureDialog =
       new AlertDialog.Builder(MainActivity.this);
     ImageView capturedImageView = new ImageView(MainActivity.this);
     capturedImageView.setImageBitmap(bmFrame);
     LayoutParams capturedImageViewLayoutParams =
       new LayoutParams(LayoutParams.WRAP_CONTENT,
         LayoutParams.WRAP_CONTENT);
     capturedImageView.setLayoutParams(capturedImageViewLayoutParams);

     myCaptureDialog.setView(capturedImageView);
     myCaptureDialog.show();
    }

   }});
 }

 MediaPlayer.OnCompletionListener myVideoViewCompletionListener =
   new MediaPlayer.OnCompletionListener() {

  @Override
  public void onCompletion(MediaPlayer arg0) {
   Toast.makeText(MainActivity.this, "End of Video",
     Toast.LENGTH_LONG).show();
  }
 };

 MediaPlayer.OnPreparedListener MyVideoViewPreparedListener =
   new MediaPlayer.OnPreparedListener() {

  @Override
  public void onPrepared(MediaPlayer mp) {

   long duration = myVideoView.getDuration(); //in millisecond
   Toast.makeText(MainActivity.this,
     "Duration: " + duration + " (ms)",
     Toast.LENGTH_LONG).show();

  }
 };

 MediaPlayer.OnErrorListener myVideoViewErrorListener =
   new MediaPlayer.OnErrorListener() {

  @Override
  public boolean onError(MediaPlayer mp, int what, int extra) {

   Toast.makeText(MainActivity.this,
     "Error!!!",
     Toast.LENGTH_LONG).show();
   return true;
  }
 };

}
Note: To use MediaMetadataRetriever, minSdkVersion="10" have to be defined in AndroidManifest.xml.
Get image frame in video using MediaMetadataRetriever
MediaMetadataRetriever, for API level 10 or higher, provides a unified interface for retrieving frame and meta data from an input media file.
Example to retrieve frame in video:

Next:
- Get the current frame in VideoView using MediaMetadataRetriever
Example to retrieve frame in video:

package com.example.androidmediametadataretriever;

import android.graphics.Bitmap;
import android.media.MediaMetadataRetriever;
import android.os.Bundle;
import android.widget.ImageView;
import android.app.Activity;

public class MainActivity extends Activity {

 String uri = "/storage/sdcard0/DCIM/100MEDIA/VIDEO0007.mp4";

 @Override
 protected void onCreate(Bundle savedInstanceState) {
  super.onCreate(savedInstanceState);
  setContentView(R.layout.activity_main);
  ImageView capturedImageView = (ImageView)findViewById(R.id.capturedimage);

  MediaMetadataRetriever mediaMetadataRetriever = new MediaMetadataRetriever();

  mediaMetadataRetriever.setDataSource(uri);
  Bitmap bmFrame = mediaMetadataRetriever.getFrameAtTime(5000000); //unit in microsecond
  capturedImageView.setImageBitmap(bmFrame);
 }

}
Next:
- Get the current frame in VideoView using MediaMetadataRetriever
"Type R cannot be resolved to a variable" after Android SDK updated
If you get the error of "Type R cannot be resolved to a variable" after Android SDK and ADT updated. Try to find and install any available update in Android SDK.
In my case, after update Android SDK Tools rev 22, and also ADT. I get error of "Type R cannot be resolved to a variable" in my projects, and any new project!
- Start Android SDK Manager again. Two more update available, Android SDK Platform-tools and Android SDK Build-tools. It was not available in the previous update.

- Install the update packages.
- Close and restart Eclipse.
- Problem solved.
A smoother Drive app for Android
(cross-posted to the Google Drive Blog)
The process of creating and accessing your stuff shouldn’t be, well...a process. Today, the Drive app for Android is getting several improvements to make creating and accessing your stuff on-the-go even easier.

To help you find the content you care about, Drive files will now be displayed in a clean, simple card-style. You can swipe between files to see large previews that let you quickly review and discover the information you’re looking for. And if you want to keep some Drive files on your Android device, you’ll now be able to “download a copy” from the actions menu inside settings.

The updated Drive for Android app also gives you to a way to keep track of important paper documents like receipts, letters, and billing statements. Simply click “Scan” from the Add New menu, snap a photo of your document, and Drive will turn the document into a PDF that’s stored for safekeeping. And because Drive can recognize text in scanned documents using Optical Character Recognition (OCR) technology, a simple search will retrieve the scanned document later. No more frantic scrambling through drawers looking for a receipt or digging through your pockets to find that business card -- just scan, upload and search in Drive.

The editing experience in Google Sheets has also gotten some improvements: now you can adjust font types and sizes for a spreadsheet and tweak the cell text colors and cell alignment right from the app. Plus, the Drive app comes with Cloud Print support so you can print anything from Drive with a Cloud Ready printer -- perfect if you need to, say, print that extra resume right before a job interview.
Get the Google Drive app today on Google Play and circle us on Google+ for continued updates.
Posted by Denis Teplyashin, Software Engineer
Tegra Android Development Pack
The Tegra Android Development Pack 2.0 installs all software tools required to develop for Android on NVIDIA’s Tegra platform. This suite of developer tools is targeted at Tegra devices, but will configure a development environment that will work with almost any Android device. This cure for the common cold is available on Windows, OSX, Ubuntu Linux 32-bit and Ubuntu Linux 64-bit.

To Download The Files Below, you must be a member of the Tegra Registered Developer Program. To join simply create a new account (it's free and easy).
To Download The Files Below, you must be a member of the Tegra Registered Developer Program. To join simply create a new account (it's free and easy).
Apply animations on layout changes using LayoutTransition
LayoutTransition (Added in API level 11) enables automatic animations on layout changes in ViewGroup objects.
example:
LayoutTransition transition = new LayoutTransition();
container.setLayoutTransition(transition);
It's the default animations effect apply on the dynamic view in last exercise "Add and Remove view dynamically".
Modify MainActivity.java from last exercise.
- Apply LayoutTransition on container of LinearLayout.
- To made the effect noticeable, insert dynamic view in front by calling container.addView(addView, 0) instead of container.addView(addView).
- Modify AndroidManifest.xml to have minSdkVersion="11".
Download the files.
Related:
To apply Android 3.0 animation API on old devices, NineOldAndroids is an alternative.
example:
LayoutTransition transition = new LayoutTransition();
container.setLayoutTransition(transition);
It's the default animations effect apply on the dynamic view in last exercise "Add and Remove view dynamically".
Modify MainActivity.java from last exercise.
- Apply LayoutTransition on container of LinearLayout.
- To made the effect noticeable, insert dynamic view in front by calling container.addView(addView, 0) instead of container.addView(addView).
- Modify AndroidManifest.xml to have minSdkVersion="11".
package com.example.androiddynamicview;

import android.os.Bundle;
import android.view.LayoutInflater;
import android.view.View;
import android.view.View.OnClickListener;
import android.widget.Button;
import android.widget.EditText;
import android.widget.LinearLayout;
import android.widget.TextView;
import android.animation.LayoutTransition;
import android.app.Activity;
import android.content.Context;

public class MainActivity extends Activity {

 EditText textIn;
 Button buttonAdd;
 LinearLayout container;

 @Override
 protected void onCreate(Bundle savedInstanceState) {
  super.onCreate(savedInstanceState);
  setContentView(R.layout.activity_main);
  textIn = (EditText)findViewById(R.id.textin);
  buttonAdd = (Button)findViewById(R.id.add);
  container = (LinearLayout)findViewById(R.id.container);

  buttonAdd.setOnClickListener(new OnClickListener(){

   @Override
   public void onClick(View arg0) {
    LayoutInflater layoutInflater =
      (LayoutInflater) getBaseContext().getSystemService(Context.LAYOUT_INFLATER_SERVICE);
    final View addView = layoutInflater.inflate(R.layout.row, null);
    TextView textOut = (TextView)addView.findViewById(R.id.textout);
    textOut.setText(textIn.getText().toString());
    Button buttonRemove = (Button)addView.findViewById(R.id.remove);
    buttonRemove.setOnClickListener(new OnClickListener(){

     @Override
     public void onClick(View v) {
      ((LinearLayout)addView.getParent()).removeView(addView);
     }});

    container.addView(addView, 0);
   }});

  LayoutTransition transition = new LayoutTransition();
  container.setLayoutTransition(transition);

 }

}
Related:
To apply Android 3.0 animation API on old devices, NineOldAndroids is an alternative.
Transitioning to Google Wallet Merchant Center
Posted by Mark Thomas, Product Manager, Google Wallet
A key focus of Google Wallet is to simplify commerce for merchants and shoppers; for over a year now, consumers on Google Play have been using Wallet to make their purchases, to the benefit of the entire ecosystem. Helping merchants benefit from the growing consumer adoption of mobile commerce is where we believe we can make the most impact. And that’s why today we're focusing our efforts on the new Google Wallet Merchant Center and retiring Google Checkout over the next six months.
Most Google Play apps developers will seamlessly transition to the Wallet Merchant Center, which provides new reporting and analytics features and much more. A small number of Google Play developers, however, will see some changes:
- Developers using Google Checkout on their website to sell physical goods or services will no longer be able to use Checkout after November 20, 2013. We have provided some discounted migration options to help with this change. If you are a U.S. merchant selling physical goods and services who does have payment processing, you can apply for Google Wallet Instant Buy, which offers a fast buying experience to Google Wallet shoppers.
- Developers who use the Google Checkout for the Notifications and/or Order Reports API(s) will need to migrate to replacement APIs, made available through Google Play, before November 20, 2013. Watch for announcements on the new APIs soon.
If you sell apps or in-app products in Google Play, you’ll soon have access to the new Wallet Merchant Center. Watch for an email notifying you that that it’s now available to you. We expect to transition all merchants to the Wallet Merchant Center over the next several weeks.
We invite you to join us for our live merchant webinar on May 23, 2013 at 10AM PDT to learn more and ask any outstanding questions. As always, feel free to contact us at any time during this transition. Finally, be sure to check out the exciting updates launched last week at Google I/O (including Instant Buy and Wallet Objects) and stay tuned for more great developer features coming soon!
Add and Remove view dynamically
This exercise demonstrate how to add and remove view dynamically at run-time. When user click on the Add button, new view will be added. When user click on Remove button, the corresponding view will be removed.
MainActivity.java
activity_main.xml
row.xml
Download the files.
Related:
- Apply animations on layout changes using LayoutTransition
- Get text from dynamically added view
MainActivity.java
package com.example.androiddynamicview;

import android.os.Bundle;
import android.view.LayoutInflater;
import android.view.View;
import android.view.View.OnClickListener;
import android.widget.Button;
import android.widget.EditText;
import android.widget.LinearLayout;
import android.widget.TextView;
import android.app.Activity;
import android.content.Context;

public class MainActivity extends Activity {

 EditText textIn;
 Button buttonAdd;
 LinearLayout container;

 @Override
 protected void onCreate(Bundle savedInstanceState) {
  super.onCreate(savedInstanceState);
  setContentView(R.layout.activity_main);
  textIn = (EditText)findViewById(R.id.textin);
  buttonAdd = (Button)findViewById(R.id.add);
  container = (LinearLayout)findViewById(R.id.container);

  buttonAdd.setOnClickListener(new OnClickListener(){

   @Override
   public void onClick(View arg0) {
    LayoutInflater layoutInflater =
      (LayoutInflater) getBaseContext().getSystemService(Context.LAYOUT_INFLATER_SERVICE);
    final View addView = layoutInflater.inflate(R.layout.row, null);
    TextView textOut = (TextView)addView.findViewById(R.id.textout);
    textOut.setText(textIn.getText().toString());
    Button buttonRemove = (Button)addView.findViewById(R.id.remove);
    buttonRemove.setOnClickListener(new OnClickListener(){

     @Override
     public void onClick(View v) {
      ((LinearLayout)addView.getParent()).removeView(addView);
     }});

    container.addView(addView);
   }});

 }

}
activity_main.xml
<LinearLayout xmlns:android="http://schemas.android.com/apk/res/android"
    xmlns:tools="http://schemas.android.com/tools"
    android:layout_width="match_parent"
    android:layout_height="match_parent"
    android:paddingBottom="@dimen/activity_vertical_margin"
    android:paddingLeft="@dimen/activity_horizontal_margin"
    android:paddingRight="@dimen/activity_horizontal_margin"
    android:paddingTop="@dimen/activity_vertical_margin"
    android:orientation="vertical"
    tools:context=".MainActivity" >

    <TextView
        android:layout_width="wrap_content"
        android:layout_height="wrap_content"
        android:text="@string/hello_world" />
    <RelativeLayout
        android:layout_width="match_parent"
        android:layout_height="wrap_content">
        <Button
            android:id="@+id/add"
            android:layout_width="wrap_content"
            android:layout_height="wrap_content"
            android:layout_alignParentRight="true"
            android:text="Add"/>
        <EditText
            android:id="@+id/textin"
            android:layout_width="match_parent"
            android:layout_height="wrap_content"
            android:layout_alignParentLeft="true"
            android:layout_toLeftOf="@id/add"/>
    </RelativeLayout>
    <LinearLayout
        android:id="@+id/container"
        android:layout_width="match_parent"
        android:layout_height="wrap_content"
        android:orientation="vertical">
    </LinearLayout>

</LinearLayout>
row.xml
<RelativeLayout xmlns:android="http://schemas.android.com/apk/res/android"
    xmlns:tools="http://schemas.android.com/tools"
    android:layout_width="match_parent"
    android:layout_height="wrap_content">
    <Button
        android:id="@+id/remove"
        android:layout_width="wrap_content"
        android:layout_height="wrap_content"
        android:layout_alignParentRight="true"
        android:text="Remove"/>
    <TextView
        android:id="@+id/textout"
        android:layout_width="match_parent"
        android:layout_height="wrap_content"
        android:layout_alignParentLeft="true"
        android:layout_toLeftOf="@id/remove"/>
</RelativeLayout>
Related:
- Apply animations on layout changes using LayoutTransition
- Get text from dynamically added view
Intel introduce Beacon Mountain, a Development Environment for Android Apps
Learn about Beacon Mountain - Intel's development environment for creating applications for Intel Atom and ARM*-based devices running Android* operating systems.
Install Android Studio on Ubuntu with error of "Plugin com.intellij failed to initialize and will be disabled"
Just try to install the Early Access Preview of Android Studio on Ubuntu 13.04. But error of "Plugin com.intellij failed to initialize and will be disabled:null" happen...!

It's due to IntelliJ IDEA need fixed installation of JDK, it have to be one of the following location:

Remark: After you installed JDK in the location, you have to set environment parameter point to the installed location. In my practice, I use the following commands in Terminal to update alternatives:
$sudo update-alternatives --install /usr/bin/javac javac /opt/java/bin/javac 1
$sudo update-alternatives --install /usr/bin/java java /opt/java/bin/java 1
where /opt/java/ is the location of my installed JDK.
It's due to IntelliJ IDEA need fixed installation of JDK, it have to be one of the following location:
- /usr/java
- /opt/java
- /usr/lib/jvm

Remark: After you installed JDK in the location, you have to set environment parameter point to the installed location. In my practice, I use the following commands in Terminal to update alternatives:
$sudo update-alternatives --install /usr/bin/javac javac /opt/java/bin/javac 1
$sudo update-alternatives --install /usr/bin/java java /opt/java/bin/java 1
where /opt/java/ is the location of my installed JDK.
New Features in Android Location
Google I/O 2013 - Beyond the Blue Dot: New Features in Android Location
What's New in Android Developer Tools - Google I/O 2013
An in-depth tour of the Android development tools, with a closer look at everything new - along with tips and tricks for getting the most out of them.
New Ways to Optimize Your Business in Google Play
Posted by Ellie Powers, Google Play team

This week at I/O, we were excited to announce some updates to Google Play to help you optimize your business on Google Play: to help you take control of your app publishing, gain insight into your users, and expand your app’s success globally.

Play Store’s new view: apps designed for tablets
Many of you have invested in making great tablet experiences for your users, and we want to ensure that that work pays off and that users are able to discover great apps for their tablets. This week, the Google Play store began providing a view of our top charts highlighting apps which have been designed for tablets according to our tablet app quality checklist.
Be sure you don’t miss out! Check that your app’s optimization tips say that your app is designed for tablets, and upload tablet screenshots for 7” and 10” tablets.
Beta testing and staged rollouts
We have introduced support for beta testing and staged rollouts so that you can get feedback on your new app or app update early in its development and make sure your users are happy with the results. You can test two different versions on two different groups at the same time, such as testing a newer version with your employees first, and a more mature version with a group of external testers.
The beta testing is private on Google Play, and you can specify who gets these versions by adding Google Groups and Google+ Communities. Users give you feedback privately rather than through public reviews. When you’re satisfied that your new version is ready, you can now do a staged rollout to a percentage of your userbase. To give you more flexibility in light of beta testing and help get your whole team involved in the Developer Console, we will soon launch additional access controls.

Localization improvements
We’re collaborating with Google's internationalization team to make translating your app into new languages easier than ever. You can purchase professional translations of your apps from independent providers through the Google Play Developer Console. You can upload the strings you want translated, select the languages you want to translate into, and select your translation vendor based on time and price. If you’re interested in translating your apps with this feature, sign up to be a part of the preview in the Developer Console today on the APK page.
The new optimization tips for localization will help you identify new potential opportunities for global expansion based on popular languages for your app’s users and category. To fully localize your app into a language, you need to translate the strings in an APK, translate your Google Play store listing, and upload localized graphics. The optimization tips will also let you know if you’re missing any of these pieces.

New Analytics and monetization features
Getting better revenue and engagement data has been another key developer request, as developers told us that they check their revenue and stats constantly. New revenue charts in the Developer Console allow you to see your app’s daily revenue and summary figures, and you can filter the data by country. Coming soon, Google Play and Google Analytics are teaming up to bring you better insight into your users. Google Analytics will start showing Google Play views and installs for each campaign, while Google Play will show Google Analytics engagement metrics.

For those of you using in-app billing, we’ve heard your feedback and made some improvements to reduce your development time and costs. Your test accounts will now able to make in-app test purchases without those transactions actually being charged, but everything else works the same as it would for a real user.
In a few weeks, we will launch a new Order Status API, which allows you to verify the status of an in-app order from your servers. We will also be launching a tool for automating downloads of financial reports. Finally, the new Google Wallet Merchant Center is continuing to roll out with enhanced reporting, additional analytics and many other enhancements.
Google Play for Education coming soon
You'll soon be able to offer apps to schools through Google Play for Education, which launches later this year to K-12 schools in the United States. This online destination will allow schools to discover, purchase, and distribute apps to their students. Visit developer.android.com/edu to get started creating or optimizing your apps for schools today.
Google I/O 2013 Video is now live
Google I/O 2013: Keynote
More is available and more is to come: http://www.youtube.com/googledevelopers
More is available and more is to come: http://www.youtube.com/googledevelopers
Android SDK Tools update rev.22
Android SDK Tools rev.22 is available. To update your tools in Eclipse, select Window -> Android SDK Manager.

This Android SDK requires Android Developer Toolkit version 22.0.0 or above.

(To manually update Android Developer Toolkit, select Help -> check for updates.)


This Android SDK requires Android Developer Toolkit version 22.0.0 or above.

(To manually update Android Developer Toolkit, select Help -> check for updates.)

Save instance state for Menu Items in orientation changed
Last exercise demonstrate how to "Show and hide menu item programatically". But the setting will lose in orientation changed. This exercise show how to save the states in Bundle.

To save instance state, override onSaveInstanceState() method to put it in outState. Then retrieve it in onCreate(). And override onPrepareOptionsMenu() method to set Visible of menu items accordingly.
Modify MainActivity.java in last exercise.
Download the files.

To save instance state, override onSaveInstanceState() method to put it in outState. Then retrieve it in onCreate(). And override onPrepareOptionsMenu() method to set Visible of menu items accordingly.
Modify MainActivity.java in last exercise.
package com.example.androidmenu;

import android.os.Bundle;
import android.app.Activity;
import android.view.Menu;
import android.view.MenuItem;
import android.widget.CompoundButton;
import android.widget.CompoundButton.OnCheckedChangeListener;
import android.widget.Toast;
import android.widget.ToggleButton;

public class MainActivity extends Activity {

 Menu menu;
 ToggleButton toggleButtonUp, toggleButtonDown;

 Boolean savedMenuUpIsVisible, savedMenuDownIsVisible;
 final static String KEY_Menu_Up = "KEY_MENU_UP";
 final static String KEY_Menu_Down = "KEY_MENU_DOWN";

 @Override
 protected void onCreate(Bundle savedInstanceState) {
  super.onCreate(savedInstanceState);
  setContentView(R.layout.activity_main);
  toggleButtonUp = (ToggleButton)findViewById(R.id.buttonup);
  toggleButtonDown = (ToggleButton)findViewById(R.id.buttondown);

  toggleButtonUp.setOnCheckedChangeListener(new OnCheckedChangeListener(){

   @Override
   public void onCheckedChanged(CompoundButton buttonView, boolean isChecked) {

    if(menu != null){
     MenuItem item_up = menu.findItem(R.id.action_up);
     item_up.setVisible(isChecked);
    }

   }});

  toggleButtonDown.setOnCheckedChangeListener(new OnCheckedChangeListener(){

   @Override
   public void onCheckedChanged(CompoundButton buttonView, boolean isChecked) {

    if (menu != null){
     MenuItem item_down = menu.findItem(R.id.action_down);
     item_down.setVisible(isChecked);
    }

   }});

  if(savedInstanceState != null){
   savedMenuUpIsVisible = savedInstanceState.getBoolean(KEY_Menu_Up, true);
   savedMenuDownIsVisible = savedInstanceState.getBoolean(KEY_Menu_Down, true);
  }

 }

 @Override
 public boolean onCreateOptionsMenu(Menu menu) {
  // Inflate the menu; this adds items to the action bar if it is present.
  this.menu = menu;
  getMenuInflater().inflate(R.menu.main, menu);
  return true;
 }

 @Override
 public boolean onOptionsItemSelected(MenuItem item) {

  switch(item.getItemId()){
  case R.id.action_settings:
   Toast.makeText(getApplicationContext(),
     "Setting...",
     Toast.LENGTH_SHORT).show();
   break;
  case R.id.action_up:
   Toast.makeText(getApplicationContext(),
     "Up...",
     Toast.LENGTH_SHORT).show();
   break;
  case R.id.action_down:
   Toast.makeText(getApplicationContext(),
     "Down...",
     Toast.LENGTH_SHORT).show();
   break;
  case R.id.action_other:
   Toast.makeText(getApplicationContext(),
     "Other...",
     Toast.LENGTH_SHORT).show();
   break;
  default:
   Toast.makeText(getApplicationContext(),
     "Unknown...",
     Toast.LENGTH_SHORT).show();
   break;
  }

  //Return false to allow normal menu processing to proceed,
  //true to consume it here.
  return false;
 }

 @Override
 public boolean onPrepareOptionsMenu(Menu menu) {

  if(savedMenuUpIsVisible != null){
   MenuItem item_up = menu.findItem(R.id.action_up);
   item_up.setVisible(savedMenuUpIsVisible);
  }

  if(savedMenuDownIsVisible != null){
   MenuItem item_down = menu.findItem(R.id.action_down);
   item_down.setVisible(savedMenuDownIsVisible);
  }

  return super.onPrepareOptionsMenu(menu);
 }

 @Override
 protected void onSaveInstanceState(Bundle outState) {
  super.onSaveInstanceState(outState);

  if (menu != null){
   MenuItem item_up = menu.findItem(R.id.action_up);
   outState.putBoolean(KEY_Menu_Up, item_up.isVisible());
   MenuItem item_down = menu.findItem(R.id.action_down);
   outState.putBoolean(KEY_Menu_Down, item_down.isVisible());
  }

 }

}
Social Gaming, Location, and More in Google Play Services
Posted by Greg Hartrell, Angana Ghosh, Francesco Nerieri, Francis Ma, and the Google Play services team

Some of the most exciting Android announcements at Google I/O this year are part of our latest Google Play services release, version 3.1.
The new version brings you Google Play games services, part of a new cloud-integrated platform for social gaming based on Google+ identity. Also included are location-based services that make it easier to build efficient location-aware apps. For apps using the popular Google Cloud Messaging platform, you can now take advantage of XMPP messaging and easier setup. Finally, Cross-Platform Single Sign On for Google+ Sign-In is now available to your apps.
You can get started using these APIs and services right away—Google Play services 3.1 is already rolling out to Android devices across the world, with support reaching all the way back to Froyo.
Google Play games services

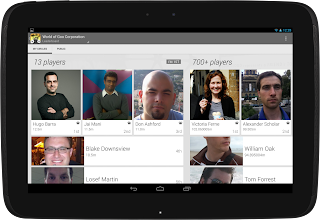
Games are always popular with Android developers, and the announcement of Google Play game services raised the volume even more.
Google Play games services lets you make your games more social, with achievements, leaderboards, and multiplayer, and they help you extend your user’s games across multiple devices by storing game saves and settings in the cloud.
Several great Android games are already using these new game services, including World of Goo, Super Stickman Golf 2, Beach Buggy Blitz, Kingdom Rush, Eternity Warriors 2, and Osmos.
You can take advantage of the new services right away using the games services SDK included in Google Play services. For all the details, check out the Google Play games services documentation.
Location APIs
If you build location-aware Android apps, you’ll want to check out the new location APIs. They make it easy to build accurate, fast, and efficient apps, with new contextual features.
The Fused Location Provider intelligently manages the underlying location technology and gives you the best location according to your needs. We’ve simplified the location APIs and completely rewritten our location algorithm to make location more accurate, flexible and use less battery.
Using the new geofencing API, your app can set up geographic boundaries around specific locations and then receive notifications when the user enters or leaves those areas.
With apps becoming increasingly contextual, understanding what the user is doing is critical to surfacing the right content. A new activity recognition API makes it easy to check the the user’s current activity — still, walking, cycling, and in-vehicle — with very efficient use of the battery. We use low-power sensors and machine-learning classifiers to recognize the activity, giving you both both high accuracy and low battery usage.
To learn more, head over to our training classes at Making Your App Location Aware or dive directly into the reference docs.
Google Cloud Messaging
We’ve added APIs to make it easier to set up GCM in your apps, and in the service itself we’ve added new messaging capabilities for your apps to use.
A new registration API lets your app register with the service using a single method call and begin receiving messages as soon as the call returns.
Sign Up for Early Access
If you’d like to try out CCS messaging or the User Notifications API, please sign up for early access.
In the GCM service itself we’ve added support for messaging over XMPP with the new GCM Cloud Connection Server (CCS). Your servers now have a persistent connection over which to send large numbers of messages, very quickly, and with no overhead. New APIs in Google Play services let apps send messages back upstream to third-party servers using CCS, without needing to manage network connections. This helps keep battery and data usage to a minimum.
Also new in the GCM service is a User Notifications API. This new API lets you synchronize notifications across a user’s multiple devices — when the user dismisses a notification on one device, the notification disappears automatically from all the other devices. To get started with GCM, head over to the developer documentation.
Google+ Cross-Platform Single Sign On
Many people use apps on multiple devices throughout the day, switching between their laptops, tablets, and mobile devices. After signing-in to an app on one device, it’s natural that when they pick up a different device and use the same app, they would expect to be signed in there as well.
To help you provide this kind of seamless transition between platforms and stay connected with users across devices, we’re adding Cross-Platform Single Sign On to our Google+ Sign-In capabilities.
If your app is already using Google+ Sign-In, you’ve already got support for Cross-Platform Single Sign On. This feature will be enabled automatically over the coming days.
Cross-Platform Single Sign On gives you a great way to build longer-running, cross-platform user experiences, and it dovetails perfectly with the new Google Play games services for bridging game state across devices using the cloud.
To learn more about Google+ Sign-In, check out http://developers.google.com/+.
More About Google Play Services
Google Play Services is our platform for offering you better integration with Google products, and providing new capabilities to use within your apps. To learn more about Google Play services and the APIs available to you through it, visit the Google Services area of the Android Developers site.
Early Access Preview of Android Studio is available now
Android Studio is a new Android development environment based on IntelliJ IDEA. Similar to Eclipse with the ADT Plugin, Android Studio provides integrated Android developer tools for development and debugging. On top of the capabilities you expect from IntelliJ, Android Studio offers:
Tor Norbye gives a quick a preview of Android Studio. It's a brand new fully featured IDE based on the community edition of IntelliJ.
- Gradle-based build support.
- Android-specific refactoring and quick fixes.
- Lint tools to catch performance, usability, version compatibility and other problems.
- ProGuard and app-signing capabilities.
- Template-based wizards to create common Android designs and components.
- A rich layout editor that allows you to drag-and-drop UI components, preview layouts on multiple screen configurations, and much more.
Tor Norbye gives a quick a preview of Android Studio. It's a brand new fully featured IDE based on the community edition of IntelliJ.
Android Studio: An IDE built for Android
Posted by Xavier Ducrohet, Tor Norbye, Katherine Chou


Easy access to Google services

Today at Google I/O we announced a new IDE that’s built with the needs of Android developers in mind. It’s called Android Studio, it’s free, and it’s available now for you to try as an early access preview.
To develop Android Studio, we cooperated with JetBrains, creators of one of the most advanced Java IDEs available today. Based on the powerful, extensible IntelliJ IDEA Community Edition, we've added features that are designed specifically for Android development, that simplify and optimize your daily workflow.
Extensible build tools
We know you need a build system that adapts to your project requirements but extends further to your larger development environment. Android Studio uses a new build system based on Gradle that provides flexibility, customized build flavors, dependency resolution, and much more.
This new build system allows you to build your projects in the IDE as well as on your continuous integrations servers. The combination lets you easily manage complex build configurations natively, throughout your workflow, across all of your tools. Check out the preview documentation to get a better idea of what the new build system can do.

Powerful code editing
Android Studio includes a powerful code editor. It's based on the IntelliJ IDEA editor, which supports features such as smart editing, advanced code refactoring, and deep static code analysis.
Smart editing features such as inline resource lookups make it easier to read your code, while giving you instant access to edit code the backing resources. Advanced code refactoring gives you the power to transform your code across the scope of the entire project, quickly and safely.
We added static code analysis for Android development, helping you identify bugs more quickly. On top of the hundreds of code inspections that IntelliJ IDEA provides, we’ve added custom inspections. For example, we’ve added metadata to the Android APIs, that flag which methods can return null and which can’t, which constants are allowed for which methods, and so on. Android Studio uses that data to analyze your code and find potential errors.


Smoother and richer GUI
Over the past year we’ve added some great drag-and-drop UI features to ADT and we’re in the process of adding them all into Android Studio. This release of Android Studio lets you preview your layouts on different device form factors, locales, and platform versions.
Easy access to Google services
within Android Tools
We wanted to make it easy for you to harness the power Google services right from your IDE. To start, we’ve made it trivial to add services such a cloud-based backend with integrated Google Cloud Messaging (GCM) to your app, directly from the IDE.
We’ve also added a new plugin called ADT Translation Manager Plugin to assist with localizing your apps. You can use the plugin to export your strings to the Google Play Developer Console for translation, then download and import your translations back into your project.
Open source development
Starting next week we’ll be doing all of our development in the open, so you can follow along or make your own contributions. You can find the Android Studio project in AOSP at https://android.googlesource.com/platform/tools/adt/idea/
Try Android Studio and give us feedback
Give Android Studio a try and send us your feedback! It's free, and the download bundle includes includes everything you need, including the IDE, the latest SDK tools, the latest Android platform, and more. .
Note: This is an early access preview intended for early adopters and testers who want to influence the direction of the Android tools. If you have a production app with a large installed base, there’s no need to migrate your development to the new tools at this time. We will continue to support Eclipse as a primary platform for development.
If you have feedback on the tools, you can send it to us using the Android Studio issue tracker.
Android at Google I/O 2013: Keynote Wrapup
The last year has been an exciting one for Android developers, with an incredible amount of momentum. In fact, over 48 billion apps have been downloaded from Google Play to date, with over 2.5 billion app downloads in the last month alone.
This week, at Google I/O, our annual developer conference, we’re celebrating this momentum, and putting on stage a number of new features and advancements both for the Android platform and Google Play, to help you design, develop and distribute great apps to your users.
We just wrapped up the keynote, and wanted to share a number of those new features; we’ll be spotlighting some of them throughout the week both here, on Google+, and in 36 Android sessions and sandboxes at the Moscone center in San Francisco (with many of the sessions livestreamed at developer.google.com). Enjoy!
Google Play Services 3.1
Google Play Services is our platform for bringing you easier integration with Google products and new capabilities to use in your apps. Today we announced a new version of Google Play Services that has some great APIs for developers.
- Google Play games services give you great new social features that you can add to your games achievements, leaderboards, cloud save, and real-time multiplayer
- Location APIs make it easy to add location- and context-awareness to your apps through a fused location provider, geofencing, and activity recognition
- Google Cloud Messaging enhancements let you use bidirectional XMPP messaging between server and devices and dismiss notifications
- Cross-Platform Single Sign On, which lets your users sign in once, for all of their devices using Google+ Sign-In.
Android Studio: A new IDE for Android development
Today we announced a new Integrated Development Environment (IDE) built just for Android, with the needs of Android developers in mind. It’s called Android Studio, it’s free, and it’s available now to try as an early access preview.
To build Android Studio, we worked with with JetBrains, creators of one of the most advanced Java IDEs available today. Based on the powerful, extensible IntelliJ IDEA Community Edition, we've added features and capabilities that are designed specifically for Android development, to simplify and optimize your daily workflow for creating Android apps.
Google Play Developer Console: a better distribution experience
Building awesome Android apps is only part of the story. Today we announced great new features in the Google Play Developer Console that give you more control over how you distribute your app and insight into how your app is doing:
- App translation service: a pilot program that lets you purchase professional translations for your app directly from the Developer Console.
- Revenue graphs: a new tab in the Developer Console gives you a summary of your app global app revenue over time.
- Alpha and beta testing and staged rollouts: you can now distribute your app to controlled alpha and beta test groups, or do staged rollouts to specific percentages of your userbase.
- Optimization tips: design your app for tablets and understand how to expand your app into new language markets.
- Google Analytics: launching later this summer, your Google Analytics usage stats will be viewable right in the Developer Console.
- Referral tracking: also launching later this summer, you’ll get a new report in Google Analytics to show what blogs, campaigns, and ads are driving your installs.
Follow the Android Sessions
Join us for the Android sessions today and through the week by livestream. Visit the I/O Live Stream schedule for details.