What's New in Android 4.4

DevBytes: What's New in Android 4.4

KitKat has been optimized to run on a much broader range of devices, with special focus on the millions of entry-level devices that have as little as 512MB RAM. To help, new APIs have been created, better tools, and better documentation to let you create apps that perform well on all devices.

Check out this video summary of some of the most significant developer features in the latest Android release, including new ways to make your apps beautiful, NFC Host Card Emulation, a printing framework, the storage access framework, low-power step detector and step counter sensors, and more!

Be sure to get the full Android 4.4 API Overview
http://developer.android.com/about/versions/android-4.4.html

And take a look at related DevBytes videos:
https://www.youtube.com/playlist?list=PLWz5rJ2EKKc-2quE-o0enpILZF3nBZg_K

Google Play Services 4.0

Google are launching Google Play services 4.0, includes the Google Mobile Ads SDK, and offers improvements to geofencing, Google+, and Google Wallet Instant Buy APIs. And dropping support for Froyo from this release of the Google Play services SDK.

source: Android Developers Blog

Android 4.4 (KitKat) includes a new WebView component based on the Chromium

Android 4.4 (KitKat) includes a new WebView component based on the Chromium open source project. The new WebView includes an updated version of the V8 JavaScript engine and support for modern web standards that were missing in the old WebView. It also shares the same rendering engine as Chrome for Android, so rendering should be much more consistent between the WebView and Chrome.

If you're a web developer looking to start developing a WebView-based Android application, see Getting Started: WebView-based Applications for Web Developers.

Source: https://developers.google.com/chrome/mobile/docs/webview/overview

The new Nexus 5, Now available in two memory versions and two colors

The new Nexus 5, now available in two memory versions and two colors, 16GB for $349 and 32GB for $399.


Visit: http://www.google.com/nexus/5/

Google Nexus 5: I Do

Android 4.4 KitKat and Updated Developer Tools

Posted by Dave Burke, Engineering Director, Android Platform


Today we are announcing Android 4.4 KitKat, a new version of Android that brings great new features for users and developers.


The very first device to run Android 4.4 is the new Nexus 5, available today on Google Play, and coming soon to other retail outlets. We’ll also be rolling out the Android 4.4 update worldwide in the next few weeks to all Nexus 4, Nexus 7, and Nexus 10 devices, as well as the Samsung Galaxy S4 and HTC One Google Play Edition devices.


As part of this release, we kicked off Project Svelte, an effort to reduce the memory needs of Android so that it can run on a much broader range of devices, including entry-level devices that have as little as 512MB RAM. From the kernel to system, frameworks, and apps, we've reduced memory footprint and improved memory management so Android can run comfortably on only 512MB of RAM. We did this not only on Android but across Google apps, like Chrome and YouTube.


By supporting a broader range of devices, Android 4.4 will help move the Android ecosystem forward. Now all users will be able to enjoy the very best that Android has to offer, on the devices that best meet their needs.


Here’s a quick look at some of the new features for developers:


  • New ways to create beautiful apps — A new full-screen immersive mode lets your app or game use every pixel on the screen to showcase content and capture touch events. A new transitions framework makes it easier to animate the states in your UI. Web content can take advantage of a completely new implementation of WebView built on Chromium.


  • More useful than ever — A printing framework lets you add the convenience of printing to your apps. A storage access framework makes it easier for users find documents, photos, and other data across their local and cloud-based storage services. You can integrate your app or storage service with the framework to give users instant access to their data.


  • Low-power sensors — New hardware-integrated sensors let you add great new features to your apps without draining the battery. Included are a step detector and step counter that let you efficiently track of the number of walking steps, even when the screen is off.


  • New media capabilities — A new screen recorder lets you capture high-quality video of your app directly from your Android device. It's a great new way to create walkthroughs, tutorials, marketing videos, and more. Apps can use adaptive playback to offer a significantly better streaming video experience.


  • RenderScript in the NDK — A new C++ API in the Android Native Development Kit (NDK) lets you use RenderScript from your native code, with access to script intrinsics, custom kernels, and more.


  • Improved accessibility support — New system-wide captioning settings let your apps present closed captions in the style that's preferred by the user.


There's a lot more, so be sure to check out the Android 4.4 platform highlights for a complete overview of those and other new capabilities for developers. For details on the APIs and how to use them, take a look at the API Overview or watch one of the new DevBytes videos on KitKat.


Along with the new Android 4.4 platform we're releasing a new version of the Android NDK (r9b). The new NDK gives you native access to RenderScript and other stable APIs in Android 4.4, so if you've been waiting to use RenderScript from your native code, give it a try.


Last, we've updated the Support Package (r19) with a new helper library for printing images through the new printing framework, as well as other updates.


You can get started developing and testing on Android 4.4 right away, in Android Studio or in ADT/Ant. You can download the Android 4.4 Platform (API level 19), as well as the SDK Tools, Platform Tools, and Support Package from the Android SDK Manager.


Google Play Services 4.0

Today we're launching a new release of Google Play services. Version 4.0 includes the Google Mobile Ads SDK, and offers improvements to geofencing, Google+, and Google Wallet Instant Buy APIs.


With over 97% of devices now running Android 2.3 (Gingerbread) or newer platform versions, we’re dropping support for Froyo from this release of the Google Play services SDK in order to make it possible to offer more powerful APIs in the future. That means you will not be able to utilize these new APIs on devices running Android 2.2 (Froyo).


We’re still in the process of rolling out to Android devices across the world, but you can already download the latest Google Play services SDK and start developing against the new APIs using the new Android 4.4 (KitKat) emulator.


Google Mobile Ads


If you’re using AdMob to monetize your apps, the new Google Mobile Ads SDK in Google Play services helps provide seamless improvements to your users. For example, bug fixes get pushed automatically to users without you having to do anything. Check out the post on the Google Ads Developer Blog for more details.


Maps and Location Based Services


The Maps and Geofencing APIs that launched in Google Play services 3.1 have been updated to improve overall battery efficiency and responsiveness.


You can save power by requesting larger latency values for notifications alerting your app to users entering or exiting geofences, or request that entry alerts are sent only after a user stays within a geofence for a specified period of time. Setting generous dwell times helps to eliminate unwanted notifications when a user passes near a geofence or their location is seen to move across a boundary.


The Maps API enhances map customization features, letting you specify marker opacity, fade-in effects, and visibility of 3D buildings. It’s also now possible to change ground overlay images.


Google+ and Google Wallet Instant Buy


Apps that are enabled with Google+ Sign-In will be updated with a simplified sign-in consent dialog. Google Wallet Instant Buy APIs are now available to everyone to try out within a sandbox, with a simplified API that streamlines the buy-flow and reduces integration time.


Google Wallet Instant Buy also includes new Wallet Objects, which means you can award loyalty points to a user's saved rewards program ID for each applicable Google Wallet Instant Buy purchase.


New user control over advertising identifier


To give users better controls and to provide you with a simple, standard system to continue to monetize your apps, this update contains a new, anonymous identifier for advertising purposes (to be used in place of Android ID). Google Settings now includes user controls that enable users to reset this identifier, or opt out of interest-based ads for Google Play apps.


More About Google Play Services


To learn more about Google Play services and the APIs available to you through it, visit the Google Services area of the Android Developers site.


Making your App Content more Accessible from Google

Posted by Chaesang Jung, Software Engineer


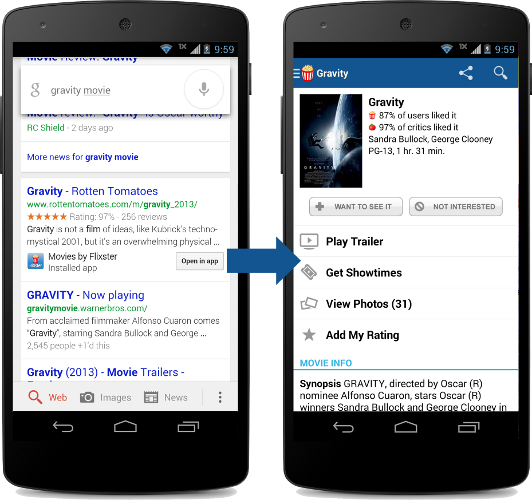
There are many reasons to build or not to build a mobile app as part of your broader mobile strategy. For instance, while apps offer a rich user experience, users can’t access them through Google Search like they do websites. Today, we’re announcing a new Google Search capability, app indexing, that will start to make apps more accessible through Google on Android.


Let’s say that a user is searching for a movie. With app indexing, Google will begin to include deep links to apps in Android search results. When the user taps on the “Open in app” deep links, the app opens up directly to the movie in question.


In this example, in order for the app deep links to appear in search results,


  • The Flixster app supports deep linking

  • The Rotten Tomatoes website has specified that the Flixster app page is an alternate for the web page

  • Google has indexed the Flixster app to determine relevance

  • The user has installed the Flixster app


The end result is that users will have a seamless search experience when accessing your app content through Google.


Google is currently testing app indexing with an initial group of developers including AllTheCooks, AllTrails, Beautylish, Etsy, Expedia, Flixster, Healthtap, IMDb, moviefone, newegg, OpenTable, Trulia, and Wikipedia. Deep links for these applications will start to appear in Google search results on Android, in the US, in a few weeks.


How to get started


If you are interested in enabling indexing for your Android app, you can learn more about our developer guidelines at developers.google.com/app-indexing and sign up. We are expanding our app indexing efforts and will gradually include more developers over time.


Android for all and the new Nexus 5

Just in time for Halloween, we have two new treats for Android fans. First, we're excited to unwrap our latest platform release, KitKat, which delivers a smarter, more immersive Android experience to even more people. And second, we're introducing Nexus 5—a new Nexus phone developed with LG.

The first thing you’ll notice about KitKat is we’ve made the experience much more engaging: the book you're reading, the game you're playing, or the movie you're watching—now all of these take center stage with the new immersive mode, which automatically hides everything except what you really want to see.

Bringing more Google smarts to Android 
Behind the polish on the screen is the power under the hood. Take the Phone app, which for most people hasn’t really changed since the days of flip phones. Now, we’re making calling easier than ever, by helping you search across your contacts, nearby places, or even Google Apps accounts (like your company’s directory), directly from within the app. And with the new Hangouts app, all of your SMS and MMS messages are together in the same place, alongside your other conversations and video calls, so you’ll never miss a message no matter how your friends send it. This is just a small taste of KitKat—learn more on our site.

Google has always focused on helping users get immediate access to the information they need, and we want to bring this same convenience and power to users on Android. With the new Nexus 5 launcher, Google smarts are deeply integrated into the phone you carry around with you, so getting to the information you need is simple, easy and fast. Swipe once from the home screen to get Google Now literally at your fingertips. Put Google to work for you by saying “OK, Google” to launch voice search, send a text, get directions or even play a song you want to hear. And in the coming weeks, we’re enhancing Now with important new card types that bring you information about contextual topics that interest you such as updates from a favorite website or blog.

Reaching the next 1 billion users 
Building a platform that makes mobile phones accessible for everyone has always been at the heart of Android. Until now, some lower-end Android phones couldn't benefit from more recent Android releases due to memory constraints. With KitKat, we've slimmed down Android’s memory footprint by doing things like removing unnecessary background services and reducing the memory consumption of features that you use all the time. We did this not only within Android but across Google services like Chrome and YouTube. RAM (or memory) is one of the most expensive parts of a phone, and now Android can run comfortably on the 512MB of RAM devices that are popular in much of the world, bringing the latest goodies in Android 4.4 within reach for the next billion smartphone users.

Introducing Nexus 5 
Along with our sweet naming tradition, we also introduce a new device with each platform release to showcase the latest Android innovations. For KitKat, we partnered with LG to develop Nexus 5 -- the slimmest and fastest Nexus phone ever made. Its design is simple and refined to showcase the 5” Full HD display. Nexus 5 also keeps you connected at blazing speeds with 4G/LTE and ultra fast wifi. The advanced new lens on Nexus 5 captures more light for brighter night and sharper action shots. And with optical image stabilization, you no longer have to worry about shaky hands and blurry pictures. A new HDR+ mode automatically snaps a rapid burst of photos and combines them to give you the best possible single shot. Learn more on our site.


Nexus 5 is available today, unlocked and without a contract, on Google Play in the U.S., Canada, U.K., Australia, France, Germany, Spain, Italy, Japan and Korea (and coming soon to India), starting at $349. Just in the time for the holidays, Nexus 5 will be available soon at the following retailers: Sprint, T-Mobile, Amazon, Best Buy and RadioShack.

Android 4.4, KitKat, which comes on Nexus 5, will also soon be available on Nexus 4, 7, 10, the Samsung Galaxy S4 and HTC One Google Play edition devices in the coming weeks.

How’s that for a treat?

Posted by Sundar Pichai, SVP, Android, Chrome & Apps

Enterprise Android: Programming Android Database Applications for the Enterprise

The definitive guide to building data-driven Android applications for enterprise systems

Android devices represent a rapidly growing share of the mobile device market. With the release of Android 4, they are moving beyond consumer applications into corporate/enterprise use. Developers who want to start building data-driven Android applications that integrate with enterprise systems will learn how with this book. In the tradition of Wrox Professional guides, it thoroughly covers sharing and displaying data, transmitting data to enterprise applications, and much more.
  • Shows Android developers who are not familiar with database development how to design and build data-driven applications for Android devices and integrate them with existing enterprise systems
  • Explores how to collect and store data using SQLite, share data using content providers, and display data using adapters
  • Covers migrating data using various methods and tools; transmitting data to the enterprise using web services; serializing, securing, and synchronizing data
  • Shows how to take advantage of the built-in capabilities of the Android OS to integrate applications into enterprise class systems
Enterprise Android prepares any Android developer to start creating data-intensive applications that today’s businesses demand

October 28, 2013  1118183495  978-1118183496 1


Basic setup for Microsoft Remote Desktop and Remote Desktop Client for Android


Setup in the video:
- Windows 8.1 Pro running on a slow and outdate Netbook, BenQ Joybook Lite U101 with Aton N270, connect router with cable.
- HTC One X running Android 4.2.2, connect via WiFi.
- HTC Fly running Android 3.2.1, connect via WiFi.


Before establish connection between host PC and remote client app, you have to setup in both PC side and client side.

Set up your Remote Desktop in host PC. (This example running Windows 8.1 Pro)

- Enter "Remote Desktop" in Search, select "Select users who can use remote desktop".


- Under Remote tab, enable "Allow remote connections to this computer" under Remote Desktop. Click the "Select Users" button.


remark: what type of connection should be allowed?

Network Level Authentication (NLA) is an authentication method that completes user authentication before you establish a full connection and the sign-in screen appears. This can help protect the remote PC from hackers and malware.
  • To prevent anyone from connecting to your PC using Remote Desktop or RemoteApp and Desktop Connections, pick Don’t allow remote connections to this computer.
  • If you don't know which version of Remote Desktop Connection other people are using, pick Allow remote connections to this computer.
  • If you know that the people who will connect to your PC are running Windows 7 or Windows 8 on their PCs, check the Only allow connections from computers running Remote Desktop with Network Level Authentication (recommended) box.
Reference: What types of Remote Desktop connections should I allow?

- Click "Add" button.


- Select "Users" in Select the object type. Enter object name and click "Check Names", to get the selected object.


- OK.


- and OK.


 Install and start "Microsoft Remote Desktop" for Android.

Set up your Remote Desktop Client in Android side.

- Select "Remote Desktops" and click the "+".


- Enter Connection, IP address in PC name, User name and Password. And click the check mark on upper-right.


Read the Official FAQ.


update@2013-10-31

Somebody said cannot see "Select users who can use remote desktop" when search "Remote Desktop".

This video show how to, remember the tag after Search is select Everywhere or Settings. If you select Files, Web images or Web videos, "Select users who can use remote desktop" will not appear.


update@2013-12-31
Fix problem of "Remote Desktop blocked by Windows Firewall."

Project Shield - Using Google's infrastructure to protect freedom of expression

Project Shield is an initiative to use Google's infrastructure to protect free expression online. The service currently combines Google's DDoS mitigation technologies and Page Speed Service (PSS), which allow websites to serve their content through Google to be better protected from DDoS attacks. The service is currently seeking 'trusted testers' and people with sites that serve media, elections and human rights-related content are invited to apply for an invite at g.co/projectshield

Getting Started with Remote Desktop Client on mobile

Microsoft release Remote Desktop Client for Android and iOS recently. Users can use the Microsoft Remote Desktop Client to connect to a remote PC and your work resources from almost anywhere.

Download here:
- for Android from Google Play
- for iOS from iTune


***To establish connection between Microsoft Remote Desktop Client to connect between remote PC, you have to do some setup. Refer to the document: Microsoft Remote Desktop Clients.


In my RD Client on Android, the setup of Remote Desktops is something like it:

Updated: Basic setup for Microsoft Remote Desktop and Remote Desktop Client for Android


Sharpen bitmap using Convolution

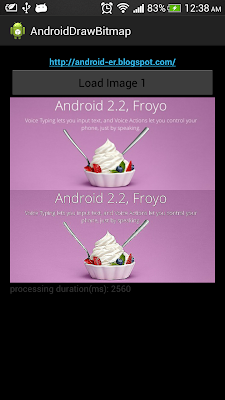
The previous exercise "Blur bitmap using Convolution". By changing the matrix of Convolution class, we can use it to sharpen bitmap.

 class Convolution {

// matrix to sharpen image
int[][] matrix = { { 0, -1, 0 }, { -1, 5, -1 }, { 0, -1, 0 } };
...


Sharpen bitmap using Convolution


more: Something about processing images in Android

Windows 8 customers can update to Windows 8.1 starting from October 17th, 2013

Beginning October 17th, 2013, Windows 8 customers can update to Windows 8.1 for free in the Windows Store! With the return of the Start button, new ways to personalize your Start screen, and more ways to do more things at once, the new Windows gives you one experience for everything in your life.

Windows 8.1 Everywhere


http://msft.it/NewWindows

Blur bitmap using Convolution

The previous exercise blur bitmap by averaging pixels with surrounding pixels. In this exercise, we are going to implement a class of Convolution, to blur bitmap with Convolution Matrix.

Blur bitmap using Convolution


package com.example.androiddrawbitmap;

import java.io.FileNotFoundException;

import android.net.Uri;
import android.os.Bundle;
import android.app.Activity;
import android.content.Intent;
import android.graphics.Bitmap;
import android.graphics.BitmapFactory;
import android.graphics.Canvas;
import android.graphics.Color;
import android.view.View;
import android.view.View.OnClickListener;
import android.widget.Button;
import android.widget.ImageView;
import android.widget.TextView;

public class MainActivity extends Activity {

Button btnLoadImage;
ImageView imageResult, imageOriginal;
TextView textDur;

final int RQS_IMAGE1 = 1;

Uri source;
Bitmap bitmapMaster;
Canvas canvasMaster;

@Override
protected void onCreate(Bundle savedInstanceState) {
super.onCreate(savedInstanceState);
setContentView(R.layout.activity_main);

btnLoadImage = (Button) findViewById(R.id.loadimage);
imageResult = (ImageView) findViewById(R.id.result);
imageOriginal = (ImageView) findViewById(R.id.original);
textDur = (TextView) findViewById(R.id.dur);

btnLoadImage.setOnClickListener(new OnClickListener() {

@Override
public void onClick(View arg0) {
Intent intent = new Intent(
Intent.ACTION_PICK,
android.provider.MediaStore.Images.Media.EXTERNAL_CONTENT_URI);
startActivityForResult(intent, RQS_IMAGE1);
}
});
}

@Override
protected void onActivityResult(int requestCode, int resultCode, Intent data) {
super.onActivityResult(requestCode, resultCode, data);

if (resultCode == RESULT_OK) {
switch (requestCode) {
case RQS_IMAGE1:
source = data.getData();

try {
bitmapMaster = BitmapFactory
.decodeStream(getContentResolver().openInputStream(
source));

imageOriginal.setImageBitmap(bitmapMaster);
loadBlurBitmap(bitmapMaster);

} catch (FileNotFoundException e) {
e.printStackTrace();
}

break;
}
}
}

private void loadBlurBitmap(Bitmap src) {
if (src != null) {

Bitmap bmBlur;
Convolution convolution = new Convolution();

long startTime = System.currentTimeMillis();
bmBlur = convolution.convBitmap(src);
long duration = System.currentTimeMillis() - startTime;

imageResult.setImageBitmap(bmBlur);
textDur.setText("processing duration(ms): " + duration);
}
}

class Convolution {

// matrix to blur image
int[][] matrix = { { 1, 1, 1 }, { 1, 1, 1 }, { 1, 1, 1 } };
// kernal_width x kernal_height = dimension pf matrix
// halfWidth = (kernal_width - 1)/2
// halfHeight = (kernal_height - 1)/2
int kernal_width = 3;
int kernal_height = 3;
int kernal_halfWidth = 1;
int kernal_halfHeight = 1;

public Bitmap convBitmap(Bitmap src) {

int[][] sourceMatrix = new int[kernal_width][kernal_height];

// averageWeight = total of matrix[][]. The result of each
// pixel will be divided by averageWeight to get the average
int averageWeight = 0;
for (int i = 0; i < kernal_width; i++) {
for (int j = 0; j < kernal_height; j++) {
averageWeight += matrix[i][j];
}
}
if (averageWeight == 0) {
averageWeight = 1;
}

int pixelR, pixelG, pixelB, pixelA;

int w = src.getWidth();
int h = src.getHeight();
Bitmap bm = Bitmap.createBitmap(w, h, Bitmap.Config.ARGB_8888);

// fill sourceMatrix with surrounding pixel
for (int x = 0; x < w; x++) {
for (int y = 0; y < h; y++) {

for (int xk = 0; xk < kernal_width; xk++) {
for (int yk = 0; yk < kernal_height; yk++) {
int px = x + xk - kernal_halfWidth;
int py = y + yk - kernal_halfHeight;

if (px < 0) {
px = 0;
} else if (px >= w) {
px = w - 1;
}

if (py < 0) {
py = 0;
} else if (py >= h) {
py = h - 1;
}

sourceMatrix[xk][yk] = src.getPixel(px, py);

}
}

pixelR = pixelG = pixelB = pixelA = 0;

for (int k = 0; k < kernal_width; k++) {
for (int l = 0; l < kernal_height; l++) {

pixelR += Color.red(sourceMatrix[k][l])
* matrix[k][l];
pixelG += Color.green(sourceMatrix[k][l])
* matrix[k][l];
pixelB += Color.blue(sourceMatrix[k][l])
* matrix[k][l];
pixelA += Color.alpha(sourceMatrix[k][l])
* matrix[k][l];
}
}
pixelR = pixelR / averageWeight;
pixelG = pixelG / averageWeight;
pixelB = pixelB / averageWeight;
pixelA = pixelA / averageWeight;

if (pixelR < 0) {
pixelR = 0;
} else if (pixelR > 255) {
pixelR = 255;
}

if (pixelG < 0) {
pixelG = 0;
} else if (pixelG > 255) {
pixelG = 255;
}

if (pixelB < 0) {
pixelB = 0;
} else if (pixelB > 255) {
pixelB = 255;
}

if (pixelA < 0) {
pixelA = 0;
} else if (pixelA > 255) {
pixelA = 255;
}

bm.setPixel(x, y,
Color.argb(pixelA, pixelR, pixelG, pixelB));
}
}

return bm;
}
}
}


Keep using layout in the post Blur bitmap.

download filesDownload the files.

download filesDownload and try the APK.

Next: By changing the matrix in Convolution class, we can use it to sharpen bitmap.


more: Something about processing images in Android

USB On the Go, for HTC


If your Android support USB OTG, you can access USB Storage via USB OTG cable. (Please notice that not all devices support this feature)

Here is a post describe using of USB On the Go for HTC device from HTC Blog: http://blog.htc.com/usb-otg/

  • First, get your USB OTG cable ready
  • Plug your USB drive into the USB port on the cable, then plug the cable into your phones microUSB port.
  • Now you can access the data on your USB drive through your HTC smartphone. Using USB OTG, you can use apps like Gallery, Music and Polaris Office to easily access files on your USB drive and your smartphone.
  • When you’re done, you can quickly check available storage on your USB drive by going to Setting > Storage on your HTC phone.  Also, don’t forget to unmount your USB drive when you’re finished.

Getting Your SMS Apps Ready for KitKat


Posted by Scott Main and David Braun


Sending and receiving SMS messages are fundamental features on mobile devices and many developers have built successful apps that enhance this experience on Android. Some of you have built SMS apps using hidden APIs—a practice we discourage because hidden APIs may be changed or removed and new devices are not tested against them for compatibility. So, to provide you with a fully supported set of APIs for building SMS apps and to make the user experience for messaging more predictable, Android 4.4 (KitKat) makes the existing APIs public and adds the concept of a default SMS app, which the user can select in system settings.


This means that if you are using the hidden SMS APIs on previous platform versions,
you need to make some adjustments so your app continues to work when Android 4.4 is released later this year.


Make your app the default SMS app


On Android 4.4, only one app can receive the new SMS_DELIVER_ACTION intent, which the system
broadcasts when a new SMS message arrives. Which app receives this broadcast is determined by
which app the user has selected as the default SMS app in system settings. Likewise, only the
default SMS app receives the new WAP_PUSH_DELIVER_ACTION intent when a new MMS arrives.


Other apps that only want to read new messages can instead receive the SMS_RECEIVED_ACTION broadcast intent when a new SMS arrives. However, only the app that receives the SMS_DELIVER_ACTION broadcast (the user-specified default SMS app) is able to write to the SMS Provider defined by the android.provider.Telephony class and subclasses. As such, it's important that you update your messaging app as soon as possible to be available as a default SMS app, because although your existing app won't crash on an Android 4.4 device, it will silently fail when attempting to write to the SMS Provider.


In order for your app to appear in the system settings as an eligible default SMS app, your manifest file must declare some specific capabilities. So you must update your app to do the following things:


  • In a broadcast receiver, include an intent filter for SMS_DELIVER_ACTION ("android.provider.Telephony.SMS_DELIVER"). The broadcast receiver must also require the BROADCAST_SMS permission.

    This allows your app to directly receive incoming SMS messages.


  • In a broadcast receiver, include an intent filter for WAP_PUSH_DELIVER_ACTION ("android.provider.Telephony.WAP_PUSH_DELIVER") with the MIME type "application/vnd.wap.mms-message". The broadcast receiver must also require the BROADCAST_WAP_PUSH permission.

    This allows your app to directly receive incoming MMS messages.


  • In your activity that delivers new messages, include an intent filter for ACTION_SENDTO ("android.intent.action.SENDTO") with schemas, sms:, smsto:, mms:, and mmsto:.

    This allows your app to receive intents from other apps that want to deliver a message.


  • In a service, include an intent filter for ACTION_RESPONSE_VIA_MESSAGE ("android.intent.action.RESPOND_VIA_MESSAGE") with schemas, sms:, smsto:, mms:, and mmsto:. This service must also require the SEND_RESPOND_VIA_MESSAGE permission.

    This allows users to respond to incoming phone calls with an immediate text message using your app.


For example, here's a manifest file with the necessary components and intent filters:


<manifest>
...
<application>
<!-- BroadcastReceiver that listens for incoming SMS messages -->
<receiver android:name=".SmsReceiver"
android:permission="android.permission.BROADCAST_SMS">
<intent-filter>
<action android:name="android.provider.Telephony.SMS_DELIVER" />
</intent-filter>
</receiver>

<!-- BroadcastReceiver that listens for incoming MMS messages -->
<receiver android:name=".MmsReceiver"
android:permission="android.permission.BROADCAST_WAP_PUSH">
<intent-filter>
<action android:name="android.provider.Telephony.WAP_PUSH_DELIVER" />
<data android:mimeType="application/vnd.wap.mms-message" />
</intent-filter>
</receiver>

<!-- Activity that allows the user to send new SMS/MMS messages -->
<activity android:name=".ComposeSmsActivity" >
<intent-filter>
<action android:name="android.intent.action.SEND" />
<action android:name="android.intent.action.SENDTO" />
<category android:name="android.intent.category.DEFAULT" />
<category android:name="android.intent.category.BROWSABLE" />
<data android:scheme="sms" />
<data android:scheme="smsto" />
<data android:scheme="mms" />
<data android:scheme="mmsto" />
</intent-filter>
</activity>

<!-- Service that delivers messages from the phone "quick response" -->
<service android:name=".HeadlessSmsSendService"
android:permission="android.permission.SEND_RESPOND_VIA_MESSAGE"
android:exported="true" >
<intent-filter>
<action android:name="android.intent.action.RESPOND_VIA_MESSAGE" />
<category android:name="android.intent.category.DEFAULT" />
<data android:scheme="sms" />
<data android:scheme="smsto" />
<data android:scheme="mms" />
<data android:scheme="mmsto" />
</intent-filter>
</service>
</application>
</manifest>


Any filters for the SMS_RECEIVED_ACTION broadcast in existing apps will continue to work the same on Android 4.4, but only as an observer of new messages, because unless your app also receives the SMS_DELIVER_ACTION broadcast, you cannot write to the SMS Provider on Android 4.4.


Beginning with Android 4.4, you should stop listening for the SMS_RECEIVED_ACTION broadcast, which you can do at runtime by checking the platform version then disabling your broadcast receiver for SMS_RECEIVED_ACTION with PackageManager.setComponentEnabledSetting(). However, you can continue listening for that broadcast if your app needs only to read special SMS messages, such as to perform phone number verification. Note that—beginning with Android 4.4—any attempt by your app to abort the SMS_RECEIVED_ACTION broadcast will be ignored so all apps interested have the chance to receive it.


Tip: To distinguish the two SMS broadcasts, imagine that the SMS_RECEIVED_ACTION simply says "the system received an SMS," whereas the SMS_DELIVER_ACTION says "the system is delivering your app an SMS, because you're the default SMS app."


Disable features when not the default SMS app


In consideration of some apps that do not want to behave as the default SMS app but still want to send messages, any app that has the SEND_SMS permission is still able to send SMS messages using SmsManager. If and only if an app is not selected as the default SMS app on Android 4.4, the system automatically writes the sent SMS messages to the SMS Provider (the default SMS app is always responsible for writing its sent messages to the SMS Provider).


However, if your app is designed to behave as the default SMS app, then while your app is not selected as the default, it's important that you understand the limitations placed upon your app and disable features as appropriate. Although the system writes sent SMS messages to the SMS Provider while your app is not the default SMS app, it does not write sent MMS messages and your app is not able to write to the SMS Provider for other operations, such as to mark messages as draft, mark them as read, delete them, etc.


So when your messaging activity resumes, check whether your app is the default SMS app by querying Telephony.Sms.getDefaultSmsPackage(), which returns the package name of the current default SMS app. If it doesn't match your package name, disable features such as the ability for users to send new messages.


When the user decides to use your app for messaging, you can display a dialog hosted by the system that allows the user to make your app the default SMS app. To display the dialog, call startActivity() with the Telephony.Sms.Intents.ACTION_CHANGE_DEFAULT intent, including an extra with the Sms.Intents.EXTRA_PACKAGE_NAME key and your package name as the string value.


For example, your activity might include code like this:


public class ComposeSmsActivity extends Activity {

@Override
protected void onResume() {
super.onResume();

final String myPackageName = getPackageName();
if (!Telephony.Sms.getDefaultSmsPackage(this).equals(myPackageName)) {
// App is not default.
// Show the "not currently set as the default SMS app" interface
View viewGroup = findViewById(R.id.not_default_app);
viewGroup.setVisibility(View.VISIBLE);

// Set up a button that allows the user to change the default SMS app
Button button = (Button) findViewById(R.id.change_default_app);
button.setOnClickListener(new View.OnClickListener() {
public void onClick(View v) {
Intent intent =
new Intent(Telephony.Sms.Intents.ACTION_CHANGE_DEFAULT);
intent.putExtra(Telephony.Sms.Intents.EXTRA_PACKAGE_NAME,
myPackageName);
startActivity(intent);
}
});
} else {
// App is the default.
// Hide the "not currently set as the default SMS app" interface
View viewGroup = findViewById(R.id.not_default_app);
viewGroup.setVisibility(View.GONE);
}
}
}


Advice for SMS backup & restore apps


Because the ability to write to the SMS Provider is restricted to the app the user selects as the default SMS app, any existing app designed purely to backup and restore SMS messages will currently be unable to restore SMS messages on Android 4.4. An app that backs up and restores SMS messages must also be set as the default SMS app so that it can write messages in the SMS Provider. However, if the app does not also send and receive SMS messages, then it should not remain set as the default SMS app. So, you can provide a functional user experience with the following design when the user opens your app to initiate a one-time restore operation:


  1. Query the current default SMS app's package name and save it.
    String defaultSmsApp = Telephony.Sms.getDefaultSmsPackage(context);


  2. Request the user change the default SMS app to your app in order to restore SMS messages (you must be the default SMS app in order to write to the SMS Provider).
    Intent intent = new Intent(context, Sms.Intents.ACTION_CHANGE_DEFAULT);
    intent.putExtra(Sms.Intents.EXTRA_PACKAGE_NAME, context.getPackageName());
    startActivity(intent);


  3. When you finish restoring all SMS messages, request the user to change the default SMS app back to the previously selected app (saved during step 1).
    Intent intent = new Intent(context, Sms.Intents.ACTION_CHANGE_DEFAULT);
    intent.putExtra(Sms.Intents.EXTRA_PACKAGE_NAME, defaultSmsApp);
    startActivity(intent);


Prepare to update your SMS app


We encourage you to update your apps as soon as possible to provide your users the best experience on Android. To help you make the changes, we'll soon be providing the necessary SDK components for Android 4.4 that allow you to compile and test your changes on Android 4.4. Stay tuned!

List attached USB devices in USB Host mode

In this exercise, my Android phone (HTC One X) act as USB Host to list attached USB devices via USB OTG cable. It target devices with minSdkVersion="12".

Listed result without any extra device attached.

With card reader attached, via USB OTG cable.

With another Nexus One attached as slave, via USB OTG cable.


To specify the app to be run as UDB Host, add uses-feature of "android.hardware.usb.host", and android:minSdkVersion="12" in AndroidManifest.xml.
<?xml version="1.0" encoding="utf-8"?>
<manifest xmlns:android="http://schemas.android.com/apk/res/android"
package="com.example.androidusbhost"
android:versionCode="1"
android:versionName="1.0" >

<uses-feature android:name="android.hardware.usb.host" />
<uses-sdk
android:minSdkVersion="12"
android:targetSdkVersion="18" />

<application
android:allowBackup="true"
android:icon="@drawable/ic_launcher"
android:label="@string/app_name"
android:theme="@style/AppTheme" >
<activity
android:name="com.example.androidusbhost.MainActivity"
android:label="@string/app_name" >
<intent-filter>
<action android:name="android.intent.action.MAIN" />

<category android:name="android.intent.category.LAUNCHER" />
</intent-filter>
</activity>
</application>

</manifest>


Main Java code.
package com.example.androidusbhost;

import java.util.HashMap;
import java.util.Iterator;

import android.hardware.usb.UsbConstants;
import android.hardware.usb.UsbDevice;
import android.hardware.usb.UsbManager;
import android.os.Bundle;
import android.view.View;
import android.view.View.OnClickListener;
import android.widget.Button;
import android.widget.TextView;
import android.app.Activity;
import android.content.Context;

public class MainActivity extends Activity {

Button btnCheck;
TextView textInfo;

@Override
protected void onCreate(Bundle savedInstanceState) {
super.onCreate(savedInstanceState);
setContentView(R.layout.activity_main);
btnCheck = (Button) findViewById(R.id.check);
textInfo = (TextView) findViewById(R.id.info);
btnCheck.setOnClickListener(new OnClickListener() {

@Override
public void onClick(View arg0) {
checkInfo();
}
});
}

private void checkInfo() {
UsbManager manager = (UsbManager) getSystemService(Context.USB_SERVICE);
HashMap<String, UsbDevice> deviceList = manager.getDeviceList();
Iterator<UsbDevice> deviceIterator = deviceList.values().iterator();

String i = "";
while (deviceIterator.hasNext()) {
UsbDevice device = deviceIterator.next();
i += "\n" +
"DeviceID: " + device.getDeviceId() + "\n" +
"DeviceName: " + device.getDeviceName() + "\n" +
"DeviceClass: " + device.getDeviceClass() + " - "
+ translateDeviceClass(device.getDeviceClass()) + "\n" +
"DeviceSubClass: " + device.getDeviceSubclass() + "\n" +
"VendorID: " + device.getVendorId() + "\n" +
"ProductID: " + device.getProductId() + "\n";
}

textInfo.setText(i);
}

private String translateDeviceClass(int deviceClass){
switch(deviceClass){
case UsbConstants.USB_CLASS_APP_SPEC:
return "Application specific USB class";
case UsbConstants.USB_CLASS_AUDIO:
return "USB class for audio devices";
case UsbConstants.USB_CLASS_CDC_DATA:
return "USB class for CDC devices (communications device class)";
case UsbConstants.USB_CLASS_COMM:
return "USB class for communication devices";
case UsbConstants.USB_CLASS_CONTENT_SEC:
return "USB class for content security devices";
case UsbConstants.USB_CLASS_CSCID:
return "USB class for content smart card devices";
case UsbConstants.USB_CLASS_HID:
return "USB class for human interface devices (for example, mice and keyboards)";
case UsbConstants.USB_CLASS_HUB:
return "USB class for USB hubs";
case UsbConstants.USB_CLASS_MASS_STORAGE:
return "USB class for mass storage devices";
case UsbConstants.USB_CLASS_MISC:
return "USB class for wireless miscellaneous devices";
case UsbConstants.USB_CLASS_PER_INTERFACE:
return "USB class indicating that the class is determined on a per-interface basis";
case UsbConstants.USB_CLASS_PHYSICA:
return "USB class for physical devices";
case UsbConstants.USB_CLASS_PRINTER:
return "USB class for printers";
case UsbConstants.USB_CLASS_STILL_IMAGE:
return "USB class for still image devices (digital cameras)";
case UsbConstants.USB_CLASS_VENDOR_SPEC:
return "Vendor specific USB class";
case UsbConstants.USB_CLASS_VIDEO:
return "USB class for video devices";
case UsbConstants.USB_CLASS_WIRELESS_CONTROLLER:
return "USB class for wireless controller devices";
default: return "Unknown USB class!";

}
}
}


layout
<LinearLayout xmlns:android="http://schemas.android.com/apk/res/android"
xmlns:tools="http://schemas.android.com/tools"
android:layout_width="match_parent"
android:layout_height="match_parent"
android:paddingBottom="@dimen/activity_vertical_margin"
android:paddingLeft="@dimen/activity_horizontal_margin"
android:paddingRight="@dimen/activity_horizontal_margin"
android:paddingTop="@dimen/activity_vertical_margin"
android:orientation="vertical"
tools:context=".MainActivity" >

<TextView
android:layout_width="wrap_content"
android:layout_height="wrap_content"
android:layout_gravity="center_horizontal"
android:autoLink="web"
android:text="http://arteluzevida.blogspot.com/"
android:textStyle="bold" />
<Button
android:id="@+id/check"
android:layout_width="match_parent"
android:layout_height="wrap_content"
android:text="Check USB devices" />
<TextView
android:id="@+id/info"
android:layout_width="match_parent"
android:layout_height="wrap_content" />

</LinearLayout>


download filesDownload the files.

Next: - List UsbDevice, UsbInterface and UsbEndpoint in USB Host mode


Step-by-step: Android USB Host Mode programming

Learn OpenGL ES: For Mobile Game and Graphics Development

Release date: August 30, 2013 | ISBN-10: 1430250534 | ISBN-13: 978-1430250531 | Edition: 1

Want to create sophisticated games and graphics-intensive apps? Learn OpenGL ES gets you started immediately with OpenGL ES.  After mastering the basics of OpenGL ES itself, you will quickly find yourself writing and building game apps, without having to learn about object oriented programming techniques.

This book demonstrates the use of a powerful open-source modeling tool, Blender. You will be guided, step by step, through the development of Tank Fence, a dynamic, interactive 3D game. Along the way you'll gain skills in building apps with Eclipse and the Android SDK or NDK, rendering graphics using hardware acceleration, and multithreading for performance and responsiveness. iOS developers will also find this book's information invaluable when writing their apps.

You'll learn everything you need to know about:
  • Creating simple, efficient game UIs
  • Designing the basic building blocks of an exciting, interactive 3D game
  • Pulling all the elements together with Blender, a powerful open-source tool for modeling, animation, rendering, compositing, video editing, and game creation
  • Taking the next big step using custom and inbuilt functions, texturing, shading, light sources, and more
  • Refining your mobile game app through collision detection, player-room-obstacle classes, and storage classes
  • Doing all this efficiently on mobile devices with limited resources and processing
What you’ll learn
  • How to install and use OpenGL ES 2.0 on Android
  • GLSL ES Fundamentals
  • State Management
  • Modeling 3D Objects Using Blender
  • Using the Perl Mesh Parser
  • Vertex Buffer Objects
  • Using Color Masks
  • sampler2D and samplerCube Uniforms
  • Multi-Texturing
  • Lambert Illumination Model
  • Implementing the Lighting Equation
  • Design, write, and build Tank Fence, an interactive 3D game
Who this book is for

Learn OpenGL ES is ideal for mobile game and interactive app developers who want to know more about the OpenGL ES engine and and use it to build more sophisticated, graphically-rich games and other apps. While the code is developed on Android, iOS developers will also find this book invaluable.

Table of Contents
1. Why OpenGL ES?
2. UI for games: Keep it simple
3. First Steps:  Mobile Game App Development
4. 3D Modeling
5. Functions, Shading, Light Source and Objects
6. Carrying Further: Collision Detection


Some example of simple styled button

Some example of simple styled button


<LinearLayout xmlns:android="http://schemas.android.com/apk/res/android"
xmlns:tools="http://schemas.android.com/tools"
android:layout_width="match_parent"
android:layout_height="match_parent"
android:orientation="vertical"
android:paddingBottom="@dimen/activity_vertical_margin"
android:paddingLeft="@dimen/activity_horizontal_margin"
android:paddingRight="@dimen/activity_horizontal_margin"
android:paddingTop="@dimen/activity_vertical_margin"
tools:context=".MainActivity" >

<TextView
android:layout_width="wrap_content"
android:layout_height="wrap_content"
android:layout_gravity="center_horizontal"
android:autoLink="web"
android:text="http://arteluzevida.blogspot.com/"
android:textStyle="bold" />

<Button
android:layout_width="fill_parent"
android:layout_height="wrap_content"
android:text="Default Button" />

<Button
android:layout_width="fill_parent"
android:layout_height="wrap_content"
android:background="@drawable/ic_launcher"
android:text="Button with background of drawable, no CLICK visual effect" />

<Button
android:layout_width="fill_parent"
android:layout_height="wrap_content"
android:background="#550000ff"
android:text="Button with background of color, no CLICK visual effect" />

<Button
android:layout_width="fill_parent"
android:layout_height="wrap_content"
android:drawableRight="@drawable/ic_launcher"
android:text="Button with drawableRight" />

<ImageButton
android:layout_width="fill_parent"
android:layout_height="wrap_content"
android:src="@drawable/ic_launcher" />

<Button
style="?android:attr/borderlessButtonStyle"
android:layout_width="fill_parent"
android:layout_height="wrap_content"
android:text="Button with borderlessButtonStyle (for API 11+)" />

<Button
android:layout_width="fill_parent"
android:layout_height="wrap_content"
android:shadowColor="#000000"
android:shadowDx="5"
android:shadowDy="5"
android:shadowRadius="10"
android:text="Button with shadow on Text" />

<Button
android:layout_width="fill_parent"
android:layout_height="wrap_content"
android:shadowColor="#000000"
android:text="Button with Styled Text"
android:textStyle="bold|italic" />

</LinearLayout>


Connecting your Android App to Azure Mobile Services (including Android Dev Tools setup)


Chris Risner and Nick Harris have  a set of excellent Mobile Services videos in the Windows Azure area of Channel 9 here.

The video in this post is for those of you who have no experience with the Android Development Tools (ADT). You'll get some errors with the latest build of the ADT unless you follow the ADT setup instructions in this video.

I'd suggest following along with this video to set up the ADT and then watching Chris and Nick's excellent set of Mobile Services videos to extend your knowledge.

Source: http://channel9.msdn.com/posts/Connecting-your-Android-App-to-Azure-Mobile-Services-including-Android-Dev-Tools-setup

Beginning Android C++ Game Development

Beginning Android C++ Game Development introduces general and Android game developers like you to Android's powerful Native Development Kit (NDK). The Android NDK platform allows you to build the most sophisticated, complex and best performing game apps that leverage C++.  In short, you learn to build professional looking and performing game apps like the book's case study, Droid Runner.In this book, you'll learn all the major aspects of game design and programming using the Android NDK and be ready to submit your first professional video game app to Google Play and Amazon Appstore for today's Android smartphones and tablet users to download and play.

The techniques contained in this book include building a game engine, writing a renderer, and building a full game app with entities, game levels and collisions. As part of the tutorial you'll also learn about inserting perspectives using cameras and including audio in your game app.

What you’ll learn

  • How to build your first real-world quality game app for Android smartphones and tablets using the power of the Android C++ APIs as found in the NDK
  • How to do professional level, quality game design, starting the Droid Runner case study that's used throughout this book to illustrate the key concepts
  • How to build a game engine
  • How to write a renderer
  • How to build the Droid Runner game app with entities, game levels and collisions
  • How to insert perspectives using cameras and more
  • How to create or integrate audio into your game app
  • How to submit to the Android app stores like Google Play and Amazon Appstore

Who this book is for

This book is for game developers looking to get into Android development for the first time, as well as Android game developers who have never used the Native Development Kit (NDK).

Table of Contents

Section 1 : An Introduction to Android and Game Programming
1. An Introduction To Game Development
2. An Introduction to the Android Game Development Ecosystem.
(A First Game:  HelloDroid)
3. Game Design For Beginners - Droid Runner
(Case Study begins: Droid Runner)
4. Building a Game Engine
5. Writing a Renderer

Section 2 : Building Droid Runner Game App
6. Game Entities
7. Building Game Levels With Collision
8. Virtual Cameras
9. Lighting and Materials
10. Game Audio
11. Self-Publishing 101

Appendices:
A. Developing with the Android NDK and Eclipse.
B. Android Hardware
C. C++ and Design Patterns
D. C++ Math 

Tablet changes in Google Play

Posted by Ellie Powers, Google Play team


Fueled by the Nexus 7 and other great devices, more than 70 million Android tablets have been activated. Thousands of developers have already designed their apps to look great on tablets, and with the holidays fast approaching, we’re making it even easier for the next wave of tablet owners to discover great apps and games.


Play Store tablet changes coming up on November 21


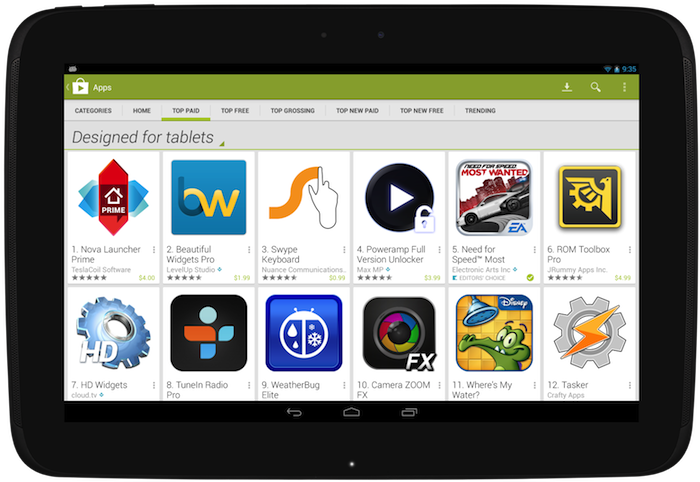
Last year, Google Play added a “designed for tablets” section, where users could easily discover apps that look great on their 7”- and 10”-tablets. This section includes only apps and games which meet criteria and guidelines we established last year. (Here’s an overview if you missed it.) Developers who invest the time to meet the criteria are seeing great results; take Remember The Milk, which saw an 83% increase in tablet downloads from being in this section. (see the whole story here).


On November 21 2013, the Play Store made a series of changes so it’s even easier for tablet users to find those apps that are best for their devices. First, by default, users browsing Google Play on a tablet will now see apps and games that are designed for tablets on the top lists (Top Paid, Top Free, Top Grossing, Top New Paid, Top New Free, and Trending). Tablet users will still be able to switch the view so they can see all apps or games if they choose. Also starting November 21, apps and games that do not meet the “designed for tablets” criteria will be marked as “designed for phones” for users who browse the Play Store on tablets.


You’ll want to make sure that your app is designed for tablets; read more about how to do this at the end of this blog post.


Make sure your app is ready!


If you want to be sure your app is included in the “Designed for tablets” view, go to the Developer Console to check your tablet optimization tips. If you see any issues listed there, you’ll need to address them in your app and upload a new binary for distribution. If there are no issues listed, your app is eligible to be included in the “Designed for tablets" view in the top lists.


Also, make sure to read the full tablet quality checklist to understand how to build outstanding tablet experiences.


Everyday, thousands of Android developers are taking advantage of the tremendous Android tablet opportunity. The flood of new users coupled with the increased screen size means new user experiences, more engagement and more monetization opportunities. We’re excited to see what you do!


Blur bitmap

This exercise generate a blur bitmap by changing each pixel to the average of its surrounding 5x5 pixel.

Blur bitmap


package com.example.androiddrawbitmap;

import java.io.FileNotFoundException;

import android.net.Uri;
import android.os.Bundle;
import android.app.Activity;
import android.content.Intent;
import android.graphics.Bitmap;
import android.graphics.BitmapFactory;
import android.graphics.Canvas;
import android.graphics.Color;
import android.view.View;
import android.view.View.OnClickListener;
import android.widget.Button;
import android.widget.ImageView;
import android.widget.TextView;

public class MainActivity extends Activity {

Button btnLoadImage;
ImageView imageResult, imageOriginal;
TextView textDur;

final int RQS_IMAGE1 = 1;

Uri source;
Bitmap bitmapMaster;
Canvas canvasMaster;

@Override
protected void onCreate(Bundle savedInstanceState) {
super.onCreate(savedInstanceState);
setContentView(R.layout.activity_main);

btnLoadImage = (Button) findViewById(R.id.loadimage);
imageResult = (ImageView) findViewById(R.id.result);
imageOriginal = (ImageView)findViewById(R.id.original);
textDur = (TextView)findViewById(R.id.dur);

btnLoadImage.setOnClickListener(new OnClickListener() {

@Override
public void onClick(View arg0) {
Intent intent = new Intent(
Intent.ACTION_PICK,
android.provider.MediaStore.Images.Media.EXTERNAL_CONTENT_URI);
startActivityForResult(intent, RQS_IMAGE1);
}
});
}

@Override
protected void onActivityResult(int requestCode, int resultCode, Intent data) {
super.onActivityResult(requestCode, resultCode, data);

if (resultCode == RESULT_OK) {
switch (requestCode) {
case RQS_IMAGE1:
source = data.getData();

try {
bitmapMaster = BitmapFactory
.decodeStream(getContentResolver().openInputStream(
source));

imageOriginal.setImageBitmap(bitmapMaster);
loadBlurBitmap(bitmapMaster);

} catch (FileNotFoundException e) {
// TODO Auto-generated catch block
e.printStackTrace();
}

break;
}
}
}

private void loadBlurBitmap(Bitmap src) {
if (src != null) {

Bitmap bmBlur;

long startTime = System.currentTimeMillis();
bmBlur = getBlurBitmap(src);
long duration = System.currentTimeMillis() - startTime;

imageResult.setImageBitmap(bmBlur);
textDur.setText("processing duration(ms): " + duration);
}
}

private Bitmap getBlurBitmap(Bitmap src) {

final int widthKernal = 5;
final int heightKernal = 5;

int w = src.getWidth();
int h = src.getHeight();

Bitmap blurBitmap = Bitmap.createBitmap(w, h, Bitmap.Config.ARGB_8888);

for (int x = 0; x < w; x++) {
for (int y = 0; y < h; y++) {

int r = 0;
int g = 0;
int b = 0;
int a = 0;

for (int xk = 0; xk < widthKernal; xk++) {
for (int yk = 0; yk < heightKernal; yk++) {
int px = x + xk -2;
int py = y + yk -2;

if(px < 0){
px = 0;
}else if(px >= w){
px = w-1;
}

if(py < 0){
py = 0;
}else if(py >= h){
py = h-1;
}

int intColor = src.getPixel(px, py);
r += Color.red(intColor);
g += Color.green(intColor);
b += Color.blue(intColor);
a += Color.alpha(intColor);

}
}

blurBitmap.setPixel(x, y, Color.argb(a/25, r/25, g/25, b/25));

}
}

return blurBitmap;
}

}


<LinearLayout xmlns:android="http://schemas.android.com/apk/res/android"
xmlns:tools="http://schemas.android.com/tools"
android:layout_width="match_parent"
android:layout_height="match_parent"
android:background="@android:color/background_dark"
android:orientation="vertical"
android:paddingBottom="@dimen/activity_vertical_margin"
android:paddingLeft="@dimen/activity_horizontal_margin"
android:paddingRight="@dimen/activity_horizontal_margin"
android:paddingTop="@dimen/activity_vertical_margin"
tools:context=".MainActivity" >

<TextView
android:layout_width="wrap_content"
android:layout_height="wrap_content"
android:layout_gravity="center_horizontal"
android:autoLink="web"
android:text="http://arteluzevida.blogspot.com/"
android:textStyle="bold" />

<Button
android:id="@+id/loadimage"
android:layout_width="match_parent"
android:layout_height="wrap_content"
android:text="Load Image 1" />

<ScrollView
android:layout_width="match_parent"
android:layout_height="wrap_content" >
<LinearLayout
android:layout_width="match_parent"
android:layout_height="wrap_content"
android:orientation="vertical" >
<ImageView
android:id="@+id/original"
android:layout_width="match_parent"
android:layout_height="wrap_content"
android:adjustViewBounds="true"
android:scaleType="fitXY" />
<ImageView
android:id="@+id/result"
android:layout_width="match_parent"
android:layout_height="wrap_content"
android:adjustViewBounds="true"
android:scaleType="fitXY" />
<TextView
android:id="@+id/dur"
android:layout_width="match_parent"
android:layout_height="wrap_content"/>
</LinearLayout>
</ScrollView>
</LinearLayout>

download filesDownload the files.

download filesDownload and try the APK.


more: Something about processing images in Android