Widget Design Guidelines

Since the beginning of the year, the Android UI team has been hard at work on the Android 1.5 release. Starting today with widgets, we would like to share some of our evolving Android design principles with you.

Widgets are a new feature that application developers can use to promote a small sample of the most relevant dynamic data from their applications on the Home screen. We've designed widgets to fit within our Home screen grid framework, which means you and your designer can create a widget within a 4x1, 3x3, or 2x2 grid cell, depending on the space you need for an at-a-glance summary of information from your application. To illustrate the preferred ways to design widgets for the home screen, we've assembled Widget Design Guidelines.

We're also providing the original artwork assets and source files that we used to create the widgets bundled with Android 1.5. If you want your widgets to match the platform in terms of appearance, use the templates that are available throughout the Widget Design Guidelines.

For more technical information around widgets, take a look at Jeff Sharkey's blog post as well as the AppWidgets documentation.

We've only just begun to scratch the surface of what's possible using widgets. We're looking forward to seeing how far you can extend our work!

One last thing: in the coming weeks, we'll be rolling out more articles and presentations that demonstrate design best practices for Android. For example, if you've ever wanted to learn how to create and be consistent with iconography on Android, stay tuned: we'll be posting sample guides and templates.


Learn about Android 1.5 and more at Google I/O. Members of the Android team will be there to give a series of in-depth technical sessions and to field your toughest questions.

Backward compatibility for Android applications

Android 1.5 introduced a number of new features that application developers can take advantage of, like virtual input devices and speech recognition. As a developer, you need to be aware of backward compatibility issues on older devices—do you want to allow your application to run on all devices, or just those running newer software? In some cases it will be useful to employ the newer APIs on devices that support them, while continuing to support older devices.

If the use of a new API is integral to the program—perhaps you need to record video—you should add a manifest entry to ensure your app won't be installed on older devices. For example, if you require APIs added in 1.5, you would specify 3 as the minimum SDK version:

  <manifest>
...
<uses-sdk android:minSdkVersion="3" />
...
</manifest>

If you want to add a useful but non-essential feature, such as popping up an on-screen keyboard even when a hardware keyboard is available, you can write your program in a way that allows it to use the newer features without failing on older devices.

Using reflection

Suppose there's a simple new call you want to use, like android.os.Debug.dumpHprofData(String filename). The android.os.Debug class has existed since the first SDK, but the method is new in 1.5. If you try to call it directly, your app will fail to run on older devices.

The simplest way to call the method is through reflection. This requires doing a one-time lookup and caching the result in a Method object. Using the method is a matter of calling Method.invoke and un-boxing the result. Consider the following:

public class Reflect {
private static Method mDebug_dumpHprofData;

static {
initCompatibility();
};

private static void initCompatibility() {
try {
mDebug_dumpHprofData = Debug.class.getMethod(
"dumpHprofData", new Class[] { String.class } );
/* success, this is a newer device */
} catch (NoSuchMethodException nsme) {
/* failure, must be older device */
}
}

private static void dumpHprofData(String fileName) throws IOException {
try {
mDebug_dumpHprofData.invoke(null, fileName);
} catch (InvocationTargetException ite) {
/* unpack original exception when possible */
Throwable cause = ite.getCause();
if (cause instanceof IOException) {
throw (IOException) cause;
} else if (cause instanceof RuntimeException) {
throw (RuntimeException) cause;
} else if (cause instanceof Error) {
throw (Error) cause;
} else {
/* unexpected checked exception; wrap and re-throw */
throw new RuntimeException(ite);
}
} catch (IllegalAccessException ie) {
System.err.println("unexpected " + ie);
}
}

public void fiddle() {
if (mDebug_dumpHprofData != null) {
/* feature is supported */
try {
dumpHprofData("/sdcard/dump.hprof");
} catch (IOException ie) {
System.err.println("dump failed!");
}
} else {
/* feature not supported, do something else */
System.out.println("dump not supported");
}
}
}

This uses a static initializer to call initCompatibility, which does the method lookup. If that succeeds, it uses a private method with the same semantics as the original (arguments, return value, checked exceptions) to do the call. The return value (if it had one) and exception are unpacked and returned in a way that mimics the original. The fiddle method demonstrates how the application logic would choose to call the new API or do something different based on the presence of the new method.

For each additional method you want to call, you would add an additional private Method field, field initializer, and call wrapper to the class.

This approach becomes a bit more complex when the method is declared in a previously undefined class. It's also much slower to call Method.invoke() than it is to call the method directly. These issues can be mitigated by using a wrapper class.

Using a wrapper class

The idea is to create a class that wraps all of the new APIs exposed by a new or existing class. Each method in the wrapper class just calls through to the corresponding real method and returns the same result.

If the target class and method exist, you get the same behavior you would get by calling the class directly, with a small amount of overhead from the additional method call. If the target class or method doesn't exist, the initialization of the wrapper class fails, and your application knows that it should avoid using the newer calls.

Suppose this new class were added:

public class NewClass {
private static int mDiv = 1;

private int mMult;

public static void setGlobalDiv(int div) {
mDiv = div;
}

public NewClass(int mult) {
mMult = mult;
}

public int doStuff(int val) {
return (val * mMult) / mDiv;
}
}

We would create a wrapper class for it:

class WrapNewClass {
private NewClass mInstance;

/* class initialization fails when this throws an exception */
static {
try {
Class.forName("NewClass");
} catch (Exception ex) {
throw new RuntimeException(ex);
}
}

/* calling here forces class initialization */
public static void checkAvailable() {}

public static void setGlobalDiv(int div) {
NewClass.setGlobalDiv(div);
}

public WrapNewClass(int mult) {
mInstance = new NewClass(mult);
}

public int doStuff(int val) {
return mInstance.doStuff(val);
}
}

This has one method for each constructor and method in the original, plus a static initializer that tests for the presence of the new class. If the new class isn't available, initialization of WrapNewClass fails, ensuring that the wrapper class can't be used inadvertently. The checkAvailable method is used as a simple way to force class initialization. We use it like this:

public class MyApp {
private static boolean mNewClassAvailable;

/* establish whether the "new" class is available to us */
static {
try {
WrapNewClass.checkAvailable();
mNewClassAvailable = true;
} catch (Throwable t) {
mNewClassAvailable = false;
}
}

public void diddle() {
if (mNewClassAvailable) {
WrapNewClass.setGlobalDiv(4);
WrapNewClass wnc = new WrapNewClass(40);
System.out.println("newer API is available - " + wnc.doStuff(10));
} else {
System.out.println("newer API not available");
}
}
}

If the call to checkAvailable succeeds, we know the new class is part of the system. If it fails, we know the class isn't there, and adjust our expectations accordingly. It should be noted that the call to checkAvailable will fail before it even starts if the bytecode verifier decides that it doesn't want to accept a class that has references to a nonexistent class. The way this code is structured, the end result is the same whether the exception comes from the verifier or from the call to Class.forName.

When wrapping an existing class that now has new methods, you only need to put the new methods in the wrapper class. Invoke the old methods directly. The static initializer in WrapNewClass would be augmented to do a one-time check with reflection.

Testing is key

You must test your application on every version of the Android framework that is expected to support it. By definition, the behavior of your application will be different on each. Remember the mantra: if you haven't tried it, it doesn't work.

You can test for backward compatibility by running your application in an emulator from an older SDK, but as of the 1.5 release there's a better way. The SDK allows you to specify "Android Virtual Devices" with different API levels. Once you create the AVDs, you can test your application with old and new versions of the system, perhaps running them side-by-side to see the differences. More information about emulator AVDs can be found in the SDK documentation and from emulator -help-virtual-device.


Learn about Android 1.5 and more at Google I/O. Members of the Android team will be there to give a series of in-depth technical sessions and to field your toughest questions.

Android 1.5 at Google I/O

I admit, I've been talking big about Google I/O in my last few posts. But I'm entirely serious: Google I/O is going to be the Android developer event of the year, no doubt about it. I want to take a few minutes to explain why.

The most exciting aspect, to my mind, is the technical content. We have 9 sessions listed now on the Google I/O sessions site, and we're working on still more. (And that's not even including the fireside chat with the Android Core Technical Team.) I recently sat down with some of the speakers to discuss their topics, and found that this is very solid material. Here are some of the sessions I'm excited about.

My background is strictly in engineering, and I never had the chance in college to take any design courses. So one session I'll definitely be at is Chris Nesladek's "Pixel Perfect Code". He's going to start with the basics, and give us an overview of the theory of UI design, and then explain the principles that we use when designing the core Android UI. If you like the UI updates that you've seen in the Android 1.5 "Cupcake" user interface, then be at this session.

My particular team works intensively with developers to help them build and launch applications. Justin Mattson is going to share some of the hard-earned debugging and performance techniques that we've picked up in our work with partners. He's going to walk you through some actual, real-world apps on the Android Market and show you how we squeezed the bugs out of them.

Now, they told me to focus on only one or two sessions in this post, but forget that. I can't resist! I have to tell you about a couple more, like David Sparks' session on the media framework. One of the most common questions we get asked goes something like "dude, what is up with all these codecs? AAC? MP3? OGG? MPEG? H264?" David's going to answer that question—among many others -- and explain how the media framework is designed and operates. Armed with this new understanding, you'll be able to make smarter choices as you design the media components of your own apps.

And last (for today), I want to mention Jeff Sharkey's "Coding for Life—Battery Life" session. A statement like "it's important to code efficiently on mobile devices" is deceptively simple. It turns out that what constitutes efficient code on, say, the desktop is sometimes woefully hard on battery life, on mobiles. What I've learned to tell developers is "everything you know is wrong." That's why I'm looking forward to Jeff's session. He's going to go through a whole basket of tips and tricks, backed up by some nice crunchy numbers.

And of course, these are just the technical sessions (and not even half of those.) We're also going to have quite a few folks representing some of our app developer and Open Handset Alliance partners at Google I/O, but I'll save those details for another post. I'm also looking forward to turning the tables, and giving some of you the floor. Besides the fireside chat where you can ask the Core Technical Team all the thorny technical questions you've been saving up, there's also a Lightning Talks session just for Android developers, and an Android Corner mixer area in the After-Hours Playground.

I'm also excited about a few surprises we've lined up... but I can't say anything about those, or they wouldn't be surprises, would they?

So, there you have it. Excitement! Drama! Surprises! It's like a movie trailer, but without the awesome voiceover. I hope it worked, and that you all are looking forward to Google I/O as much as I am. (By the way, I'm instructed to inform you that you can save a bit of coin by registering early. You might want to hurry though, since early registration ends May 1.)

Happy Coding!

Android 1.5 is here!

I've got some good news today: the Android 1.5 SDK, release 1 is ready! Grab it from the download page.

For an overview of the new Android 1.5 features, see the 1.5 release notes page in our developer site.

I am also happy to let you know that our partners at HTC have made available new system images to upgrade your Android Dev Phone 1 (ADP1) to Android 1.5. This new version (which is only available for the ADP1) is based on the Cupcake branch from the Android Open Source Project and corresponds to the system image of the Android 1.5 SDK, release 1. If you have questions about the process of updating your device, you can ask the mailing list that we've set up.

I'd also like to note that Android developer phones like the ADP1 are intended for application development, rather than daily use. Additionally, they are operator-neutral and country-neutral, so they may not include certain features found on end-user devices.

Introducing GLSurfaceView

GLSurfaceView is a new API class in Android 1.5. GLSurfaceView makes OpenGL ES applications easier to write by:

  • Providing the glue code to connect OpenGL ES to the View system.
  • Providing the glue code to make OpenGL ES work with the Activity life-cycle.
  • Making it easy to choose an appropriate frame buffer pixel format.
  • Creating and managing a separate rendering thread to enable smooth animation.
  • Providing easy-to-use debugging tools for tracing OpenGL ES API calls and checking for errors.

GLSurfaceView is a good base for building an application that uses OpenGL ES for part or all of its rendering. A 2D or 3D action game would be a good candidate, as would a 2D or 3D data visualization application such as Google Maps StreetView.

The Simplest GLSurfaceView Application

Here's the source code to the simplest possible OpenGL ES application:

package com.example.android.apis.graphics;

import javax.microedition.khronos.egl.EGLConfig;
import javax.microedition.khronos.opengles.GL10;

import android.app.Activity;
import android.opengl.GLSurfaceView;
import android.os.Bundle;

public class ClearActivity extends Activity {
@Override
protected void onCreate(Bundle savedInstanceState) {
super.onCreate(savedInstanceState);
mGLView = new GLSurfaceView(this);
mGLView.setRenderer(new ClearRenderer());
setContentView(mGLView);
}

@Override
protected void onPause() {
super.onPause();
mGLView.onPause();
}

@Override
protected void onResume() {
super.onResume();
mGLView.onResume();
}

private GLSurfaceView mGLView;
}

class ClearRenderer implements GLSurfaceView.Renderer {
public void onSurfaceCreated(GL10 gl, EGLConfig config) {
// Do nothing special.
}

public void onSurfaceChanged(GL10 gl, int w, int h) {
gl.glViewport(0, 0, w, h);
}

public void onDrawFrame(GL10 gl) {
gl.glClear(GL10.GL_COLOR_BUFFER_BIT | GL10.GL_DEPTH_BUFFER_BIT);
}
}

This program doesn't do much: it clears the screen to black on every frame. But it is a complete OpenGL application, that correctly implements the Android activity life-cycle. It pauses rendering when the activity is paused, and resumes it when the activity is resumed. You could use this application as the basis for non-interactive demonstration programs. Just add more OpenGL calls to the ClearRenderer.onDrawFrame method. Notice that you don't even need to subclass the GLSurfaceView view.

Note that the GLSurfaceView.Renderer interface has three methods:

The onSurfaceCreated() method is called at the start of rendering, and whenever the OpenGL ES drawing context has to be recreated. (The drawing context is typically lost and recreated when the activity is paused and resumed.) OnSurfaceCreated() is a good place to create long-lived OpenGL resources like textures.

The onSurfaceChanged() method is called when the surface changes size. It's a good place to set your OpenGL viewport. You may also want to set your camera here, if it's a fixed camera that doesn't move around the scene.

The onDrawFrame() method is called every frame, and is responsible for drawing the scene. You would typically start by calling glClear to clear the framebuffer, followed by other OpenGL ES calls to draw the current scene.

How about User Input?

If you want an interactive application (like a game), you will typically subclass GLSurfaceView, because that's an easy way of obtaining input events. Here's a slightly longer example showing how to do that:

package com.google.android.ClearTest;

import javax.microedition.khronos.egl.EGLConfig;
import javax.microedition.khronos.opengles.GL10;

import android.app.Activity;
import android.content.Context;
import android.opengl.GLSurfaceView;
import android.os.Bundle;
import android.view.MotionEvent;

public class ClearActivity extends Activity {
@Override
protected void onCreate(Bundle savedInstanceState) {
super.onCreate(savedInstanceState);
mGLView = new ClearGLSurfaceView(this);
setContentView(mGLView);
}

@Override
protected void onPause() {
super.onPause();
mGLView.onPause();
}

@Override
protected void onResume() {
super.onResume();
mGLView.onResume();
}

private GLSurfaceView mGLView;
}

class ClearGLSurfaceView extends GLSurfaceView {
public ClearGLSurfaceView(Context context) {
super(context);
mRenderer = new ClearRenderer();
setRenderer(mRenderer);
}

public boolean onTouchEvent(final MotionEvent event) {
queueEvent(new Runnable(){
public void run() {
mRenderer.setColor(event.getX() / getWidth(),
event.getY() / getHeight(), 1.0f);
}});
return true;
}

ClearRenderer mRenderer;
}

class ClearRenderer implements GLSurfaceView.Renderer {
public void onSurfaceCreated(GL10 gl, EGLConfig config) {
// Do nothing special.
}

public void onSurfaceChanged(GL10 gl, int w, int h) {
gl.glViewport(0, 0, w, h);
}

public void onDrawFrame(GL10 gl) {
gl.glClearColor(mRed, mGreen, mBlue, 1.0f);
gl.glClear(GL10.GL_COLOR_BUFFER_BIT | GL10.GL_DEPTH_BUFFER_BIT);
}

public void setColor(float r, float g, float b) {
mRed = r;
mGreen = g;
mBlue = b;
}

private float mRed;
private float mGreen;
private float mBlue;
}

This application clears the screen every frame. When you tap on the screen, it sets the clear color based on the (x,y) coordinates of your touch event. Note the use of queueEvent() in ClearGLSurfaceView.onTouchEvent(). The queueEvent() method is used to safely communicate between the UI thread and the rendering thread. If you prefer you can use some other Java cross-thread communication technique, such as synchronized methods on the Renderer class itself. But queueing events is often the simplest way of dealing with cross-thread communication.

Other GLSurfaceView Samples

Tired of just clearing the screen? You can find more interesting samples in the API Demos sample in the SDK. All the OpenGL ES samples have been converted to use the GLSurfaceView view:

  • GLSurfaceView - a spinning triangle
  • Kube - a cube puzzle demo
  • Translucent GLSurfaceView - shows how to display 3D graphics on a translucent background
  • Textured Triangle - shows how to draw a textured 3D triangle
  • Sprite Text - shows how to draw text into a texture and then composite it into a 3D scene
  • Touch Rotate - shows how to rotate a 3D object in response to user input.

Choosing a Surface

GLSurfaceView helps you choose the type of surface to render to. Different Android devices support different types of surfaces, with no common subset. This makes it tricky problem to choose the best available surface on each device. By default GLSurfaceView tries to find a surface that's as close as possible to a 16-bit RGB frame buffer with a 16-bit depth buffer. Depending upon your application's needs you may want to change this behavior. For example, the Translucent GLSurfaceView sample needs an Alpha channel in order to render translucent data. GLSurfaceView provides an overloaded setEGLSurfaceChooser() method to give the developer control over which surface type is chosen:

setEGLConfigChooser(boolean needDepth)
Choose a config that's closest to R5G6B5 with or without a 16-bit framebuffer
setEGLConfigChooser(int redSize, int greenSize,int blueSize, int alphaSize,int depthSize, int stencilSize)
Choose the config with the fewest number of bits per pixel that has at least as many bits-per-channel as specified in the constructor.
setEGLConfigChooser(EGLConfigChooser configChooser)
Allow total control over choosing a configuration. You pass in your own implementation of EGLConfigChooser, which gets to inspect the device's capabilities and choose a configuration.

Continuous Rendering vs. Render When Dirty

Most 3D applications, such as games or simulations, are continuously animated. But some 3D applications are more reactive: they wait passively until the user does something, and then react to it. For those types of applications, the default GLSurfaceView behavior of continuously redrawing the screen is a waste of time. If you are developing a reactive application, you can call GLSurfaceView.setRenderMode(RENDERMODE_WHEN_DIRTY), which turns off the continuous animation. Then you call GLSurfaceView.requestRender() whenever you want to re-render.

Help With Debugging

GLSurfaceView has a handy built-in feature for debugging OpenGL ES applications: the GLSurfaceView.setDebugFlags() method can be used to enable logging and/or error checking your OpenGL ES calls. Call this method in your GLSurfaceView's constructor, before calling setRenderer():

public ClearGLSurfaceView(Context context) {
super(context);
// Turn on error-checking and logging
setDebugFlags(DEBUG_CHECK_GL_ERROR | DEBUG_LOG_GL_CALLS);
mRenderer = new ClearRenderer();
setRenderer(mRenderer);
}

Learn about Android 1.5 and more at Google I/O. Members of the Android team will be there to give a series of in-depth technical sessions and to field your toughest questions.

Live folders

Live folders have been introduced in Android 1.5 and let you display any source of data on the Home screen without forcing the user to launch an application. A live folder is simply a real-time view of a ContentProvider. As such, a live folder can be used to display all your contacts, your bookmarks, your email, your playlists, an RSS feed, etc. The possibilities are endless! Android 1.5 ships with a few stock live folders to display your contacts. For instance, the screenshot below shows the content of the live folders that displays all my contacts with a phone number:

If a contacts sync happens in the background while I'm browsing this live folder, I will see the change happen in real-time. Live folders are not only useful but it's also very easy to modify your application to make it provider a live folder. In this article, I will show you how to add a live folder to the Shelves application. You can download its source code and modify it by following my instructions to better understand how live folders work.

To give the user the option to create a new live folder, you first need to create a new activity with an intent filter who action is android.intent.action.CREATE_LIVE_FOLDER. To do so, simply open AndroidManifest.xml and add something similar to this:

<activity
android:name=".activity.BookShelfLiveFolder"
android:label="BookShelf">
<intent-filter>
<action android:name="android.intent.action.CREATE_LIVE_FOLDER" />
<category android:name="android.intent.category.DEFAULT" />
</intent-filter>
</activity>

The label and icon of this activity are what the user will see on the Home screen when choosing a live folder to create:

Since you just need an intent filter, it is possible, and sometimes advised, to reuse an existing activity. In the case of Shelves, we will create a new activity, org.curiouscreature.android.shelves.activity.BookShelfLiveFolder. The role of this activity is to send an Intent result to Home containing the description of the live folder: its name, icon, display mode and content URI. The content URI is very important as it describes what ContentProvider will be used to populate the live folder. The code of the activity is very simple as you can see here:

public class BookShelfLiveFolder extends Activity {
public static final Uri CONTENT_URI = Uri.parse("content://shelves/live_folders/books");

@Override
protected void onCreate(Bundle savedInstanceState) {
super.onCreate(savedInstanceState);

final Intent intent = getIntent();
final String action = intent.getAction();

if (LiveFolders.ACTION_CREATE_LIVE_FOLDER.equals(action)) {
setResult(RESULT_OK, createLiveFolder(this, CONTENT_URI,
"Books", R.drawable.ic_live_folder));
} else {
setResult(RESULT_CANCELED);
}

finish();
}

private static Intent createLiveFolder(Context context, Uri uri, String name, int icon) {
final Intent intent = new Intent();

intent.setData(uri);
intent.putExtra(LiveFolders.EXTRA_LIVE_FOLDER_NAME, name);
intent.putExtra(LiveFolders.EXTRA_LIVE_FOLDER_ICON,
Intent.ShortcutIconResource.fromContext(context, icon));
intent.putExtra(LiveFolders.EXTRA_LIVE_FOLDER_DISPLAY_MODE, LiveFolders.DISPLAY_MODE_LIST);

return intent;
}
}

This activity, when invoked with theACTION_CREATE_LIVE_FOLDER intent, returns an intent with a URI, content://shelves/live_folders/books, and three extras to describe the live folder. There are other extras and constants you can use and you should refer to the documentation of android.provider.LiveFolders for more details. When Home receives this intent, a new live folder is created on the user's desktop, with the name and icon you provided. Then, when the user clicks on the live folder to open it, Home queries the content provider referenced by the provided URI.

Live folders' content providers must obey specific naming rules. The Cursor returned by the query() method must have at least two columns named LiveFolders._ID and LiveFolders.NAME. The first one is the unique identifier of each item in the live folder and the second one is the name of the item. There are other column names you can use to specify an icon, a description, the intent to associate with the item (fired when the user clicks that item), etc. Again, refer to the documentation of android.provider.LiveFolders for more details.

In our example, all we need to do is modify the existing provider in Shelves called org.curiouscreature.android.shelves.provider.BooksProvider. First, we need to modify the URI_MATCHER to recognize our content://shelves/live_folders/books content URI:

private static final int LIVE_FOLDER_BOOKS = 4;
// ...
URI_MATCHER.addURI(AUTHORITY, "live_folders/books", LIVE_FOLDER_BOOKS);

Then we need to create a new projection map for the cursor. A projection map can be used to "rename" columns. In our case, we will replace BooksStore.Book._ID, BooksStore.Book.TITLE and BooksStore.Book.AUTHORS with LiveFolders._ID, LiveFolders.TITLE and LiveFolders.DESCRIPTION:

private static final HashMap LIVE_FOLDER_PROJECTION_MAP;
static {
LIVE_FOLDER_PROJECTION_MAP = new HashMap();
LIVE_FOLDER_PROJECTION_MAP.put(LiveFolders._ID, BooksStore.Book._ID +
" AS " + LiveFolders._ID);
LIVE_FOLDER_PROJECTION_MAP.put(LiveFolders.NAME, BooksStore.Book.TITLE +
" AS " + LiveFolders.NAME);
LIVE_FOLDER_PROJECTION_MAP.put(LiveFolders.DESCRIPTION, BooksStore.Book.AUTHORS +
" AS " + LiveFolders.DESCRIPTION);
}

Because we are providing a title and a description for each row, Home will automatically display each item of the live folder with two lines of text. Finally, we implement the query() method by supplying our projection map to the SQL query builder:

public Cursor query(Uri uri, String[] projection, String selection,
String[] selectionArgs, String sortOrder) {

SQLiteQueryBuilder qb = new SQLiteQueryBuilder();

switch (URI_MATCHER.match(uri)) {
// ...
case LIVE_FOLDER_BOOKS:
qb.setTables("books");
qb.setProjectionMap(LIVE_FOLDER_PROJECTION_MAP);
break;
default:
throw new IllegalArgumentException("Unknown URI " + uri);
}

SQLiteDatabase db = mOpenHelper.getReadableDatabase();
Cursor c = qb.query(db, projection, selection, selectionArgs, null, null, BooksStore.Book.DEFAULT_SORT_ORDER);
c.setNotificationUri(getContext().getContentResolver(), uri);

return c;
}

You can now compile and deploy the application, go to the Home screen and try to add a live folder. I added a books live folder to my Home screen and when I open it, I can see the list of all of my books, with their titles and authors, and all it took was a few lines of code:

The live folders API is extremely simple and relies only on intents and content URI. If you want to see more examples of live folders implementation, you can read the source code of the Contacts application and of the Contacts provider.

You can also download the result of our exercise, the modified version of Shelves with live folders support.


Learn about Android 1.5 and more at Google I/O. Members of the Android team will be there to give a series of in-depth technical sessions and to field your toughest questions.

Future-Proofing Your Apps

Hi, developers! I hope you've heard about the early-look version of the Android 1.5 SDK that we recently released. There are some great new features in there, but don't get too excited yet -- some of you will need to fix some problems in your apps before you can start taking advantage of Android 1.5.

We've done some fairly extensive testing of the popular apps on the Android Market, and it turns out that a few of those apps use some bad techniques that cause them to crash or behave strangely on Android 1.5. The list below is based on our observations of five ways that we've seen bad apps fail on 1.5. You can think of these as "anti-patterns" (that is, techniques to avoid) for Android development. If you've written an app with the Android 1.0 or 1.1 SDKs, you'll need to pay close attention.

Technique to Avoid, #1: Using Internal APIs

Even though we've always strongly advised against doing so, some developers have chosen to use unsupported or internal APIs. For instance, many developers are using the internal brightness control and bluetooth toggle APIs that were present in 1.0 and 1.1. A bug -- which is now fixed in Android 1.5 -- allowed apps to use those APIs without requesting permission. As a result, apps that use those APIs will break on 1.5. There are other changes to unsupported APIs in 1.5 besides these, so if you've used internal APIs in your apps, you need to update your apps to stop doing so. Even if they don't break on Android 1.5, there's a good chance they will on some later version. (There's some good news, though: because "flashlight" apps are so popular, we've added the "screenBrightness" field on the WindowManager.LayoutParams class just for that use case.)

Technique to Avoid, #2: Directly Manipulating Settings

Okay, strictly speaking this one isn't evil, since this is a change in behavior that we made to Android itself. But we made it because some developers were doing naughty things: a number of apps were changing system settings silently without even notifying the user. For instance, some apps turn on GPS without asking the user, and others might turn on data roaming.

As a result, applications can no longer directly manipulate the values of certain system Settings, even if they previously had permission to do so. For instance, apps can no longer directly turn on or off GPS. These apps won't crash, but the APIs in question now have no effect, and do nothing. Instead, apps will need to issue an Intent to launch the appropriate Settings configuration screen, so that the user can change these settings manually. For details, see the android.provider.Settings.Secure class, which you can find in the 1.5_pre SDK documentation (and later). Note that only Settings that were moved to the Settings.Secure class are affected. Other, less sensitive, settings will continue to have the same behavior as in Android 1.1.

Technique to Avoid, #3: Going Overboard with Layouts

Due to changes in the View rendering infrastructure, unreasonably deep (more than 10 or so) or broad (more than 30 total) View hierarchies in layouts are now likely to cause crashes. This was always a risk for excessively complex layouts, but you can think of Android 1.5 as being better than 1.1 at exposing this problem. Most developers won't need to worry about this, but if your app has very complicated layouts, you'll need to put it on a diet. You can simplify your layouts using the more advanced layout classes like FrameLayout and TableLayout.

Technique to Avoid, #4: Bad Hardware Assumptions

Android 1.5 includes support for soft keyboards, and there will soon be many devices that run Android but do not have physical keyboards. If your application assumes the presence of a physical keyboard (such as if you have created a custom View that sinks keypress events) you should make sure it degrades gracefully on devices that only have soft keyboards. For more information on this, keep on eye on this blog as we'll be posting more detailed information about handling the new soft keyboards.

Technique to Avoid, #5: Incautious Rotations

Devices running Android 1.5 and later can automatically rotate the screen, depending on how the user orients the device. Some 1.5 devices will do this by default, and on all others it can be turned on by the user. This can sometimes result in unpredictable behavior from applications that do their own reorientations (whether using the accelerometer, or something else.) This often happens when applications assume that the screen can only rotate if the physical keyboard is exposed; if the device lacks a physical keyboard, these apps do not expect to be reoriented, which is a coding error. Developers should be sure that their applications can gracefully handle being reoriented at any time.

Also, apps that use the accelerometer directly to reorient themselves sometimes compete with the system doing the same thing, with odd results. And finally, some apps that use the accelerometer to detect things like shaking motions and that don't lock their orientation to portrait or landscape, often end up flipping back and forth between orientations. This can be irritating to the user. (You can lock your app's orientation to portrait or landscape using the 'android:screenOrientation' attribute in your AndroidManifest.xml.)

Have any of your apps used one of these dubious techniques? If so, break out your IDE, duct tape, and spackle, and patch 'em up. I'm pretty excited by the new features in the Android 1.5 SDK, and I look forward to seeing your apps on my own 1.5-equipped phone -- but I can't, if they won't run! Fortunately, the fixes for these are pretty simple, and you can start fixing all of the above even with the 1.1_r1 SDK release.

By the way, if you'd like to fully immerse yourself in Android 1.5, join us at Google I/O! It's my pleasure to shamelessly plug an event that's shaping up to be the Android developer event of the year. We've added two more sessions—one on multimedia jujitsu, and a particularly interesting session on the Eyes-Free Android project—with even more yet to come. I thought Google I/O was a pretty killer event last year, and this year's looking even better, especially in terms of Android content.

I hope to meet many of you there, but either way, Happy Coding!

Creating an Input Method

To create an input method (IME) for entering text into text fields
and other Views, you need to extend the InputMethodService.
class. This class provides much of the basic implementation for an input
method, in terms of managing the state and visibility of the input method and
communicating with the currently visible activity.


A good starting point would be the SoftKeyboard sample code provided as part
of the SDK. You can modify the sample code to start building your own input
method.


An input method is packaged like any other application or service. In the
AndroidManifest.xml file, you declare the input method as a
service, with the appropriate intent filter and any associated meta data:


<manifest xmlns:android="http://schemas.android.com/apk/res/android"
package="com.example.fastinput">

<application android:label="@string/app_label">

<!-- Declares the input method service -->
<service android:name="FastInputIME"
android:label="@string/fast_input_label"
android:permission="android.permission.BIND_INPUT_METHOD">
<intent-filter>
<action android:name="android.view.InputMethod" />
</intent-filter>
<meta-data android:name="android.view.im" android:resource="@xml/method" />
</service>

<!-- Optional activities. A good idea to have some user settings. -->
<activity android:name="FastInputIMESettings" android:label="@string/fast_input_settings">
<intent-filter>
<action android:name="android.intent.action.MAIN"/>
</intent-filter>
</activity>
</application>
</manifest>


If your input method allows the user to tweak some settings, you should
provide a settings activity that can be launched from the Settings application.
This is optional and you may choose to provide all user settings directly in
your IME's UI.


The typical life-cycle of an InputMethodService looks like
this:


Visual Elements


There are two main visual elements for an input method—the input view and the
candidates view. You don't have to follow this style though, if one of them is
not relevant to your input method experience.


Input View


This is where the user can input text either in the form of keypresses,
handwriting or other gestures. When the input method is displayed for the first
time, InputMethodService.onCreateInputView() will be called. Create
and return the view hierarchy that you would like to display in the input method
window.


Candidates View


This is where potential word corrections or completions are presented to the
user for selection. Again, this may or may not be relevant to your input method
and you can return null from calls to
InputMethodService.onCreateCandidatesView(), which is the default
behavior.


Designing for the different Input Types


An application's text fields can have different input types specified on
them, such as free form text, numeric, URL, email address and search. When you
implement a new input method, you need to be aware of the different input types.
Input methods are not automatically switched for different input types and so
you need to support all types in your IME. However, the IME is not responsible
for validating the input sent to the application. That's the responsibility of
the application.


For example, the LatinIME provided with the Android platform provides
different layouts for text and phone number entry:


InputMethodService.onStartInputView() is called with an
EditorInfo
object that contains details about the input type and other
attributes of the application's text field.

(EditorInfo.inputType
& EditorInfo.TYPE_CLASS_MASK
) can be one of many different values,
including:


  • TYPE_CLASS_NUMBER

  • TYPE_CLASS_DATETIME

  • TYPE_CLASS_PHONE

  • TYPE_CLASS_TEXT


See android.text.InputType for more details.


EditorInfo.inputType can contain other masked bits that
indicate the class variation and other flags. For example,
TYPE_TEXT_VARIATION_PASSWORD or TYPE_TEXT_VARIATION_URI
or TYPE_TEXT_FLAG_AUTO_COMPLETE.


Password fields


Pay
specific attention when sending text to password fields. Make sure that
the password is not visible within your UI — neither in the input
view or the candidates view. Also, do not save the password anywhere without
explicitly informing the user.


Landscape vs. portrait


The UI needs to be able to scale between landscape and portrait orientations.
In non-fullscreen IME mode, leave sufficient space for the application to show
the text field and any associated context. Preferably, no more than half the
screen should be occupied by the IME. In fullscreen IME mode this is not an
issue.


Sending text to the application


There are two ways to send text to the application. You can either send
individual key events or you can edit the text around the cursor in the
application's text field.


To send a key event, you can simply construct KeyEvent objects and call
InputConnection.sendKeyEvent(). Here are some examples:


InputConnection ic = getCurrentInputConnection();
long eventTime = SystemClock.uptimeMillis();
ic.sendKeyEvent(new KeyEvent(eventTime, eventTime,
KeyEvent.ACTION_DOWN, keyEventCode, 0, 0, 0, 0,
KeyEvent.FLAG_SOFT_KEYBOARD|KeyEvent.FLAG_KEEP_TOUCH_MODE));
ic.sendKeyEvent(new KeyEvent(SystemClock.uptimeMillis(), eventTime,
KeyEvent.ACTION_UP, keyEventCode, 0, 0, 0, 0,
KeyEvent.FLAG_SOFT_KEYBOARD|KeyEvent.FLAG_KEEP_TOUCH_MODE));


Or use the convenience method:


InputMethodService.sendDownUpKeyEvents(keyEventCode);


Note:
It is recommended to use the above method for certain fields such as
phone number fields because of filters that may be applied to the text
after each key press. Return key and delete key should also be sent as
raw key events for certain input types, as applications may be watching
for specific key events in order to perform an action.


When editing text in a text field, some of the more useful methods on
android.view.inputmethod.InputConnection are:


  • getTextBeforeCursor()

  • getTextAfterCursor()

  • deleteSurroundingText()

  • commitText()


For example, let's say the text "Fell" is to the left of the cursor
and you want to replace it with "Hello!":


InputConnection ic = getCurrentInputConnection();
ic.deleteSurroundingText(4, 0);
ic.commitText("Hello", 1);
ic.commitText("!", 1);


Composing text before committing


If your input method does some kind of text prediction or requires multiple
steps to compose a word or glyph, you can show the progress in the text field
until the user commits the word and then you can replace the partial composition
with the completed text. The text that is being composed will be highlighted in
the text field in some fashion, such as an underline.


InputConnection ic = getCurrentInputConnection();
ic.setComposingText("Composi", 1);
...
ic.setComposingText("Composin", 1);
...
ic.commitText("Composing ", 1);


Intercepting hard key events


Even though the input method window doesn't have explicit focus, it receives
hard key events first and can choose to consume them or forward them along to
the application. For instance, you may want to consume the directional keys to
navigate within your UI for candidate selection during composition. Or you may
want to trap the back key to dismiss any popups originating from the input
method window. To intercept hard keys, override
InputMethodService.onKeyDown() and
InputMethodService.onKeyUp(). Remember to call
super.onKey* if you don't want to consume a certain key
yourself.


Other considerations


  • Provide a way for the user to easily bring up any associated settings
    directly from the input method UI

  • Provide
    a way for the user to switch to a different input method (multiple
    input methods may be installed) directly from the input method UI.

  • Bring
    up the UI quickly - preload or lazy-load any large resources so that
    the user sees the input method quickly on tapping on a text field. And
    cache any resources and views for subsequent invocations of the input
    method.

  • On the flip side, any large memory allocations should
    be released soon after the input method window is hidden so that
    applications can have sufficient memory to run. Consider using a
    delayed message to release resources if the input method is in a hidden
    state for a few seconds.

  • Make sure that most common characters
    can be entered using the input method, as users may use punctuation in
    passwords or user names and they shouldn't be stuck in a situation
    where they can't enter a certain character in order to gain access into
    a password-locked device.


On-screen Input Methods


Starting from Android 1.5, the Android platform offers an Input Method
Framework (IMF) that lets you create on-screen input methods such as software
keyboards. This article provide an overview of what Android input method editors
(IMEs) are and what an application needs to do to work well with them. The IMF
is designed to support new classes of Android devices, such as those without
hardware keyboards, so it is important that your application works well with the
IMF and offers a great experience for users.


What is an input method?


The Android IMF is designed to support a variety of IMEs, including soft
keyboard, hand-writing recognizers, and hard keyboard translators. Our focus,
however, will be on soft keyboards, since this is the kind of input method that
is currently part of the platform.


A user will usually access the current IME by tapping on a text view to
edit, as shown here in the home screen:


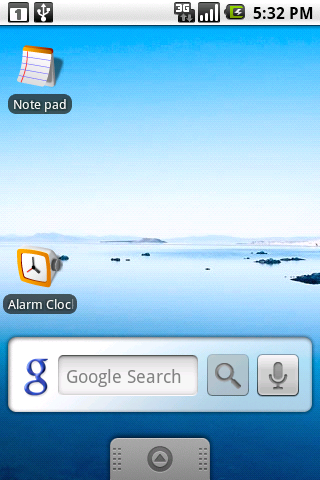
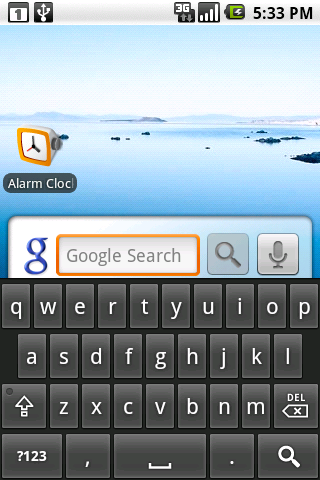
The soft keyboard is positioned at the bottom of the screen over the
application's window. To organize the available space between the application
and IME, we use a few approaches; the one shown here is called pan and
scan
, and simply involves scrolling the application window around so that
the currently focused view is visible. This is the default mode, since it is the
safest for existing applications.


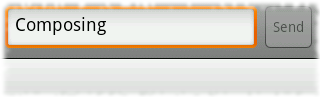
Most often the preferred screen layout is a resize, where the
application's window is resized to be entirely visible. An example is shown
here, when composing an e-mail message:


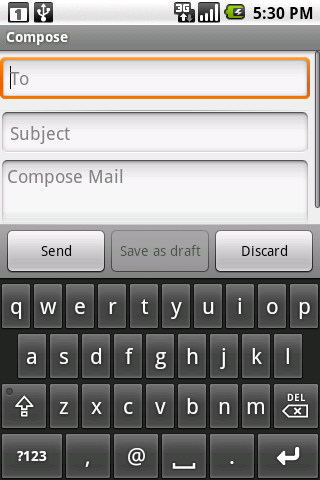
The size of the application window is changed so that none of it is hidden by
the IME, allowing full access to both the application and IME. This of course
only works for applications that have a resizeable area that can be reduced to
make enough space, but the vertical space in this mode is actually no less than
what is available in landscape orientation, so very often an application can
already accommodate it.


The final major mode is fullscreen or extract
mode. This is used when the IME is too large to reasonably share space
with the underlying application. With the standard IMEs, you will only
encounter this situation when the screen is in a landscape orientation,
although other IMEs are free to use it whenever they desire. In this
case the application window is left as-is, and the IME simply displays
fullscreen on top of it, as shown here:


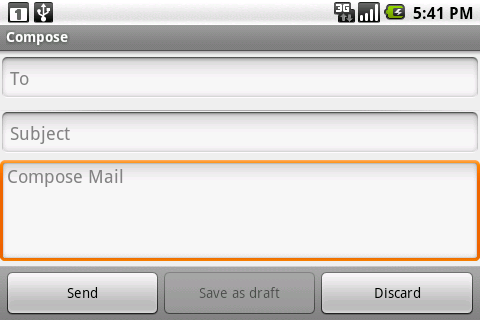
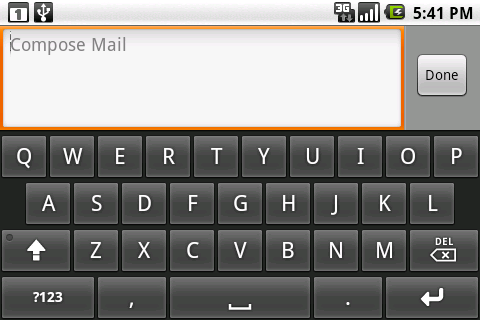
Because the IME is covering the application, it has its own editing area,
which shows the text actually contained in the application. There are also some
limited opportunities the application has to customize parts of the IME (the
"done" button at the top and enter key label at the bottom) to improve the user
experience.


Basic XML attributes for controlling IMEs


There are a number of things the system does to try to help existing
applications work with IMEs as well as possible, such as:


  • Use pan and scan mode by default, unless it can reasonably guess that
    resize mode will work by the existence of lists, scroll views, etc.

  • Analyze the various existing TextView attributes to guess at the kind of
    content (numbers, plain text, etc) to help the soft keyboard display an
    appropriate key layout.

  • Assign a few default actions to the fullscreen IME, such as "next field"
    and "done".


There are also some simple things you can do in your application that will
often greatly improve its user experience. Except where explicitly mentioned,
these will work in any Android platform version, even those previous to Android
1.5 (since they will simply ignore these new options).


Specifying each EditText control's input type


The most important thing for an application to do is to use the new
android:inputType
attribute on each EditText. The attribute provides much richer
information
about the text content. This attribute actually replaces many existing
attributes (android:password,
android:singleLine,
android:numeric,
android:phoneNumber,
android:capitalize,
android:autoText, and
android:editable). If you specify the older attributes
and the new android:inputType attribute, the system uses
android:inputType and ignores the others.


The android:inputType attribute has three pieces:


  • The class is the overall interpretation of characters. The
    currently supported classes are text (plain text),
    number (decimal number), phone (phone number), and
    datetime (a date or time).

  • The variation is a further refinement on the class. In the
    attribute you will normally specify the class and variant together, with the
    class as a prefix. For example, textEmailAddress is a text field
    where the user will enter something that is an e-mail address (foo@bar.com) so
    the key layout will have an '@' character in easy access, and
    numberSigned is a numeric field with a sign. If only the class is
    specified, then you get the default/generic variant.

  • Additional flags can be specified that supply further refinement.
    These flags are specific to a class. For example, some flags for the
    text class are textCapSentences,
    textAutoCorrect, and textMultiline.


As an example, here is the new EditText for the IM application's message text view:


    <EditText android:id="@+id/edtInput"
android:layout_width="0dip"
android:layout_height="wrap_content"
android:layout_weight="1"
android:inputType="textShortMessage|textAutoCorrect|textCapSentences|textMultiLine"
android:imeOptions="actionSend|flagNoEnterAction"
android:maxLines="4"
android:maxLength="2000"
android:hint="@string/compose_hint"/>


A full description of all of the input types can be found in the
documentation. It is important to make use of the correct input types that are
available, so that the soft keyboard can use the optimal keyboard layout for the
text the user will be entering.


Enabling resize mode and other window features


The second most important thing for your app to do is to specify the overall
behavior of your window in relation to the input method. The most visible aspect
of this is controlling resize vs. pan and scan mode, but there are other things
you can do as well to improve your user experience.


You will usually control this behavior through the
android:windowSoftInputMode attribute on each
<activity> definition in your
AndroidManifest.xml. Like the input type, there are a couple
different pieces of data that can be specified here by combining them
together:


  • The window adjustment mode is specified with either
    adjustResize or adjustPan. It is highly recommended
    that you always specify one or the other.

  • You can further control whether the IME will be shown automatically when
    your activity is displayed and other situations where the user moves to it. The
    system won't automatically show an IME by default, but in some cases it can be
    convenient for the user if an application enables this behavior. You can request
    this with stateVisible. There are also a number of other state
    options for finer-grained control that you can find in the documentation.


A typical example of this field can be see in the edit contact activity,
which ensures it is resized and automatically displays the IME for the user:


    <activity name="EditContactActivity"
android:windowSoftInputMode="stateVisible|adjustResize">
...
</activity>


Note:Starting from Android 1.5 (API Level 3),
the platform offers a new method,
{@link android.view.Window#setSoftInputMode(int mode)},
that non-Activity windows can use to control their behavior. Calling this method
in your will make your application incompatible with previous versions of the
Android platform.


Controlling the action buttons


The final customization we will look at is the "action" buttons in the IME.
There are currently two types of actions:


  • The enter key on a soft keyboard is typically bound to an action when not
    operating on a mult-line edit text. For example, on the G1 pressing the hard
    enter key will typically move to the next field or the application will
    intercept it to execute an action; with a soft keyboard, this overloading of the
    enter key remains, since the enter button just sends an enter key event.

  • When in fullscreen mode, an IME may also put an additional action button to
    the right of the text being edited, giving the user quick access to a common
    application operation.


These options are controlled with the android:imeOptions
attribute on TextView. The value you supply here can be any
combination of:


  • One of the pre-defined action constants (actionGo,
    actionSearch, actionSend, actionNext,
    actionDone). If none of these are specified, the system will infer
    either actionNext or actionDone depending on whether
    there is a focusable field after this one; you can explicitly force no action
    with actionNone.

  • The flagNoEnterAction option tells the IME that the action
    should not be available on the enter key, even if the text itself is
    not multi-line. This avoids having unrecoverable actions like (send) that can be
    accidentally touched by the user while typing.

  • The flagNoAccessoryAction removes the action button from the
    text area, leaving more room for text.
  • The flagNoExtractUi
    completely removes the text area, allowing the application to be seen behind
    it.


The previous IM application message view also provides an example of an
interesting use of imeOptions, to specify the send action but not
let it be shown on the enter key:


android:imeOptions="actionSend|flagNoEnterAction"


APIs for controlling IMEs


For more advanced control over the IME, there are a variety of new APIs you
can use. Unless special care is taken (such as by using reflection), using these
APIs will cause your application to be incompatible with previous versions of
Android, and you should make sure you specify
android:minSdkVersion="3" in your manifest. For more information,
see the documentation for the href="http://developer.android.com/guide/topics/manifest/uses-sdk-element.html"><uses-sdk>> manifest element.


The primary API is the new android.view.inputmethod.InputMethodManager class, which you can retrieve with Context.getSystemService().
It allows you to interact with the global input method state, such as
explicitly hiding or showing the current IME's input area.


There are also new window flags controlling input method interaction, which you can control through the existing Window.addFlags() method and new Window.setSoftInputMode() method. The PopupWindow
class has grown corresponding methods to control these options on its
window. One thing in particular to be aware of is the new WindowManager.LayoutParams.FLAG_ALT_FOCUSABLE_IM constant, which is used to control whether a window is on top of or behind the current IME.


Most of the interaction between an active IME and application is done through the android.view.inputmethod.InputConnection
class. This is the API an application implement, which an IME calls to
perform the appropriate edit operations on the application. You won't
normally need to worry about this, since TextView provides its own implementation for itself.


There are also a handful of new View APIs, the most important of these being onCreateInputConnection() which creates a new InputConnection for an IME (and fills in an android.view.inputmethod.EditorInfo
structure with your input type, IME options, and other data); again,
most developers won't need to worry about this, since TextView takes
care of it for you.


Introducing home screen widgets and the AppWidget framework

One exciting new feature in the Android 1.5 SDK is the AppWidget framework which allows developers to write "widgets" that people can drop onto their home screen and interact with. Widgets can provide a quick glimpse into full-featured apps, such as showing upcoming calendar events, or viewing details about a song playing in the background.

When widgets are dropped onto the home screen, they are given a reserved space to display custom content provided by your app. Users can also interact with your app through the widget, for example pausing or switching music tracks. If you have a background service, you can push widget updates on your own schedule, or the AppWidget framework provides an automatic update mechanism.

At a high level, each widget is a BroadcastReceiver paired with XML metadata describing the widget details. The AppWidget framework communicates with your widget through broadcast intents, such as when it requests an update. Widget updates are built and sent using RemoteViews which package up a layout and content to be shown on the home screen.

Widget screenshotYou can easily add widgets into your existing app, and in this article I'll walk through a quick example: writing a widget to show the Wiktionary "Word of the day." The full source code is available, but I'll point out the AppWidget-specific code in detail here.

First, you'll need some XML metadata to describe the widget, including the home screen area you'd like to reserve, an initial layout to show, and how often you'd like to be updated. The default Android home screen uses a cell-based layout, so it rounds your requested size up to the next-nearest cell size. This can be a little confusing, so here's a quick equation to help:

Minimum size in dip = (Number of cells * 74dip) - 2dip

In this example, we want our widget to be 2 cells wide and 1 cell tall, which means we should request a minimum size 146dip x 72dip. We're also going to request updates once per day, which is roughly every 86,400,000 milliseconds. Here's what our widget XML metadata looks like:

<appwidget-provider
xmlns:android="http://schemas.android.com/apk/res/android"
android:minWidth="146dip"
android:minHeight="72dip"
android:initialLayout="@layout/widget_message"
android:updatePeriodMillis="86400000"
/>

Next, let's pair this XML metadata with a BroadcastReceiver in the AndroidManifest:

<!-- Broadcast Receiver that will process AppWidget updates -->
<receiver android:name=".WordWidget" android:label="@string/widget_name">
<intent-filter>
<action android:name="android.appwidget.action.APPWIDGET_UPDATE" />
</intent-filter>
<meta-data android:name="android.appwidget.provider" android:resource="@xml/widget_word" />
</receiver>

<!-- Service to perform web API queries -->
<service android:name=".WordWidget$UpdateService" />

Finally, let's write the BroadcastReceiver code to actually handle AppWidget requests. To help widgets manage all of the various broadcast events, there is a helper class called AppWidgetProvider, which we'll use here. One very important thing to notice is that we're launching a background service to perform the actual update. This is because BroadcastReceivers are subject to the Application Not Responding (ANR) timer, which may prompt users to force close our app if it's taking too long. Making a web request might take several seconds, so we use the service to avoid any ANR timeouts.

/**
* Define a simple widget that shows the Wiktionary "Word of the day." To build
* an update we spawn a background {@link Service} to perform the API queries.
*/
public class WordWidget extends AppWidgetProvider {
@Override
public void onUpdate(Context context, AppWidgetManager appWidgetManager,
int[] appWidgetIds) {
// To prevent any ANR timeouts, we perform the update in a service
context.startService(new Intent(context, UpdateService.class));
}

public static class UpdateService extends Service {
@Override
public void onStart(Intent intent, int startId) {
// Build the widget update for today
RemoteViews updateViews = buildUpdate(this);

// Push update for this widget to the home screen
ComponentName thisWidget = new ComponentName(this, WordWidget.class);
AppWidgetManager manager = AppWidgetManager.getInstance(this);
manager.updateAppWidget(thisWidget, updateViews);
}

/**
* Build a widget update to show the current Wiktionary
* "Word of the day." Will block until the online API returns.
*/
public RemoteViews buildUpdate(Context context) {
// Pick out month names from resources
Resources res = context.getResources();
String[] monthNames = res.getStringArray(R.array.month_names);

// Find current month and day
Time today = new Time();
today.setToNow();

// Build today's page title, like "Wiktionary:Word of the day/March 21"
String pageName = res.getString(R.string.template_wotd_title,
monthNames[today.month], today.monthDay);
RemoteViews updateViews = null;
String pageContent = "";

try {
// Try querying the Wiktionary API for today's word
SimpleWikiHelper.prepareUserAgent(context);
pageContent = SimpleWikiHelper.getPageContent(pageName, false);
} catch (ApiException e) {
Log.e("WordWidget", "Couldn't contact API", e);
} catch (ParseException e) {
Log.e("WordWidget", "Couldn't parse API response", e);
}

// Use a regular expression to parse out the word and its definition
Pattern pattern = Pattern.compile(SimpleWikiHelper.WORD_OF_DAY_REGEX);
Matcher matcher = pattern.matcher(pageContent);
if (matcher.find()) {
// Build an update that holds the updated widget contents
updateViews = new RemoteViews(context.getPackageName(), R.layout.widget_word);

String wordTitle = matcher.group(1);
updateViews.setTextViewText(R.id.word_title, wordTitle);
updateViews.setTextViewText(R.id.word_type, matcher.group(2));
updateViews.setTextViewText(R.id.definition, matcher.group(3).trim());

// When user clicks on widget, launch to Wiktionary definition page
String definePage = res.getString(R.string.template_define_url,
Uri.encode(wordTitle));
Intent defineIntent = new Intent(Intent.ACTION_VIEW, Uri.parse(definePage));
PendingIntent pendingIntent = PendingIntent.getActivity(context,
0 /* no requestCode */, defineIntent, 0 /* no flags */);
updateViews.setOnClickPendingIntent(R.id.widget, pendingIntent);

} else {
// Didn't find word of day, so show error message
updateViews = new RemoteViews(context.getPackageName(), R.layout.widget_message);
CharSequence errorMessage = context.getText(R.string.widget_error);
updateViews.setTextViewText(R.id.message, errorMessage);
}
return updateViews;
}

@Override
public IBinder onBind(Intent intent) {
// We don't need to bind to this service
return null;
}
}
}

And there you have it, a simple widget that will show the Wiktionary "Word of the day." When an update is requested, we read the online API and push the newest data to the surface. The AppWidget framework automatically requests updates from us as needed, such as when a new widget is inserted, and again each day to load the new "Word of the day."

Finally, some words of wisdom. Widgets are designed for longer-term content that doesn't update very often, and updating more frequently than every hour can quickly eat up battery and bandwidth. Consider updating as infrequently as possible, or letting your users pick a custom update frequency. For example, some people might want a stock ticker to update every 15 minutes, or maybe only four times a day. I'll be talking about additional strategies for saving battery life as part of a session I'm giving at Google I/O.

One last cool thing to mention is that the AppWidget framework is abstracted in both directions, meaning alternative home screens can also contain widgets. Your widgets can be inserted into any home screen that supports the AppWidget framework.

We've already written several widgets ourselves, such as the Calendar and Music widgets, but we're even more excited to see the widgets you'll write!

UI framework changes in Android 1.5

On Monday, we released an early look at the Android 1.5 SDK. Not only does this platform update contain numerous new features, APIs, and bug fixes, but Android 1.5 also brings a new default look for the Android UI framework. After Android 1.0 and 1.1, our designers worked hard to refine and polish the appearance of the system. The screenshots below show the same activity (creating a new contact) on Android 1.1 and Android 1.5:

You can see in this example that the buttons and checkboxes have a new appearance. Even though these changes do not affect binary nor source compatibility, they might still break the UI of your apps. As part of the UI refresh, the minimum size of some of the widgets has changed. For instance, Android 1.1 buttons have a minimum size of 44x48 pixels whereas Android 1.5 buttons now have a minimum size of 24x48 pixels. The image below compares the sizes of Android 1.1 buttons with Android 1.5 buttons:

If you rely on the button's minimum size, then the layout of your application may not be the same in Android 1.5 as it was in Android 1.1 because of this change. This would happen for instance if you created a grid of buttons using LinearLayout and relying on the minimum size yielded by wrap_content to align the buttons properly:

This layout could easily be fixed by using the android:layout_weight attribute or by replacing the LinearLayout containers with a TableLayout.

This example is probably the worst-case UI issue you may encounter when running your application on Android 1.5. Other changes introduced in Android 1.5, especially bug fixes in the layout views, may also impact your application—especially if it is relying on faulty/buggy behavior of the UI framework.

If you encounter issues when running your application on Android 1.5, please join us on the Google groups or IRC so that we and the Android community can help you fix your application.

Happy coding!

Getting ready for Android 1.5

Android 1.5 SDK release!I'm excited to announce that starting today, developers can get an early look at the SDK for the next version of the Android platform. This new version (which will be 1.5) is based on the cupcake branch from the Android Open Source Project. Version 1.5 introduces APIs for features such as soft keyboards, home screen widgets, live folders, and speech recognition. At the developer site, you can download the early-look Android 1.5 SDK, read important information about upgrading your Eclipse plugin and existing projects, and learn about what's new and improved in Android 1.5.

We've also made changes to the developer tools and the structure of the SDK itself. Future Android SDK releases will include multiple versions of the Android platform. For example, this early-look includes Android platform versions 1.1 and 1.5. One benefit of this change is that developers can target different Android platform versions from within a single SDK installation. Another is that it enables developers to install Android SDK add-ons to access extended functionality that might be provided by OEMs, carriers, or other providers. We at Google are using this feature ourselves: this early-look SDK includes an add-on for the Google APIs. This add-on provides support for the Google Maps API, which was previously embedded in the "core" SDK.

To help you prepare your applications for the release of Android 1.5 on phones, over the next few weeks we'll be publishing a series of articles on this blog to highlight new APIs and other changes. In addition to the new APIs that I've mentioned, we'll cover topics such as OpenGL, asynchronous tasks, system settings, and new Activity callbacks.

I encourage you to start working with this early-look SDK, but please know that the APIs for Android 1.5 have not been finalized. The majority of the APIs are settled, but there may be some changes before the final release. As a result, it's very important that you don't release applications based on this early-look SDK, since they may not work on real devices. The applications you release should be built on the final Android 1.5 SDK release, which will be available around the end of this month.

I look forward to seeing all the great apps that use the new capabilities in Android 1.5. Happy coding!