- Part 1 is all about the development on the Android side.
- Part 2 deals with the development on the Tizen side.
- Part 3 is about the complete application for SAP, which is basically packaging of the Android part and the Tizen part.
It also teaches how to test the applications using the Emulator.
Showing posts with label how to. Show all posts
Showing posts with label how to. Show all posts
How to Create a Basic Integrated Gear Application
The tutorial, by Samsung Developers, teaches developers how to build a basic sample application for SAP. This is a three-part series. It also teaches how to test the applications using the Emulator.

"the import android.support.v7.app cannot be resolved" after updated
If you have the error of "the import android.support.v7.app cannot be resolved" after Android SDK and ADT updated in Eclipse. Try to Clean all projects, include appcompat_... libs.
Project (on Eclipse menu) -> Clean... -> select Clean all projects... then OK.

Project (on Eclipse menu) -> Clean... -> select Clean all projects... then OK.
ic_launcher cannot be resolved or is not a field
Sometimes you will face with error of "ic_launcher cannot be resolved or is not a field", one of the possible reason is import android.R incorrectly.
Note: Eclipse sometimes likes to add an import android.R statement at the top of your files that use resources, especially when you ask eclipse to sort or otherwise manage imports. This will cause your make to break. Look out for these erroneous import statements and delete them.
~ http://source.android.com/source/using-eclipse.html
Note: Eclipse sometimes likes to add an import android.R statement at the top of your files that use resources, especially when you ask eclipse to sort or otherwise manage imports. This will cause your make to break. Look out for these erroneous import statements and delete them.
~ http://source.android.com/source/using-eclipse.html
How to generate APK in Eclipse of Android-adt
To generate APK using Eclipse of Android-adt:
Right click your project -> Android Tools -> Export Signed Application Package...
follow the video:
Please keep (strongly recommand to make a copy) the keystore file. If you publish your apps in Google Play, and you have to update it, you need to update APK using original keystore.
Right click your project -> Android Tools -> Export Signed Application Package...
follow the video:
Please keep (strongly recommand to make a copy) the keystore file. If you publish your apps in Google Play, and you have to update it, you need to update APK using original keystore.
Step-by-step to create a simple Android App
The video show the steps to build a simple Android App using Android-ADT (Eclipse), in 7 minutes. In the app, clicking on the button to show a photo, and clicking on the photo to remove itself. In the end of the video show how it in working.
/res/layout/fragment_main.xml
/src/com/example/showmyphoto/MainActivity.java
- The app generated using the Project Wizard of Android SDK Tools 22.6.2, ActionBarActivity created with Fragment. So we have to modify fragment_main.xml for layout, and handle our ui elements in onCreateView() of PlaceholderFragment class.
- The photo is stored inside the app /res/drawable/spiderman.jpg, its name must be in lowercase letter.
/res/layout/fragment_main.xml
<LinearLayout xmlns:android="http://schemas.android.com/apk/res/android"
    xmlns:tools="http://schemas.android.com/tools"
    android:layout_width="match_parent"
    android:layout_height="match_parent"
    android:paddingBottom="@dimen/activity_vertical_margin"
    android:paddingLeft="@dimen/activity_horizontal_margin"
    android:paddingRight="@dimen/activity_horizontal_margin"
    android:paddingTop="@dimen/activity_vertical_margin"
    android:orientation="vertical"
    tools:context="com.example.showmyphoto.MainActivity$PlaceholderFragment" >

    <TextView
        android:layout_width="wrap_content"
        android:layout_height="wrap_content"
        android:text="@string/hello_world" />

    <Button
        android:id="@+id/mybutton"
        android:layout_width="wrap_content"
        android:layout_height="wrap_content"
        android:text="Show my photo" />

    <ImageView
        android:id="@+id/myimageview"
        android:layout_width="match_parent"
        android:layout_height="match_parent" />

</LinearLayout>
/src/com/example/showmyphoto/MainActivity.java
package com.example.showmyphoto;

import android.support.v7.app.ActionBarActivity;
import android.support.v7.app.ActionBar;
import android.support.v4.app.Fragment;
import android.os.Bundle;
import android.view.LayoutInflater;
import android.view.Menu;
import android.view.MenuItem;
import android.view.View;
import android.view.View.OnClickListener;
import android.view.ViewGroup;
import android.widget.Button;
import android.widget.ImageView;
import android.os.Build;

public class MainActivity extends ActionBarActivity {

 @Override
 protected void onCreate(Bundle savedInstanceState) {
  super.onCreate(savedInstanceState);
  setContentView(R.layout.activity_main);

  if (savedInstanceState == null) {
   getSupportFragmentManager().beginTransaction()
     .add(R.id.container, new PlaceholderFragment()).commit();
  }
 }

 @Override
 public boolean onCreateOptionsMenu(Menu menu) {

  // Inflate the menu; this adds items to the action bar if it is present.
  getMenuInflater().inflate(R.menu.main, menu);
  return true;
 }

 @Override
 public boolean onOptionsItemSelected(MenuItem item) {
  // Handle action bar item clicks here. The action bar will
  // automatically handle clicks on the Home/Up button, so long
  // as you specify a parent activity in AndroidManifest.xml.
  int id = item.getItemId();
  if (id == R.id.action_settings) {
   return true;
  }
  return super.onOptionsItemSelected(item);
 }

 /**
  * A placeholder fragment containing a simple view.
  */
 public static class PlaceholderFragment extends Fragment {

  Button myButton;
  ImageView myImageView;

  public PlaceholderFragment() {
  }

  @Override
  public View onCreateView(LayoutInflater inflater, ViewGroup container,
    Bundle savedInstanceState) {
   View rootView = inflater.inflate(R.layout.fragment_main, container,
     false);

   myButton = (Button)rootView.findViewById(R.id.mybutton);
   myImageView = (ImageView)rootView.findViewById(R.id.myimageview);

   myButton.setOnClickListener(new OnClickListener(){

    @Override
    public void onClick(View v) {
     myImageView.setImageResource(R.drawable.spiderman);
    }});

   myImageView.setOnClickListener(new OnClickListener(){

    @Override
    public void onClick(View v) {
     myImageView.setImageBitmap(null);
    }});

   return rootView;
  }
 }

}
Nexus 7 recognized as unknown Serial Number (Solved)
If your device cannot be recognized by ADT (or adb), ???????????? shown on Serial number.

In my case, solve it by setting USB computer connection to either Media device (MTP) or Camera (PTP). Don't disable both.
Related: To enable developer options on KitKat (Android 4.4), refer to the post.
In my case, solve it by setting USB computer connection to either Media device (MTP) or Camera (PTP). Don't disable both.
- Setting
- select Storage
- click on the menu icon on upper right corner, and click the USB computer connection
- Enable either Media device (MTP) or Camera (PTP)
Related: To enable developer options on KitKat (Android 4.4), refer to the post.
Enable developer options on KitKat (Android 4.4)
To enable developer options on KitKat:
Settings > About Phone > Tap on Build number 7 times
Related: Nexus 7 recognized as unknown Serial Number (Solved)
Settings > About Phone > Tap on Build number 7 times
 |
| Enable developer options on KitKat |
Related: Nexus 7 recognized as unknown Serial Number (Solved)
How to capture screen on Nexus 7
To capture screen on Nexus 7, press and hold both POWER and VOL-DOWN together, for a short moment.
related: Record screen action (capture video) on Android KitKat
related: Record screen action (capture video) on Android KitKat
Windows firewall block Remote Desktop connection - solved
As posted in "Basic setup for Microsoft Remote Desktop and Remote Desktop Client for Android". I can connect Remote Desktop Client on Android to my Windows 8.1 Pro with basic setup. But it fail to connect recently!

It's found that Windows firewall block the remote desktop connection. To fix it:
- Search setting of "firewall" in windows Search, select "Allow an app through Windows Firewall".

- It can be noticed that Public of Remote Desktop app is unchecked.

- To enable Remote Desktop for public, click on the "Change Settings" button, and click to check it. Then OK.

- Remote Desktop Client app on Android work now.


It's found that Windows firewall block the remote desktop connection. To fix it:
- Search setting of "firewall" in windows Search, select "Allow an app through Windows Firewall".

- It can be noticed that Public of Remote Desktop app is unchecked.

- To enable Remote Desktop for public, click on the "Change Settings" button, and click to check it. Then OK.

- Remote Desktop Client app on Android work now.

How to build Open JavaFX for Android
Here (https://blogs.oracle.com/jfxprg/entry/how_to_build_open_javafx) is a short recipe for baking JavaFX for Android dalvik. Just a few ingredients needed but each one requires special care.
assets folder in Android Studio
Android Studio is a new Android development environment based on IntelliJ IDEA, Gradle-based build support. It have different project structure.
In Eclipse, assets is in /assets folder under your project. In Android Studio, it is in /src/main/assets. In both Eclipse and Android Studio, /assets have the same level of /res folder.
Compare with the exercise of "Embed html using Google Maps JavaScript API v3 in Android App", where /assets/simplemap.html is a asset file of HTML. In Android Studio, it in /src/main/assets/simplemap.html. In both case, it can be accessed with "file:///android_asset/simplemap.html".


reference: Gradle Plugin User Guide > Project Structure
In Eclipse, assets is in /assets folder under your project. In Android Studio, it is in /src/main/assets. In both Eclipse and Android Studio, /assets have the same level of /res folder.
Compare with the exercise of "Embed html using Google Maps JavaScript API v3 in Android App", where /assets/simplemap.html is a asset file of HTML. In Android Studio, it in /src/main/assets/simplemap.html. In both case, it can be accessed with "file:///android_asset/simplemap.html".


reference: Gradle Plugin User Guide > Project Structure
Connecting your Android App to Azure Mobile Services (including Android Dev Tools setup)
Chris Risner and Nick Harris have a set of excellent Mobile Services videos in the Windows Azure area of Channel 9 here.
The video in this post is for those of you who have no experience with the Android Development Tools (ADT). You'll get some errors with the latest build of the ADT unless you follow the ADT setup instructions in this video.
I'd suggest following along with this video to set up the ADT and then watching Chris and Nick's excellent set of Mobile Services videos to extend your knowledge.
Source: http://channel9.msdn.com/posts/Connecting-your-Android-App-to-Azure-Mobile-Services-including-Android-Dev-Tools-setup
Enable Developer Options for devices with Android 4.2 and higher
On devices running Android 4.2 and higher, the Developer options is hidden by default. To enable Developer Options, go to Settings > About phone and tap Build number seven times, the detail steps may various depends on model.
Here is the steps to enable Developer Options on HTC One X running Android 4.2.2:
- Open Settings, select About.

- Open Software information

- Open More

- Tap on Build number 7 times

- You are now a developer!
- The Developer Options will be in Settings.

Here is the steps to enable Developer Options on HTC One X running Android 4.2.2:
- Open Settings, select About.

- Open Software information

- Open More

- Tap on Build number 7 times

- You are now a developer!
- The Developer Options will be in Settings.

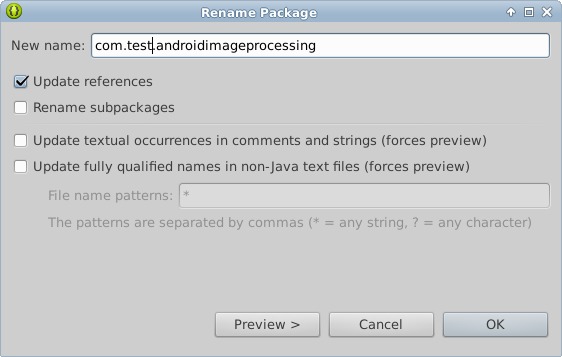
Rename Package in Eclipse
To rename Package in Eclipse for Android SDK, right click your package to be rename (NOT project), select Refactor > Rename...

Enter your new name of package, make sure the check box of Update references is checked (otherwise you will get numbers of in-correct reference), and click OK to finish.


Enter your new name of package, make sure the check box of Update references is checked (otherwise you will get numbers of in-correct reference), and click OK to finish.
Android Emulator error libGL.so: cannot open shared object file: No such file or directory
If you run Android Emulator with the error of "libGL.so: cannot open shared object file: No such file or directory", you have to make link for libGL.so.
My machine run Ubuntu 12.04. The following is my solution to fix it. (assume libGL is installed in somewhere in your system)
- Locate your installed libGL:
$locate libGL
- make link to installed libGL.so
$sudo ln -s /usr/lib/i386-linux-gnu/libGLU.so.1 /usr/lib/libGL.so

My machine run Ubuntu 12.04. The following is my solution to fix it. (assume libGL is installed in somewhere in your system)
- Locate your installed libGL:
$locate libGL
- make link to installed libGL.so
$sudo ln -s /usr/lib/i386-linux-gnu/libGLU.so.1 /usr/lib/libGL.so

Require more memory for App to run
To request more memory for App to run, you can specify android:largeHeap="true" in <application>. android:largeHeap specify Whether your application's processes should be created with a large Dalvik heap.
reference: http://developer.android.com/guide/topics/manifest/application-element.html#largeHeap
reference: http://developer.android.com/guide/topics/manifest/application-element.html#largeHeap
Graphical Layout Editor of ADT
ADT provides many features to allow you to design and build your application's user interface. Many of these features are in the graphical layout editor, which you can access by opening one of your application's XML layout files in Eclipse.

Know more: Android Developer Tools - Graphical Layout Editor

Know more: Android Developer Tools - Graphical Layout Editor
Register your app using YouTube Android Player API and obtain API Key
To use YouTube Android Player API in your app, you have to register it and obtain API key. This post show you the steps to do so.
- Login with your Google account in Google APIs Console.
- Pull-down the Slection on left, and click Create... under Other Projects.

- Enter name of your project.

- Enable YouTube Data API v3 to ON.

- And then click to select API Access, and you will found you API key. You have to insert it in your code to use YouTube Android Player API.

To develop Android apps with YouTube Android Player API, read the posts in YouTube Android Player API step-by-step.
- Login with your Google account in Google APIs Console.
- Pull-down the Slection on left, and click Create... under Other Projects.

- Enter name of your project.

- Enable YouTube Data API v3 to ON.

- And then click to select API Access, and you will found you API key. You have to insert it in your code to use YouTube Android Player API.

To develop Android apps with YouTube Android Player API, read the posts in YouTube Android Player API step-by-step.
Unexpected namespace prefix "xmlns" found for tag fragment on xmlns:map="http://schemas.android.com/apk/res-auto"
This post share my experience on the error of Unexpected namespace prefix "xmlns" found for tag fragment on xmlns:map="http://schemas.android.com/apk/res-auto".
Recently, I re-check my old project using Google Maps Android API v2, it work without error before. But LogCat show error:
Then I re-visit the layout xml with MapFragment, error message show Unexpected namespace prefix "xmlns" found for tag fragment on the statement xmlns:map="http://schemas.android.com/apk/res-auto".

To solve it, correct Java Build Path by right clicking on your project -> Java Build Path, select Order and Export tab, check both Android 4.2.2 and Android Private Libraries, and click OK.

And then clean and build the project.

Similar to the case: java.lang.RuntimeException: Unable to instantiate activity ComponentInfo
Recently, I re-check my old project using Google Maps Android API v2, it work without error before. But LogCat show error:
...
E/AndroidRuntime(20411): Caused by: android.app.Fragment$InstantiationException: Unable to instantiate fragment com.google.android.gms.maps.MapFragment: make sure class name exists, is public, and has an empty constructor that is public
...
E/AndroidRuntime(20411): Caused by: java.lang.ClassNotFoundException: com.google.android.gms.maps.MapFragment
...
Then I re-visit the layout xml with MapFragment, error message show Unexpected namespace prefix "xmlns" found for tag fragment on the statement xmlns:map="http://schemas.android.com/apk/res-auto".

To solve it, correct Java Build Path by right clicking on your project -> Java Build Path, select Order and Export tab, check both Android 4.2.2 and Android Private Libraries, and click OK.

And then clean and build the project.

Similar to the case: java.lang.RuntimeException: Unable to instantiate activity ComponentInfo